How to paint on old waterfront paint. How to refresh or paint a whitewash ceiling
If the task has become the task of updating the already colored surface, which means that one layer of paint is applied to it. How to do so that work is not useless?
To paint the ceiling on the old paint without problems, you need to take into account some points.
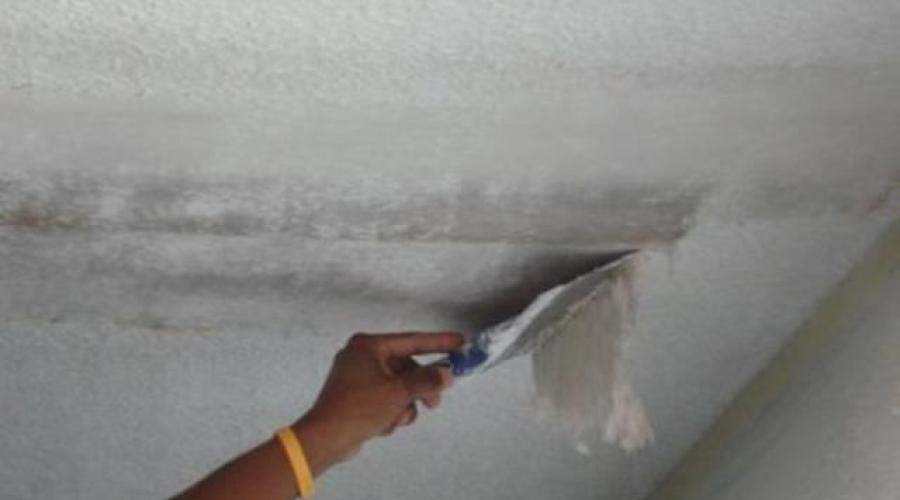
To avoid unpleasant situations in working when painting, you need to prepare a good surface. It is impossible to hope that covering the new paint ceiling can be hidden all defects. Everything is completely the opposite, the layer of paint will highlight all: scratches, waves after painting, irregularities. First, it is important to carefully inspect the ceiling. If everything is well needed to get to the primer. But if the paint is located on the surface, which thrust out or keeps well based on, then you need to remove all such paint. This can be done using sandpaper. After that, treat the surface with the primer thin layer. After drying the primer, we proceed to the surface update. If we see that the surface needs hardening, then we need to make shtlock or even possibly plastering the surface treated. If it is necessary to produce, then the priming must be carried out more intensively. You can do it even in several layers. This will provide the quality of work. Primer to produce best brushed, not roller. This will ensure good penetration of primer in irregularities and depressions.
But if there is no paint on the ceiling, and the old Belil, it is simply cleaning the surface and the primer will not cost. The entire layer of Belil must be completely removed.
After the surface is prepared completely to painting, you need to close the walls and the floor of the film so that they remain clean. The room temperature at paint must match the instructions. Also in order to paint the ceiling on the old paint, you need to prepare a tool and paint that you have chosen. And paint and tools must be a good quality. Because this depends on the final result of the work performed. Rollers and brushes will be needed to be different sizes, and you can also purchase a telescopic extension cuce and paint cuvette.
How to paint the ceiling on the old paint using technology so that there are no unpleasant moments?
The first thing to do is to scrong the ceiling corners. This can be made with a tassel or a small roller. To walk with these tools all over the perimeter, a strip of 5 centimeters. And the entire surface of the ceiling is then painted with a large roller. For high-quality painting you need to apply at least two layers. The first layer should be carried out, ranging from the window, across daylight. Pour a small amount of paint into the cuvette, to immerse the paint roller, and then rolling it carefully on a special platform. So all the extra paint will go, which will help evenly distribute it on the ceiling. No need to make sharp movements, smoothly carry out a roller on the ceiling, at the same time examining the presence of unpainted areas. And if these are discovered, immediately paint them. To paint the ceiling on the old paint, the second layer, you need the same technology. The second layer is applied after a thorough check on high-quality first coating and its complete drying. After painting, the second layer must be traced that direct ultraviolet rays will not fall on the ceiling, eliminate drafts. Never try to speed up paint drying in any way, let it occur in a natural way. So you can avoid peeling paint from the base. After each painting, keep track of the tool to remain clean, without residual paints on it.
What defects can form when painting the ceiling?
Roller strips may appear. They are formed with a bad rolling rolling. It can be avoided, re-rolling the roller over a colored basis when there will be no paint on the roller. It can also happen if an irregular load on the roller when staining. It is important to distribute the force applied to the tool so that the load is uniform.
It is also important before you start working, paint need to mix well so that there are no bands that will differ with a tint.
If you comply with painting technology, you will never have a reason to look for shortcomings in the work done. And the result will pleasantly surprise.
We restore the whitewashed ceiling
Sometimes, when performing repair workThe old coating on the ceiling still looks quite worn, but there is a desire to give him a little more "commodity". On how to refresh the whitewashed ceiling, and let's talk on. You can do this, although it will be necessary to carry out a whole range of events.
In general, the painting of the ceiling after blissing is possible only the same composition that was applied earlier. If the chalk was used, then it is possible to restore such a coating is simple, but if plaster and lime is applied, then work will be much larger.
Is it possible to paint right on the old whitewash
Separate situations, provide such a decision. Before painting a whitewashed ceiling, you need to make sure that the old whims is still quite tight and nowhere does not lag behind the slab. If neither cracks nor lagging sites, then such a coating can be repainted.
In principle, such a solution is suitable for all types of painted surfaces, but should be taken into account than everything is painted before. If the chalk was used, then it is not worth applying a lime - only get ugly divorces. The same, applies to the opposite option - on the lime it is not necessary to bleach with chalk compositions.
In general, it is better to avoid re-applying, on top of the old coating. Even the most durable, it over time loses its clutching properties, and may just turn.
This is especially true when painting is not a chalome composition or lime, but when using ready-made shop. It is better to work hard, and get a decent result at the end than to curse yourself for laziness, seeing peeling new coating.
Choosing, how to paint the ceiling after the previous whitewash, it is better to stop your choice on the water-level paint, if it did not say before the base is old. Since such type of coloring composition is better combined with a mushroom base.
Define what is applied
Make it just - you need to spend your finger on the plane and look at it. If the finger has become white, then the chalk was used, as it is very dirty. In this case, you can get rid of a small list of works.
If the coating does not get a hand, then, most likely, a lime is applied, which will not tolerate simple repainting. It can easily crumble. Therefore, it must be removed from the plane completely.
In cases where a water-emulsion is applied on the surface, it will also have to pre-delete a strict coating where it began to lag behind the surface. This can be done with a spatula and various special compositions.
Remove the layer of old coating
The easiest thing is to paint the ceiling after the plain chalk. As it is simple to remove the chalk coating - it is swollen and partially washed away warm water. After that, the entire layer is easily removed by the usual spatula.

For lime coatings, a spatula will need to remove all lagging coverage areas. The work is quite a tedious, but, even the small retarded areas cannot be passed - then, when a new layer of coloring composition is applied, it can easily be "wound" on the roller, being a twisted primer and new paint.
The paint can stay on the surface, but, before it, it also needs to be rolled out with a wet roller, and whether it does not lag behind the ceiling. If such sites are detected, you need to clean them with a spatula, to the most concrete slab.
When the old layer is completely removed, you can begin further work on giving the ceiling of a beautiful look.
Protecting work
Here you should pay attention to the seams and joints of the ceiling plates. They are pre-needed to thoroughly cleaned from the whole old putty and painting. After that, with a brush, not a roller, all such places are heated.
The main plane also needs priming. When performing this stage of work, areas can be found on the plane, the sections with the lagging old layer of paint or blots, which were not seen earlier. It is necessary to thoroughly clean them to concrete, and again to project.
Seeling flaws
Whatever even there was no previous paint layer, flaws are still detected during the repair. They should be sealed with a putty, and then, align the surfaces with a special grater with a metal grid. After there is another primer layer on those sites that have shovel.

Whitewash
The first direction of the movement of the staining layer should go across the light flux entering the room. Simply put - along the wall on which the window is located.
The next direction of staining is across the first. If there are more than two passes for staining, then you need to fit their directions so that the latter was directed from the window.
Refine different compositions, you need using the different tool. Best, and easier, use the paintopult, but, such a device is not all. Therefore, most prefer roller.

Start painting, always follows from corners and lines along the walls. To do this, apply an unintentious brush. It is more convenient for her in the corners, and along the wall, the paint strip is applied to not soak the wall with a roller. In addition, the roller will leave the misunderstanding strips where its edge simply does not fit close to the wall.

You should take a roller with an average pile. A small pile can leave non-crushed plots, and too long everything paints enough enough. And besides, such a roller is heavier to work.
If on some kind of areas, the whitewash will begin to be peeling, it means that the surface stripping was carried out badly, and after drying the applied dyeing composition, in such places it should be cleaned up the surface to concrete and re-taking it.
Conclusion
Flowing over how to paint the ceiling on a whitewash, it should be considered that such a solution is possible only in a small amount of cases. Most work options include full removal of old whitewash.
Perhaps the best solution will be the complete remission of the entire ceiling, with the elimination of existing flaws and full repainting.
http://wikipotolok.com
Nowadays there are many times modern materials For decoration, both for walls and ceiling. Today, one of the most affordable types of ceiling finishes is the painting of waterfront paint. Manufacturers of this material offer a very large assortment of paint, which will help make painting ceiling Qualitative.

Tools and Materials for Preparation and Painting Ceiling
- Roller for painting
- Roller for primer (you can use the usual sprayer)
- Putty knife
- Sandpaper or mesh for wiping
- Paint Paint Bath
- Malyary Scotch (sticky construction tape)
- Drill with a nozzle "Mixer"
- Water-emulsion paint.
- Primer
- Shpaklevka
- Dye for water-level paint (in case of color painting)
- Eye protection glasses
Preparation of the ceiling to painting
Before performing painting works, it is necessary to prepare the painted surface for high-quality painting.
- If the ceiling color is planned according to the old paint paint, it is necessary to clean the surface from dust and dirt and primed so that the surfaces of the surface becomes denser and did not absorb paint. The not primary surface will absorb paint, which will lead to uneven coating, divorce and stains.
- A plastered surface must be covered with a thin smooth layer of putty and give to dry. If there are small protrusions from the spatula on the surface, then they need to be cleaned with sandpaper or grid for wiping. It is necessary to perform it very carefully to avoid the appearance of the jar. If there are small scratches or jar on the surface of the ceiling, they must be carefully sharpened with putty once again. For the best result, the surface of the ceiling must be lured throughout the area. A dry smooth surface must be cleaned of dust (you can use a regular vacuum cleaner). Next, it is necessary to progress the ceiling using a roller or a regular sprayer (it can be purchased at any economic store, it is used to spray flowers and room plants). When using a roller for primer ceiling, the amount of primer increases, since the primer is very liquid and constantly flows and sprinkles. It is advisable to use a sprayer, because the primer falls into the hardships and covers the ceiling by a very thin and smooth layer. The primer procedure will facilitate uniform paint application and prevent the appearance of spots from uneven absorbability of the plastered surface.
- For coloring of the ceiling of plasterboard You need to sneak all the joints with a painting mesh and sharpen them. Next, it is necessary to cover the putty all the plasterboard and give dry. The surface of the ceiling must be swallowed using sandpaper or grid for rubbing, primed. For the perfect coating of the water-level paint, the surface must be very smooth and smooth.

Choosing a roller for painting the ceiling of water-level paint
For staining the ceiling of a large area, you must purchase a wide roller with a fur coat. Typically, the coat is made from natural materials (Sheep fur, goats, Lama, velor, mohair). To give the texture of the surface, it is better to choose a roller with a long and thick fur coat, for giving smoothness need a roller with a short fur coat. The roller from the foam rubber is not suitable for staining the ceiling, because the liquid paint will flush down, with the desired result will not work. It should be remembered that the roller with a long fur coat will help hide small defects on the ceiling. When choosing a roller, we should consider the weight of the roller, from the heavy roller, the hands quickly get tired. There are also coats for rollers from polyamides, this material is more durable and racks to different chemical solutions.
Security measures
It is necessary to start the color of the ceiling before the final finishing of the walls and the floor, as the drops, and the splashes can spoil the wall coating and the flooring.

If painting is performed indoors, where there is furniture, it must be protected by film. Before starting painting, it is also necessary to protect your eyes and the skin from the fall of water-level paint. Though for the skin, this paint is safe, as it is made on the basis of water, it will be problematic to wash it from the surface of the skin. If the skin is fan, then you can wash the water-free paint using vinegar.
Technology Painting Ceiling Water-Emless Paints
Before painting paint, it is necessary to stir well. On the prepared surface, the water-liquid paint should be applied in several layers. The first layer of painting is better to perform diluted paint. To do this, pour part of the paint into clean dishes and dilute with water 5: 1, very carefully stirred with a drill with a nozzle. Next, it is necessary to pour a part of the paint in the bath to rolling the paint and wet the roller in the paint. Ribbed surface Baths will help remove paint surplus and evenly distribute the paint on the roller. The roller paint distribution procedure must be performed after each macania. It is necessary to apply paint on the ceiling in two directions (back-back), roll over it on the surface so that there are no not scratched places left (each new smear must close the previous one). The edges of the ceiling near the baguettes must be punished with a brush. The next layer of painting needs to be performed after complete drying of the previous layer. Usually it is performed by undiluted waterfront paint to impart a ceiling of mattness, small roughness and textures. For high-quality painting, a layer of 1 mm is sufficient. The process of drying paint should be natural, the use of the heater, the contact of direct sunlight and the presence of drafts is unacceptable, these factors provoke paint exfoliation.
For color painting ceiling Use a special dye. It must be added to white water-emulsion paint in the desired quantity before making the desired color. It must be remembered that the paint that is not yet applied to the surface looks darker. The dye is added directly into the container with the paint and is carefully placed until a homogeneous state with a drill with a nozzle. It should be remembered that it is necessary to calculate the correct amount of paint for finishing the ceiling, otherwise there may be a mismatch of color in the manufacture of a new portion, and then it will have to redo all the work. There is also a finished colored water-emulsion paint. Color painting should also be performed in several layers. The first layer should be done by diluted paint, it will help to penetrate into small gaps. It's more difficult to apply a thick paint and it lies unevenly. It is necessary to breed it in a 5: 1 ratio (paint: water) thoroughly stirring. If the ceiling is planned to be painted with two colors (duplex), then the paint is first applied to the level that is higher. After applying paints to the first level, it is necessary to wait until the paint is dry, then with painting scotch, to smoke the places where the colors will be shown. This procedure is performed to protect the painted part of the ceiling. For the last layer, it is recommended to use a new roller (new fur coat) from a medium long pile.
Painting the ceiling is better to perform in the daytime with good lighting, as the lamp light is very difficult to paint smoothly and efficiently.
After priming the ceiling, the roller needs to be thoroughly flushed with flowing water with soap, the remnants of the primer will irrevocably spoil the roller. After the color of the ceiling, the roller must be rinsed with running water, until the water is transparent. A poorly washed roller will be unsuitable for subsequent use, since the remnants of water-free paint dried and then pull the roller will be very problematic.
Painted Ceiling Care
The painted ceiling of water-level paint is very easy to care. It is easy for cleaning from dust and dirt to be washed with warm water with the addition of any detergent or washing powder.
Painting Ceiling Oil Paint
For coloring ceiling You can also use oil paint. Modern manufacturers of these paints achieved the essential quality of this material, almost excluding the allocation of unpleasant odor when painting. Such paint is best used in rooms with high humidity and kitchens. Painted surfaces of oil paint are distinguished by special strength and wear resistance.
Getting Started, first of all, it is necessary to protect all the surfaces that are not planned to be stained using a polyethylene film. It is better to produce painting using a painting brush or a foam roller.
The prepared surface must be primed, it will help to apply a paint with a smooth layer. Performing the painting of the ceiling by painting brush strokes must be in different direction. To avoid dust paint flux, you need to put on a protective device that can be made from a conventional plastic bottle and secure it with a tape. It is better to apply oil paint into two layers, while the second layer is applied after complete drying of the first. If the first layer is not completely dry, then the paint will start sliding and spoil all the work. It is necessary to paint the ceiling of oil paint in a well-ventilated room, since the content of small amounts of harmful evaporation can lead to deterioration of well-being and dizziness.
After completing the work, the tool must be washed with a solvent or white spirit and put in water container, it will prevent the drying of the brush or roller.
Online video on how to paint the ceiling
It would seem, a simple thing - paint the ceiling
For several months now I am doing repair. One without any help, and without any special training. Before that, I did a little repair, not professionally, mainly finishing works. Before you start painting the ceiling, I did not read a single line on this topic on the Internet. Apparently in vain. Some things I could do better. It would seem that such a simple thing is to paint the ceiling. In truth, I was hoping to finish this process in a few hours. As a result, everything about everything, left for several days (in sum of about 24 hours), because I did not know the most elementary things and reached everything. Knowing simple moments, I could do it much faster.
Because My ceiling demanded quite serious repair work, I started not immediately from painting. In essence, the process itself is painting, this is just the simplest in the painting of the ceiling :). In my case, the front of the work, from start to the end, was: a slit of shit (under wiring), gasket and fixing the cable, embedding the shock, alignment of the ceiling, primer, painting and tint. Each of these types of work brought me a lot of "pleasant" surprises. In our case, we will assume that you have a hidden wiring and you do not need to cut the shoes and lay the cable, this is a separate topic for the "conversation".
Tools that you need
Let's start, perhaps with tools. So, we will need roller. I painted with a roller with a long pile. I was recommended by the seller (I think not in vain), later I found this confirmation. Foam and velor rollers are not suitable. We will need us paint Bath and Tassel. Brush no matter what, most importantly, more :).
Look in more detail on the paint. I used water-emulsion paint, you can of course oil, but then it will be difficult to handate it from the ceiling in the future. I would still not recommended to use glossy paint, it exceeds any nerve irregularities and looks somehow too glamorous. You will also need a rag and oddly enough pool glasses :). Guess what? That's all. Go to the process of painting, more precisely preparation for painting.
Leveling ceiling
Now even a small child is known that in order to paint the ceiling you need to align it before. Most often, the problem of the uneven ceiling happens in the places of the ceiling overlaps. They or discard or, on the contrary, have gaps. For example, I drank ceiling junctions. I decided it with the help of grinders. She walked around the joints, removed the layer of paint, concrete and old putty, grinding all this perfectly removes. When handling joints, the main thing is not to get carried away and not remove too much.
If gaps appeared in the stoves, they can be eliminated by putty. The difference in height in the plates can also be aligned with putty. It allows layer alignment to 1 cm. For the ceiling it is quite enough. Important moment! When leveling the ceiling, do not use the oil putty, it is expensive and on large surfaces gives cracks, tested on bitter experience. Oil putty It is not bad to use to eliminate small gaps and depressions, no more than 1 cm width. I, for example, supracted her ships. If you wish, you can sharpen the same joints in the stakes.
Sprouter the ceiling, it is important!
Before aligning the ceiling to drive it down and remove the top layer of paint. I joined it. In places where the alignment was not needed, the old paint was exfoliated and went to lumps ahead with a new one, I had literally to flick the old paint layers. The solution in this case may be such. We take a spatula or sandpaper and scrape the old layer of paint, quickly and efficiently. In the extreme case, when painting simply take more paint, whatever the roller sticks to the surface. If your ceiling is painted with oil paint, I would recommend going through the surface of the sandpaper, IMHO is so more efficient and paint will be better than it.
We smoothly go to the process of painting. When the surface is aligned and projected, you can start painting. There are no wisdom. The main thing is to make sure that the primer and putty dried completely. According to the instructions, the primer should dry 1 hour, and the putter 12 hours (time varies depending on the manufacturer). I waited for a day in both cases, it's a lot. In your case, it all depends on your patience. Another point. On top of the putty, the primer can not be applied, paint so will be perfectly. Especially if it is white paint, will be in a tone with putty.
Some moments and tricks to pay attention to
- You can use the table as a ladder, most importantly, it would be stable. Behind the process, painting can be easily captivated and play in the box. If the table is walking, put a piece of paper.
- Open the building glasses. Believe me, even the water-emulsion paint brings very unpleasant sensations on the surface of the eye. There was experience, verified.
- Krable the ceiling first. If you first paint or bed floor, then the splashes of paint will leave unpleasant memories on the surface of the floor. Ideally, the order of finishing the premises should be like this: the ceiling, walls, floor, everything else.
- Mix the paint in the bank without opening the jar. Simply, you need to surrender. If you are a woman, ask the nearby or standing man to do it for you. Or, not raising the jars, ride it on the floor.
- Tin tinting irregularities, as well as those places where "does not pull" the roller.
- During the tinting, army with a cloth, to immediately wash the paint, if it is unexpectedly theft on the floor or walls.
- Krable the ceiling in two layers, so you hide stains and irregularities. For the third time you can paint, only the most problematic zones. Paint Do not divide this "divorce".
- Do not forget to lower the roller and tassels in the water, so that it would not harden. For example, I lost after the second painting, thus roller.
- Before alignment and painting, remove all the lighting devices, live wires, and it is better to turn off the electricity at all.
- The clothes should be old, which is not a pity, preferably with a long sleeve and collar.
P.S. If your security is worried about - installation of video surveillance, Moscow offers various options. You will not only install, but also will serve the equipment. It should also be noted quite reasonable prices for real quality!