How to repaid anchor. Master class on replacing an anchor angle grinding machine. Repair of collector electric motors
On the shelf with tools, every self-respecting men should lie "Bulgarian". And indeed, without this tool, it is almost impossible to do in the farm. You always remember about the Bulgarian when it is necessary to cut off a piece of any product from dense material, be it metal, stone or ceramics. But, like any other tool, Bulgarian can break. At the same time, in 60 percent cases, the cause of the malfunction becomes the failure of the electric motor, or rather, the brushes of the collector or anchor. Do not rush to throw out the instrument, because with the help of simple manipulations, you can still fix and rewind the engine with your own hands.
First you need to disassemble the tool and carefully examine the structural elements. In particular, we are most interested in the electric motor. Before removing the burnt or torn winding, it is necessary to calculate the amount of its turns. To do this, the upper coil is separated from the winding and cut off. At the same time it is necessary to burn the coil on the open fire and calculate required amount turns.
If you plan to rewind without the use of special devices, it is not recommended to remove anchor immediately. Needless to inspect the collector. It will not be superfluous to measure the insulation resistance. At the same time, the value should not be less than 200kom relative to the hull. After that, it is necessary to carefully clean the collector, if there were winding residues, as well as make new grooves in the collector, in which the ends of the coils will be inserted.
As soon as anchor is cleared, it must be driving. To do this, you need to make sleeves that are very realistic to build from electrical cardboard. Next, they need to insert into existing grooves anchors. Thick cardboard is not desirable. Its thickness should not be greater than 0.2 mm. After the anchor is cleaned, the sleeves will find their place in the grooves and the converted collector will be installed, you can turn the coil.
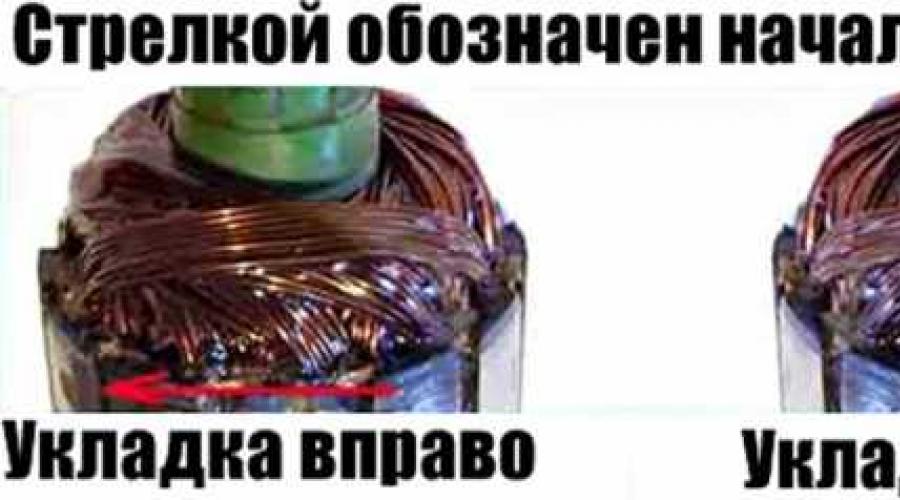
If the winding is carried out in a circular type, the turns must be stacked consistently until the grooves are filled in anchor. To understand how to make the laying, it is simple enough - you just need to look at the device from the side of the shaft. At the same time, the winding must be made counterclockwise. This type of laying is called "Right".
Be sure to impose a bandage to the winding. Make it best next to the collector so that you can easily produce fasteners of turns of coils. Many people do not know what a bandage is. In fact, it is a pair of turns of thick thread, which should be tightly wound and tied. Capron thread is better not to use, because it can be melted during the engine operation. It is best to use cotton material products.
After the completion of the work, be sure to check the revealed anchor for the presence of cliffs or inter-touch closures. It is necessary to do this before the anchor is impregnated, otherwise replacing the winding will be more difficult. Impregnation must be carried out in order to fasten the coil's turns. It can be performed using epoxy resin or varnish.
The last stage is a flow. It is from the quality of the performance of this work, it depends on how much the revealed anchor will be spoken. In this case, the beats should not exceed 0.05 mm. After completion of the groove, it is necessary to check again on the fact of the presence of closures between the turns and on the body.
pue8.ru.
Rewinding the electric motor with your own hands at home from professionals
Technique is often subjected to overloads and mechanical damage. It costs just once or shedding something on the tool, as a rust appears on the rotor winding, and the anchor itself is shifted. The consequences are deployed: the electric motor overheats, sparks and vibrates. Working with such a tool is dangerous.
If you have equipment repair skills and a minimum set of tools, then the fault will help rewind an anchor at home. The fact is that it is the winding that takes on the first "blows" of improper operation. Conductor cores are burst and burning. Their replacement will extend the life of technology and increase engine performance.
How to rewind anchor electric motor at home
Before repairs, prepare tools and materials:
- multimeter. If it is not, you will need a voltage indicator, a megommeter and a 12 V light bulb with a capacity of 30-40 W;
- new winding. The diameter of the core must be identical to the diameter of the old winding;
- soldering iron;
- dielectric cardboard with a thickness of 0.3 mm;
- varnish or epoxy resin;
- motor thick cotton threads;
- emery paper.
In order not to make an extra work, it is important to correctly identify the cause of the vehicle breakdown. To do this, inspect the tool and check whether the current on the collector and the start button, using a multimeter or indicator. If everything is in order, then you need to inspect the device from the inside.
Engine diagnostics
Disconnect the power tool and disassemble the case. Smoke the rotor. If an inter-touch closure occurred, then the insulating coating melts and exudes a sharp smell.
When external signs No fault, it is worth checking the lamellae anchor multimeter. Switch the device to an ohmmeter mode, and set the range of 200 Ohm. Two senses "ring" neighboring lamellas. The change of resistance testifies to breakage in the coil.
Ommeter can be replaced with a light bulb. Connect plus and minus terminals on the instrument plug, and in the gap, put the lamp. Rotate an anchor tree with hand. If the light bulb "blinks", then there has happened an inter-touch closure. Lamp does not burn? So, there was a circuit breakdown or there is no resistance in one of the slats.
Replacing the winding and new insulation will prevent engine burnout. To extend the life of the electric motor, the rotor rewind is recommended at least once every two years.
Instructions: How to rewind anchor winding
Before rewinding, you need to fix the main engine indicators. Consider and write down: the number of grooves anchors and collector lamellae. Determine the winding step. The most common step 1-6 is when the coil is placed in the initial groove, then in 7 and fixes to 1 groove.
Some factory windings use reset to the right or left. For example, when winding and reset to the right, the coil goes to the right from the initial groove. So, with the number of grooves anchor 12, the winding step 1-6 and reset to the right, the winding is laid in 1 groove, then in 8 and after winding the desired number of turns, is fixed in 2 groove. All this needs to be considered. Otherwise, the winding will be laid incorrectly, which will negatively affect the direction of rotation.
The rewind of an anchor of the electric motor will take about 4 hours. In order for the assembly, it does not arise difficulties, it is recommended to photograph the initial location of the parts during each stage of operation:


- Fastening. Thugs are tightly several turns of x \\ b on winding near the collector to secure the coil. Synthetic threads cannot be used - they are melted.
- Check chains. As in diagnosing, check the winding for cliffs and inter-touch closures.
- Treatment. If the check did not reveal the faults, then cover the winding with varnish or epoxy resin and dry. To speed up the process, you can send anchor into the usual oven for 20 hours at a temperature of 80 degrees.
Rewind completed. With a certain skill, the repair does not take much time. If you changed the winding for the first time, and not quite confident in the correctness of laying the wire, you can make an additional check.
Static balancing anchor electric motor with their own hands
The key to the uninterrupted work of the technique after rewinding the anchor is the correct balancing. In large companies on the repair of electric motors, on a special machine make a dynamic balancing. So how to rewind the anchor for the first time it is difficult, then to identify gross errors, will help the device for static balancing "on the knives". It is easy to construct independently.
Select two blades of steel. They must have good straightforwardness and processing cleanliness. Install the blades on the hard base parallel to each other. Distance between blades - anchor size. As a result, such a device should be obtained:

Sketchy image of the device "on the knives", where 1 is anchor of the electric motor; 2 - steel blades; 3 - base; A and b - points for soldering goods.
The balancing method is simple: anchor placed on the blades and is watching its movement. Anchor will turn around, since the hardest part will be left below. Task - Move the center of gravity as close as possible to the anchor axis, which is indicated by the dotted line. With high-quality balancing, the anchor remains fixed. To align the weight, cargoes from plasticine are placed on points A and B. When equilibrium is achieved, loads are removed, weighed and solder metal equal to their weight.
The balancing method is simple: anchor placed on the blades and is watching its movement. Anchor will turn around, since the hardest part will be left below. Task - Move the center of gravity as close as possible to the anchor axis, which is indicated by the dotted line. With high-quality balancing, the anchor remains fixed. To align the weight, on the point, and the goods are hung out of plasticine. When equilibrium is achieved, loads are removed, weighed and solder metal equal to their weight.
Now you know how to rewind anchor with your own hands. Thanks to the balancing skills, your tool will not vibrate and overheat, even with minor shortcomings in the winding laying. Regular check of contacts and planned cleaning of the body will help minimize the likelihood of vehicle breakdowns.
remonteldv.ru.
Check and repair Anchor Bulgarian DIY 1
Features of the work of the asynchronous engine Bulgarian
In almost all electrical appliances used in everyday life, an asynchronous electric motor is applied. An important advantage of this type of motor is that when changing the load on it, the frequency of revolutions does not change. This means that if, for example, long and without stopping cut the stone with a household grinder, there will not be no external signs of engine overload. The speed of rotation of the disk will be constant, the sound is monophonic. It will change only the temperature, but this can not be noticed if your hands are dressed in gloves.
Asynchronous motor collector is sensitive to overheating
With inattentive relationship, the advantage can turn into a disadvantage. Asynchronous engines are very sensitive to overheating, a significant excess of the operating temperature attracts the melting of isolation on the rotor windings. Initially, the motor will work with interruptions, and then - when the intersensional short circuit occurs - the engine will stop at all. It is worth several times to overheat the Bulgarian engine and is most likely that the anchor is melted. In addition, from high temperatures Contacts are disappeared connecting the wires of the primary winding with the collector, which leads to the interrupting of the electric current.
How to determine the malfunction of the perfoch anchors
Signs of the breakdown of the armor of the Bulgarians are: increased springs of brushes on the collector of the motor, the vibration of the motor on small revolutions, rotation of the working shaft in different directions. If such symptoms are present, the tool should be stopped - this is dangerous. Suspicions are easy to check with simple tests.
Visual inspection outside
The troubleshooting should be started with the visual inspection of the Bulgarian:
- Conduct a general inspection of the instrument.
- Pay attention to the integrity of the network cord, the presence of voltage in the outlet.
- Using the voltage indicator, make sure that the current enters the motor collector and the start button.
Inspection of the device from the inside
If the power is fine, but the Bulgarian does not work, you have to open the case to access the motor. As a rule, the disassembly does not represent difficulties. But it is necessary to adhere to simple rules that will avoid trouble during the back assembly:
- Be sure to turn off the device from the network before disassembling.
- Remove with a spindle working disk and protective cover.
- Copy the housing in a well-lit place on a clean table surface.
- Remember the location of all parts and nodes before disassembly. It is recommended to draw or photograph the internal device of the device.
- Screws and fastening screws in a separate place so as not to be lost.
Inspect the motor is best under bright lighting, so that all small parts are well distinguishable. Anchor must freely rotate around its axis, properly working bearings should not have a sound when working. Anchor should not be traces of melted wiring, the winding of the contour must be integer, without breaks. You can sniff the rotor. With interstitious closure, the insulating varnish is burning and publishes a stable specific smell. But for such diagnostics you need a certain experience.
Circuits circuit tester
If the visual inspection did not give explicit results, it is recommended to continue the survey with a multimeter. By placing the switching toggle switch to an ohmmeter position (range of 200 Ohm), two neighboring armature lamellas are necessary for two adjacent lesions. If the resistance on all turns is the same, it means that the windings are good. If on some pairs, the tester shows another resistance or chain break - in this coil malfunction.
Multimeter in resistance measurement mode Check the integrity of coils
The wiring break can occur between winding and core. You should carefully examine the connectivity of the coils with the collector lamellas at the bottom of the anchor, visually check the pack of contacts.
Contact checking Lamp
If there is no tester, you can get out of the position using a simple light bulb at 12 volts. Power can be any, optimally 30-40 W. The voltage from the 12 volt battery should be served on the fork of the grinder, inserting a light bulb into the break. With good anchor, if you rotate the spindle with your hand, the bulb should burn without changing brightness. If the heat is changing - this true sign Mixless short circuit.
If the light is not lit, then it can talk about:
- It is possible to hang brings in a non-working position. A retaining spring has worked.
- There was a break of the feed circuit.
- There was a closure or a gap in the stator winding.
There are other diagnostic methods, but they require more complex equipment, which is usually not used at home. An experienced master will determine the breakdown with a high degree of accuracy using the "Punch" or the simplest transformer with a cut toroidal core and one primary winding.
In what cases can be saved anchor and restore it with your own hands
If the damage to the anchor is set with guaranteed accuracy, the part must be removed from the electric motor. Motor disassembly must be made with special accuracy, after removing the brush and disconnecting the power terminal. The rotor is removed along with the support bearings and the impeller cooling of the motor, they constitute a single integer with it.
Bulgarian Device Device Scheme
If most of the wiring is damaged, the balancing is broken as a result of overheating, it is better to replace it entirely. An increased vibration and an uneven hum of the operation of the mechanism says about the balancing violation.
How to rewind anchor - step-by-step instruction
If the anchor balancing is not broken, and the problem is only in spoiled windings, then such anchor can be restored independently, rewinding the coil. Rotor rewind at home requires a large patience and accuracy.
The master must have skills in working with a soldering iron and instruments for the diagnosis of electrical circuits. If you are unsure of your abilities, it is better to attribute the engine to repair in the workshop or independently replace the entire anchor.
For independent rewind, the anchors will need:
- wire for a new winding. The copper lived with a diameter, exactly the corresponding old conductor, is used;
- dielectric paper for insulation winding from the core;
- varnish for pouring coils;
- soldering iron with tin-lead soldier and rosin.
The process of rewind consists of the following steps:
- Dismantling of old windings. They should be carefully removed, without damaging the metal anchor case. If any burgers or damage were revealed on the housing, they need to be sworn in a file or shrink by essay. Sometimes, for complete cleaning of the housing from slags, the masters prefer to burn its burner.
- Preparing a collector to connect a new wire. Remove the collector is not necessary. It is necessary to explore the lamellas and measure the megommeter or multimeter resistance of contacts relative to the case. It must be no more than 0.25 mΩ.
- Removing the old wiring at the collector. Carefully remove the remnants of the wires, cut into the grooves in terms of contacts. In the future, the end of the coil wires will be inserted into the grooves.
- Installing sleeves for anchor. The sleeves are made from a dielectric material with a thickness of 0.3 mm, for example, electrical cardboard. Cut a certain number of sleeves and insert into the grooves of the purified anchor.
- Rewind coils. The end of the new conductor is stripped by the end of the lamella and wounds with sequential circular movements, counterclockwise. Such styling is called "stacking to the right." Winding repeat for all coils. Near the collector to pull the wires with thick thread from x / b fabric (the COOP is prohibited, as it melts when heated).
- Check the quality of winding. At the end of the laying of all windings, check the multimeter no intercity closures and possible breaks.
- Finish processing. The finished coil is treated with varnish or epoxy resin to fasten the winding. In the factory conditions, impregnation is dried in special furnaces. At home it can be done in the oven. As an option - to use quick-drying varnishes for impregnation, catching a coating in several layers.
Replacement anchors yourself at home
Practice shows that if it is decided to replace the anchor of the Bulgarian, then it is best to change it together with the support bearings and the impeller cooling engine.
For replacement, you will need:
- New anchor ush. Must match your model. Interchangemented with other models is unacceptable.
- Shugs, wrench.
- Soft brushes and rags for wiring mechanism.
How to remove anchor
The replacement of the anchor begins with the disassembly of the grinder. The following steps are performed:
- Brush knots from two sides are twisted. Brushes extracted. The removal will need a wide flat screwdriver.
- 4 screws fastening the gearbox housing are unscrewed. Higher should be carefully
- Carefully revealed and removed the cap of the gearbox to receive access inside the gear mechanism. For the disassembly of the gearbox will be needed
- A lock ring is removed, fixing a small gear on anchor.
- The anchor retainer is released from attachment, anchor is extracted along with a small gear and bearing.
- The gear, the bearing and the fixation disk anchors are removed, rubbed with a rag. The mixer is removed by a special filler. The signal is driven by the rotation of the stubborn screw
Video: replacement of bearings on the grinder
How to put anchor into place
To set a new anchor of the grinder to place a new part, then collect the tool in the reverse order. The following follower:
- Anchor shaft is installed on the fixation disk.
- The method of pressure is installed by the bearing.
- A small gear is satisfied and fixed by a locking ring.
- Anchor starts in the gear body, the docking holes are combined.
- The gearbox mounting bolts are twisted.
- Anchor with the gearbox is inserted into the body of the grinder and fixed.
- The brushes are deposited into their places, closed with covers.
After performing these actions, Bulgarian is ready to work. Replacing anchor produced.
Video: How to check the grinder
Ancient Sufi wisdom reads: "That person who is able to go out with dignity from a difficult situation. But the wise one who does not fall into such a situation. " Observing operating rules household appliances, not allowing the overheating of the motor, you can avoid breakdowns and troubles in the work of the Bulgarian. The content and storage of the instrument in cleanliness and dryness will prevent its mechanisms from contamination and oxidation of the conductive elements. Timely maintenance the tool is guaranteed to save from unpleasant surprises During work.
100uslug.com.
Repair of collector electric motors
In residential equipment used electric motors of various types, depending on the working conditions, purpose and functionality of the electrical appliance. For example, asynchronous motors are more suitable for electrical equipment with a stable mode of operation, and for electric drills, washing machines, Kitchen Combines, etc. It is necessary to use collector electric motors, as it requires a frequent change in the velocity of the shaft.
The failure of the collector engine makes the electrical appliance completely unsuitable for operation, and expensive repair shops forcing the owners of spoiled household equipment to make a decision to acquire a new product. But in the presence of some skills and in the conditions of a limited budget, many homemade masters are thinking about the feasibility of repairing electric motors with their own hands.

Disassembled collector electric motor
Checking power circuits
When fixing the failed electrical equipment, sometimes before repairing the collector engine, it does not reach the case - it turns out that the extension socket is defective, the power cord is unborn, the connection terminal has unscrewed, or the launch switch. It is necessary to check the presence of voltage on the nodes of the power supply circuit of the collector electric motor to 220V, ranging from the plug, ending with the contact block of the connection.

Channel power cord and power button
Since the collector electric motors, the comparison of electromagnetic fields occurs due to the permanent switching of rotary windings (collector brushes), then the mechanical cause of the loss of electrical contact in the collector is the most common. The principle of the operation of collector engines is described in the previous article, and some repairs will be given below and replacing the contacts of the rotor (anchor).

Rotor (anchor) collector electric motor
In various autonomous power tools, kitchen electrical appliances and in children's toys, a collective DC motor motor is often used. Power supply of electric motors is carried out by a constant voltage coming from batteries, rectifiers, or control controllers. Not always the presence of voltage indicates the performance of the power supply (the battery can be planted), so you should also check the current of the collector and the entire chain when the collector motor is turned on.

Low power collector DC motor with control controller
If the equipment has stopped rotating, first of all, it is necessary to check the flow of voltage to the input contacts of the collector motor when it is turned on.
Briefly about device collector electric motors
In collector electric motors, the magnetic fields of the stator and the rotor interact at an angle, as profitable as possible to give the shaft of the moment of rotation. The rotation angle sensor (rotor position) and at the same time switching system are collector brushes on the rotor. The system of coils with magnetic pipelines, which creates a resulting electromagnetic field to make the moment is called anchor.

Principle of operation of the collector electric motor on the example of a DC motor
In most collector electric motors, an anchor is a rotor, the electromagnetic field of which is "clinging" for magnetic fields of magnets or stator excitation windings. Therefore, under the word "anchor" often understand the rotor of the collector engine, since the switching of stator windings is more complex and less efficient.

Anchor (rotor) electric motor
DC collector electric motors with magnets are used mainly in children's toys and in electric drivers of cars. To create powerful magnetic field And the stronger torque use the excitation coils that are connected in several ways:
- The serial connection (collector current and excitation coils is equal to). The advantage is a large maximum moment, which, however, can be a disadvantage of idle, spouting the collector motor to critical high revolutions;
- Parallel connection. The advantage is the good stability of the rotor rotor rotor when the load changes on the shaft, but the maximum moment is smaller, compared with the sequential excitation;
- Mixed excitation, in which one part of the rotor windings and the stator is connected consistently, and the other is parallel. The most popular example of the use of mixed excitation in collector electric motors is a car starter;
- An independent excitation, in which the rotor and stator collector current is adjusted separately. It is used in powerful collector electric motors on electric locomotives.

Connecting coils of excitation coils in DC motor
Leaving aside the theory, it should be noted that the collector electric motors of the DC with sequential excitation can also work from alternating voltage, in fact, being universal. These engines have an additional output to connect alternating voltage and have been widely used in various power tools, thanks to the "flexible" characteristics of changes in the speed of revolutions and the moment of rotation.

Circuit diagram of excitation coils and designation of a universal collector engine
Checking coils excitation
Based on the device of the collector motor, the troubleshooting can be conditionally divided into checking the excitation coils (or permanent magnets) and rotor windings. When repairing DC engines with magnets, you should pay attention to them in search of cracks, as they worsen the magnetic field strength, which reduces general characteristics electric motor.

Cutter engine cutter with permanent magnets
Checking the excitation coils are made by an ohmmeter, checking their conductivity, as well as a megommeter, eliminating the breakdown on the body. Since the intersless closure in the coils of the excitation coil is extremely difficult, using only a multimeter, then use indirect methods, checking the color of winding wires for the presence of traces of overheating or visible damage. Knowing accurate resistance of excitation coils from the passport of the electric motor, you can compare the data with the measurement results by the module.

Stator coils excitation
Since the intersensive closure in the coils of the excitation coils is a rare fault, it is limited only to test data of the windings, carrying attention to the check and repair an anchor of the electric motor. An anchor of the collector engine can be divided into several parts:
- Rotor winding with magnetic pipelines;
- Collector consisting of brushes and contact plates (lamellas);
- Shaft with bearings.

Electric motor anchor device
Inspection of collector engine mechanics
When repairing any electric motor, the free stroke of the shaft should be checked, which depends on the wear of bearings. Prolonged inertial rotation of the rotor, the absence of a grincop, creak, radial and axial beating of the shaft indicates good quality bearings when searching for the cause of excessive heating of the collector motor. Making advantage of the serviceability of mechanics, you can check the electrical component of the electric motor.
It often happens that breakdown in the mechanics of the electric motor or all electrical equipment is the cause of a malfunction in the electrical part of the engine
For example, parts of the bearing scattering inside the electromotor or the fragments hit from other mechanisms can damage rotary and stator windings of the collector engine. Therefore, sacrificing the electrical appliance or power tools, you should always pay attention to the health of other mechanisms, because the collector motor inside the case is open and unprotected from entering small items that can damage it.

In many power tools, the engine is not protected from minor items
Prevention and repair of brushes
In collector electric motors, contact brushes make noise at normal operation, so when manually testing the free move of the engine shaft, you need to be able to distinguish between the characteristics of the brushes of sounds. Characteristic clips and rustles should be uniform, without a chaotic grincling and jamming. Very often the reason for the loss of electrical contact is the mechanical jamming of the collector's contact brushes.

Some nodes of the collector engine
The collector brush consists of a holder, a graphite contactor and a pressure spring. Sometimes the spring weakens, and it needs to stretch a little for greater clamping power. Due to abrasion of graphite, a small crumb is formed, which, together with dust and moisture, pollutes the gap between the graphite contactor and the holder. In this space, layers are formed, which dry out and harden from heating the brushes, thereby fixing them.

Device collector brushes
This embodiment of the brushes due to the hardened dirt in the holder is often the cause of the inability to start a previously working manifold motor. While the working engine makes vibration, the pressure spring can overcome the resistance of the layers, and the contact with the collector lamellas is saved. But after shutdown, the accumulated dirt is frozen, the brush is fixed and decreases due to cooling, forming a gap that burst contact with the lamellas.

Electric motor anchor collector lamella
Check the clamping power of the brush, you can catch graphite with a knife or shallow screwdriver - the contactor should move freely in the holder, elastically bouncing, hovering into the lamella. Otherwise, the brush and holder can be cleaned, rinse in a solvent, or a little spin the face of a graphite contactor for a larger clearance. If the development of the brush almost reached the threshold of the resource, then it is better to replace it with a new one. If it is impossible to find identical replacement of the brush, select the closest version and spill the edges of the graphite contactor to the desired dimensions.

New brushes need to short with a file to give the desired size
Repair and collector prevention
 The motor collector consists of contact plates - lamellas connected to the outputs of anchor windings. The large operating current of the collector, and the formation due to the electromagnetic induction of the reactive EMF switching windings, leads to increased spark when brushes and lamellae. Strong sparking leads to burnout lamellae, which is why they are covered by pores and caverns. The deterioration in the quality of the surface of the lamellas leads to even greater sparking and is diminishing their wear in avalanche-like progression.

Pollution collector
The initial cause of collector wear is pollution of graphite crumb lamelters from erasing brushes. The gaps between the slats are intended for their insulation, but the graphite dust falls into the intervals is the current conductor, which worsens the characteristics of the collector motor and leads to the formation of the so-called circular spark. If in the process of operation of the spark motor, as it should be stretched from the brushes around the collector's circumference, then its lamellas are contaminated, and they need to be cleaned.

Circular spark in the collector
Cleaning the collector lamellas produce an eraser, sponge, or shallow sandpaper, clean the gaps of the seer. If pollution is strong, you can use the file, but you need to be careful not to distort the geometry of the collector circumference with uneven spill. Another reason for the contamination of the collector is the corrosion of the lamella material with the formation of layers of oxide, which also need to be cleaned.

Cleaning collector sponge
If, after cleaning the lamellae, deep cavities from corrosion or sparking were found, then the reservoir repairs are produced by applying copper on the plates with welding or galvanic method for sealing flashes. Since the file is very difficult to give the correct form to the collector, produce it with a turning on the lathe. In some cases, if there is an opportunity to purchase a new collector, it is replaced, but in this case there is a painstaking work on the attachment of numerous anchor winding conclusions.

Collector Return on the lathe
Verification and rewind of windings
If the coils of excitation, brushes and collector lamellas are in a satisfactory condition, you need to check the integrity of the rotor windings. Initially, a visual inspection of windings and conclusions attached to the collector's contact plates are carried out.
Wiring wiring windings will immediately indicate the need to rewind or replace an anchor. If there is a view of the winding in a satisfactory condition, then you need to check the integrity of the conclusions that are filled with glue, epoxy resin, or are coated with a special insulating material.

Carefully inspect the collector and connections to the windings
If it is impossible to visually verify the integrity of the compounds of the windings conclusions, you can apply a multimeter probe to two adjacent lamellas and remember resistance, repeating this procedure in a circle. If a strong deviation is shown at some stage of measurement, it is possible to break into an anchor winding or interstetic closure.
From the power of the electric motor, as well as the type of anchor winding (wave or loop), the measured resistance depends, so you need to study the circuit of the connection of the anchor windings of a particular motor for a more accurate check. There are special devices for searching for interspercine closures in anchors.

Anchor verification choke - with the presence of inter-touch closure, the plate will rattling
The coils of excitement are easier, so they are easier to rewind. The windings of the anchors are placed in the outer grooves of the rotor magnetic pipeline and are connected by a complex scheme depending on the type of engine. The replacement of stator and rotary windings (rewind) is produced in workshops on special equipment - winding machines.
Independent rewind of an anchor of a small collector engine at home is possible manually in the presence of accurate parameters of windings, identical winding wire, connection scheme, and time and diligence. Workshops have special winding machines, as shown in the video:
The video below shows the process of repairing the collector engine of the hair dryer:
Bulgarian is used to perform many tasks in the farm. Regular use can lead to device breakdown. The most common broken element is anchor. It has a high thermal load, and also a mechanical and electromagnetic effect also affects. As a result, many craftsmen have to think about the repair of this detail.
Anchor device
The anchor of the grinder consists of a winding that conducts current and magnetic pipeline. In the magnetic lines there is a crash shaft. The design of the magnetic wire is formed by plates and grooves, which are isolated between themselves by coating a varnish. A certain sequence of laying conductors of anchor winding in the groove has been developed. Conductors form a turn. The end of it is binding to the lamellas. The layout of the start of the starting turn and the end of the latter is designed in such a way that they are closed onto one lamella.
With constant overheating of the bulgark motor, anchor melting occurs. As a result of high temperatures, the contacts of the wires that connect the primary winding with the collector can disappear. All this leads to the fact that the current is not served.
Malfunction of anchor
 There are criteria on the basis of which it can be concluded that anchor repair is required:
- the number of sparks emanating from the brushes on the motor collector;
- there is vibration at low speed;
- the work shaft begins to move in different positions.
The presence of these features indicates an anchor failure. Subsequent use can be dangerous.
The following anchors damage are known:
- open electrical current conductors;
- closure between the turns;
- insulation disorder, which leads to a closure of the winding on the metal surface of the rotor;
- dispaying the endings of the collector;
- easternactive abrasion of the collector.
As a result of these faults, the engine gradually ceases to work. To find out the reason for the failure of the cornerless machine, should be diagnosed. It can be carried out visually or using appropriate appliances.
How to check the anchor on the grinder?
Rules of visual inspection
Standard diagnostics involves visual analysis of the device. It is necessary to analyze the integrity of the wire and flow to the motor collector. With normal power supply, it is necessary to explore the grinder from the inside. Disassemble the device will not be much labor. It is best to take a picture of the location of the main device modules. After disassembly, conduct visual anchor checks on such properties:
- the course of the anchor must be free;
- the absence of black spots and odor, which can talk about the laying of the winding, the insulating varnish of which leaves the traces;
- the absence of crumpled turns and solder residues, which leads to a short circuit;
- on the contacts, the lamellas should not be burnout, otherwise it is necessary to check the binding of the lamella and winding bucks;
- lack of worn or burnt plates;
- the space between the slats should not contain graphite residues from the brushes.
If the disadvantages are not identified with visual inspection, then the instruments must be checked. Anchor on the grinder can be checked both with the help of the tester and using the usual light bulb.
Inspection with tester
 Multimeter is set to an ohmmeter. The resistance of 200 ohms is set. Propens are connected to lamellas located next to each other. If the value on the device is less than 1 Ohm, then there is a short circuit. With the value of more average, there is a breakpit of turns. With a high resistance or absence of any value (in the case of digital instrument), you can also judge the break.
There are situations where the break is not detected. Then the breakdown is done. With the maximum resistance, one of the probe is placed on the shaft, and the other moves along the plates. If the value is zero, then there is no damage. Then the rotor is checked by a multimeter. Property in this case moves along the slasses. If it is impossible to check the tester using a light bulb.
Control with a light bulb
In the absence of the device, many are interested in the question of how to check the grinder on the possible damage to the anchor. The feed power is broken, and a light bulb is placed in the break place of one wire. Then the shaft rotates. On the change of brightness of the bulbs, you can judge the closure between the turns. In the absence of combustion, such conclusions are possible:
- the location of the brushes does not correspond to the working position, due to the triggering of the retaining spring;
- breaking contour;
- circuit or gap in the stator winding.
You can sound the indicator of short closed turns and an anchor check device. This can make an experienced person.
Is it possible to repair anchor
 Repair Anchors Bulgarian cannot be performed if there is vibration, since the balance is disturbed. This situation requires replacement. It is possible to eliminate short circuit and replacement of the winding.
First you need to disassemble the engine and remove the rotor. But before this disconnect the power terminals and remove the brushes. The grinder rotor gets together with the support bearing and the impeller for cooling.
Rewind of anchor
Anchors for Bulgarian USM are rewinding at home. To do this, you need to have certain skills when working with a soldering iron. To rewind an anchor with your own hands, you will need:
- wire with copper residential, which corresponds to the previous conductor;
- dielectric paper to isolate winding;
- varnish for pouring coils;
- soldering iron.
Rewind scheme:
- removing previous windings - try not to spoil the surface of the case. If damage appears, grinding the emery or file;
- inspection of the collector - the resistance of the contacts of the lamellas in comparison with the shell should not exceed 0.25 MΩ;
- survived the collector from the old wires - the development of grooves to insert the ends of new wires;
- putting the sleeves - they are made of a material that does not conduct a current, for example, electrical cardboard. The size of them is 0.3 mm;
- rewind of coils - the end of the new wire joins the end of the lamella. Remove in the direction counterclockwise. Near the collector to secure the wires with cotton thread;
- control for the lack of closures - measure the resistance to the tester;
- applying a varnish or epoxy to fix the winding - make a drying in the oven or use the means that quickly dry out.
If such actions fail, you can replace the perfoch anchor.
Change of anchor
The replacement of an anchor on the grinder is carried out simultaneously with the replacement of support bearings and the impeller cooling of the motor. To perform such devices:
- new anchor for the Bulgarian, suitable exactly to your device;
- screwdriver and key;
- brush with soft bristles and napkin for wiping elements.
 Disassembly stages:
- removing brushes;
- twisting gearbox;
- removing the reducer cover;
- ring removal, which fixes a small gear on anchor;
- extract anchor together with gear and bearing;
- removing the bearing with a special removable device;
- removing the gear and securing disk;
- wiping the main elements with a napkin.
The setting of the new part for the grinding machine is carried out in reverse order:
- installing the fixing disk on the shaft;
- pressing the bearing;
- installing a small gear and its mount with a locking ring;
- anchor room into a gearbox with docking holes;
- consolidation of the gearbox in the body of the grinder;
- installing brushes;
- checking the device.
Thus, repair anchors with your own hands can be performed quickly and easily. But in order to prevent such cases, it is necessary to use the device carefully and not subject to long-term high loads. The content of the tool in a dry place and the necessary care will extend its life.
There is a circular spark in the network - this is evidence that the lamellae anchors burned, and its urgent replacement is required. How to make tool repair do it yourself you will learn from our step-by-step master class Using the example of Makita 9069.
Replace anchor in the angular grinding machine is simple enough. It is not necessary to give the tool to the workshop, it can be done on your own.
To work, we will need:
- flat screwdriver;
- hexagon keys;
- new anchor for the ears Makita 9069;
- rag for wiring a disc from dust and lubrication.
Start repair
Flat dumping unscrewing the lid of the brush node, remove the brushing node washer to remove the tool cover (the covers are from both sides of the USM) and remove the brushes.
Unscrew the 4 screws of the gearbox to the housing.

Remove the gearbox along with an anchor and dust ring. The housing and the ring lay aside - they are not produced with them.

Hexagoned g-shaped wrench unscrewing 4 bolts of the gearbox cover and remove it.


A small gear on anchor is fixed by a retaining ring (black ring). Removant remove the retaining ring.

Carefully remove the gasket.

Unscrew the front and rear armature fixation bolts.

Remove anchor with a bearing and a small gear.

Remove the gear and bearing.

Remove the anchor fixation disc and wipe it from dust and lubricant with a rag.


Take a new anchor and install the disc of fixation on it.

We put and semind the bearing.

We establish a small gear and fix the locking ring.

We insert anchor into the gearbox housing.

We combine holes in the gearbox and on the disk of the anchor fixation and tighten the front and rear armature bolts.


We put the gasket and install the gearbox cover.

We twist the gearbox bolts.

We wipe the dust from the ESM hull.

Install the dust ring.

Insert the gearbox with an anchor into the ESM body.

Fix gearbox with 4 screws.

We install brushes and fix them with covers.


Anchor is changed, the tool is ready for work.
The anchor of the grinder more than all the nodes are subjected to temperature, mechanical and electromagnetic loads. Therefore, it is a frequent cause of the tool failure, and as a result, often needs to be repaired. How to check the anchor on working capacity and repair the item with your own hands - in our article.
Device anchor Bulgarian
The anchor of the Bulgarian engine is a conductive winding and a magnetic circuit in which the rotation shaft is pressed. He has at one end leading gear, on another collector with lamellas. The magnetic core consists of grooves and soft plates covered with varnish for isolation from each other.
In the grooves in the special scheme, two conductor anchor winding are laid. Each conductor makes half the turn, whose ends are pairly connected on the lamella. The beginning of the first turn and the end of the latter are in the same groove, so they are closed on one lamel.
How to check the anchor of the grinder for goodness
Outfunctions Anchors:
- Cutting conductor.
- The insulation test for mass is the closure of the winding on the metal housing of the rotor. It occurs due to the destruction of isolation.
- Disincay collector conclusions.
- Uneven collector wear.
Mixless closure.
If the anchor is defective, the engine overheating is, the winding isolation is melted, the turns are briefly closed. The contacts connect the anchor winding with the collector plates are disappeared. Current stops and the engine stops working.
Types of diagnostics Anchors:
- visually;
- multimeter;
- light bulb;
- special devices.
Standard diagnostics
Before you take the device for diagnostics, inspect anchor. It may be damaged. If the wiring was melted, the burned insulating lacquer will leave black traces or a specific smell. You can see the bent and crumpled coils or conductive particles, for example, solder residues. These particles cause short circuit between the turns. Lamella have bent edges, called roasters, for connecting to the winding.
Due to the violation of these contacts, the lamellas will burn out.
Other collector damage: raised, worn or burnt plates. Graphite from the brushes can accumulate between the slats, which also points to a short circuit.
How to check with a multimeter
Video: How to check
If you do not have a tester, use a 12 volt voltage tube to 40 W.
How to check the brotank rotor with a light bulb
- Take two wires and connect them with a lamp.
- Make a break on the minus wire.
- Serve voltage on wires. End of the rupture attach to the collector plates and scroll it. If the light is on, without changing brightness, it means there is no short circuit.
- Swipe the closure test on iron. Connect one wire with lamellas, and the other with the rotor gland. Then with the shaft. If the light bulb will burn, then there is a breakdown on the ground. The winding closes on the rotor body or shaft.
This procedure is similar to the diagnosis of multimeter.
Check the indicator of short-circuited turns (IKZ)
Anchors come across, which do not see the wires connected to the collector due to the fill with an opaque compound or due to the bandage. Therefore, it is difficult to determine the switching at the collector regarding the grooves. The indicator of short-circuited turns will help.
This device has a small size and easy to use.
First check the anchor on the absence of cliffs. Otherwise, the indicator will not be able to determine the short circuit. For this, the tester measure the resistance between the two adjacent slats. If the resistance exceeds the average at least twice, then there is a break. In the absence of a break, go to the next step.
The resistance control allows you to select the sensitivity of the device. He has two light bulbs: red and green. Adjust the knob so that the red light bulb began to burn. On the case of the indicator there are two sensors in the form of white dots located at a distance of 3 centimeters from each other. Attach the indicator by the sensors to the winding. Slowly twist anchor. If the red light lights up, it means there is a short circuit.
Video: IKZ in work
Diagnostics Anchor Check Instrument (choke)
An anchor verification instruments determine the presence of inter-touch winding closure. The throttle is a transformer that has only the primary winding and carved the magnetic clearance in the core.
When we put the rotor in this clearance, its winding begins to work as a secondary winding of the transformer. Turn on the device and put an anchor with a metal plate, for example, a metal ruler or hacker canvas. If there is an intersless closure, from the local oversaturation of the iron plate will vibrate either magazine to the anchor housing. Turn the anchor around the axis by moving the plate so that she lay on different turns. If there is no closure, the plate will move freely on the Rothor.
Video: how to make a throttle with your own hands and check anchor
How to repair anchor at home
Because of the anchor, a third breakdowns are screwed. With everyday intense mode, the malfunction may occur already in the first six months, for example, with a late replacement of the brushes. With a sparing use, the screwdriver will last a year or more.
Anchor can be saved if balancing is not broken. If during the operation of the device, an intermittent hum is heard and a strong vibration goes, then this is a breakdown of balancing. Such anchor is subject to replacement. And you can repair the winding and collector. Small short circuits are eliminated. If a significant part of the winding is damaged, it can be rewinded. Worn and badly damaged lamellas soaking, increasing or pour. In addition, it is not necessary to take care of an anchor, if you are unsure of your capabilities. It is better to replace it or attribute to the workshop.
Flower collector
Over time, the collector is formed from brushes. To get rid of it, it is necessary:

Do not forget to clean the rotor from chips so that you do not have a closure.
Video on the topic
How to rewind anchor
Before you disassemble an anchor, write down or drucribe the winding direction. It can be left or right. To determine it correctly, look at the anchor end from the collector. Put gloves, take sharp plug or cutting metal. Remove windows winding. The collector needs to be cleaned, and not unbelievable. Carefully, without damaging the groove insulators, select the rods of the remaining parts of the winding with the help of a hammer and a metal chisel.
Video: Remove the winding
Nadfil, without damaging the films of the insulator, remove the remnants of the impregnation. Consider the conductors in the groove. Calculate the number of turns in the section and measure the wire diameter. Draw a scheme. Cut the sleeve from cardboard for isolation and insert them into the grooves.
Video: Winding left and right
After the winding, weld the conclusions of the sections with the collector's roots. Now check the winding tester and the short circuit indicator. Start impregnation.
Instructions for impregnation (taking into account the revolt number regulator)

At the end of the process, the collector is slightly crushed. Balancing anchor with dynamic balancing and grinder. Now crush finally on the bearing. You must clean the grooves between the slats and polish the collector. Make the final check and closure check.
The feature of the winding for Bulgarians with an adjustable number of revolutions is that the rotor is wound with power reserve. The current density affects the number of revolutions. The wire section is overestimated, and the number of turns is underestimated.
Repair: Troubleshooting isolation
If the insulation breakdown was small and you found it, you need to clean this place from Nagara and check the resistance. If its value is normal, insulate the wire asbestos. Top drip by quick-drying glue type "SuperMent". It is leaning through asbestos and well blows the wire.
If you have not found the place of insulation breakdown, then try carefully to soak the winding with impregnating electrical varnish. Piggy and impetuous isolation is soaked with this varnish and becomes stronger. Dry anchor in a gas oven at a temperature of about 150 degrees. If it does not help, try to rewind the winding or change anchor.
Soldering plates collector
Lamellas are installed on the plastic base. They can be erased to the basics itself. Only the edges remain, to which the brushes do not get.
Such a collector can be restored by soldering.
- Copper pipes or plates Cut the required number of lamellae in size.
- After reading the anchor from the residues of copper, solder the usual tin with soldering acid.
- When all the slaughters are soldered, make grinding and polishing. If not turning machine, use a drill or screwdriver. Insert the anchor shaft into the cartridge. First polish the file. Then polish with zero sandpaper. Do not forget to clean the grooves between the slats and measure the resistance.
- There are not completely damaged lamellas. To restore them, it is necessary to spend more thorough preparation. Lightly crush the collector for cleaning the plates.
- The location under the plate should be expanded by bormer carefully, so as not to remove the large layer of the insulator.
- Find two pieces of the copper wire of this size so that they closely lay down in the resulting groove. Purified wires to put in the groove and get out.
- Make a blank lamellae from copper. It should be tightly into the groove and be higher than the existing lamellae to make it easier to solder.
- Write the workpiece so that there is a lot of solder. It will be tightly sitting in the groove. Place the workpiece in the groove and attach a soldering iron to it. Keep it until the solder is melted.
- Excessively stripped, polish and polish.
If the collector was completely worn out, then after soldering it is enough for nothing more than a month of active use. And not to the end, damaged plates after such a repair are withstanding several broth replacements and are not falling.
As Shakespeare said: "Nothing is not forever under the moon." Household appliances, alas, no exception. It happens that even the most reliable mechanism fails. And you have to be ready to meet this fact without panic, with solid confidence that there are no hopeless situations. How does the Bulgarian arranged, what faults may be, how to check the anchor of the electric motor, determine the cause of the breakdown and eliminate problems? Knowledge of the devices of the main components of the power tool will allow the master with their own hands to diagnose and repair the corner grinding machine.
Features of the work of the asynchronous engine Bulgarian
In almost all electrical appliances used in everyday life, an asynchronous electric motor is applied. An important advantage of this type of motor is that when changing the load on it, the frequency of revolutions does not change. This means that if, for example, long and without stopping cut the stone with a household grinder, there will not be no external signs of engine overload. The speed of rotation of the disk will be constant, the sound is monophonic. It will change only the temperature, but this can not be noticed if your hands are dressed in gloves.
Asynchronous motor collector is sensitive to overheating
With inattentive relationship, the advantage can turn into a disadvantage. Asynchronous engines are very sensitive to overheating, a significant excess of the operating temperature attracts the melting of isolation on the rotor windings. Initially, the motor will work with interruptions, and then - when the intersensional short circuit occurs - the engine will stop at all. It is worth several times to overheat the Bulgarian engine and is most likely that the anchor is melted. In addition, contacts connecting the wires of the primary winding with the collector, which leads to the interrupting of the electric current.
How to determine the malfunction of the perfoch anchors
Signs of the breakdown of the armor of the Bulgarians are: increased springs of brushes on the collector of the motor, the vibration of the motor on small revolutions, rotation of the working shaft in different directions. If such symptoms are present, the tool should be stopped - this is dangerous.Suspicions are easy to check with simple tests.
Visual inspection outside
The troubleshooting should be started with the visual inspection of the Bulgarian:
- Conduct a general inspection of the instrument.
- Pay attention to the integrity of the network cord, the presence of voltage in the outlet.
- Using the voltage indicator, make sure that the current enters the motor collector and the start button.
 Indicator Check the integrity of the electrical circuit
Inspection of the device from the inside
If the power is fine, but the Bulgarian does not work, you have to open the case to access the motor. As a rule, the disassembly does not represent difficulties. But it is necessary to adhere to simple rules that will avoid trouble during the back assembly:
- Be sure to turn off the device from the network before disassembling.
- Remove with a spindle working disk and protective cover.
- Copy the housing in a well-lit place on a clean table surface.
- Remember the location of all parts and nodes before disassembly. It is recommended to draw or photograph the internal device of the device.
- Screws and fastening screws in a separate place so as not to be lost.
Inspect the motor is best under bright lighting, so that all small parts are well distinguishable. Anchor must freely rotate around its axis, properly working bearings should not have a sound when working. Anchor should not be traces of melted wiring, the winding of the contour must be integer, without breaks. You can sniff the rotor. With interstitious closure, the insulating varnish is burning and publishes a stable specific smell. But for such diagnostics you need a certain experience.
Circuits circuit tester
If the visual inspection did not give explicit results, it is recommended to continue the survey with a multimeter. By placing the switching toggle switch to an ohmmeter position (range of 200 Ohm), two neighboring armature lamellas are necessary for two adjacent lesions. If the resistance on all turns is the same, it means that the windings are good. If on some pairs, the tester shows another resistance or chain break - in this coil malfunction.
 Multimeter in resistance measurement mode Check the integrity of coils
The wiring break can occur between winding and core. You should carefully examine the connectivity of the coils with the collector lamellas at the bottom of the anchor, visually check the pack of contacts.
Contact checking Lamp
If there is no tester, you can get out of the position using a simple light bulb at 12 volts. Power can be any, optimally 30-40 W. The voltage from the 12 volt battery should be served on the fork of the grinder, inserting a light bulb into the break. With good anchor, if you rotate the spindle with your hand, the bulb should burn without changing brightness. If the heat is changing - this is the correct sign of the intersensional short circuit.
If the light is not lit, then it can talk about:
- It is possible to hang brings in a non-working position. A retaining spring has worked.
- There was a break of the feed circuit.
- There was a closure or a gap in the stator winding.
There are other diagnostic methods, but they require more complex equipment, which is usually not used at home. An experienced master will determine the breakdown with a high degree of accuracy using the "Punch" or the simplest transformer with a cut toroidal core and one primary winding.
In what cases can be saved anchor and restore it with your own hands
If the damage to the anchor is set with guaranteed accuracy, the part must be removed from the electric motor. Motor disassembly must be made with special accuracy, after removing the brush and disconnecting the power terminal. The rotor is removed along with the support bearings and the impeller cooling of the motor, they constitute a single integer with it.
 Bulgarian Device Device Scheme
If most of the wiring is damaged, the balancing is broken as a result of overheating, it is better to replace it entirely. An increased vibration and an uneven hum of the operation of the mechanism says about the balancing violation.
How to rewind anchor - step-by-step instruction
If the anchor balancing is not broken, and the problem is only in spoiled windings, then such anchor can be restored independently, rewinding the coil. Rotor rewind at home requires a large patience and accuracy.
The master must have skills in working with a soldering iron and instruments for the diagnosis of electrical circuits. If you are unsure of your abilities, it is better to attribute the engine to repair in the workshop or independently replace the entire anchor.
For independent rewind, the anchors will need:
- wire for a new winding. The copper lived with a diameter, exactly the corresponding old conductor, is used;
- dielectric paper for insulation winding from the core;
- varnish for pouring coils;
- soldering iron with tin-lead soldier and rosin.
The process of rewind consists of the following steps:
- Dismantling of old windings. They should be carefully removed, without damaging the metal anchor case. If any burgers or damage were revealed on the housing, they need to be sworn in a file or shrink by essay. Sometimes, for complete cleaning of the housing from slags, the masters prefer to burn its burner.
- Preparing a collector to connect a new wire. Remove the collector is not necessary. It is necessary to explore the lamellas and measure the megommeter or multimeter resistance of contacts relative to the case. It must be no more than 0.25 mΩ.
- Removing the old wiring at the collector. Carefully remove the remnants of the wires, cut into the grooves in terms of contacts. In the future, the end of the coil wires will be inserted into the grooves.
- Installing sleeves for anchor. The sleeves are made from a dielectric material with a thickness of 0.3 mm, for example, electrical cardboard. Cut a certain number of sleeves and insert into the grooves of the purified anchor.
- Rewind coils. The end of the new conductor is stripped by the end of the lamella and wounds with sequential circular movements, counterclockwise. Such styling is called "stacking to the right." Winding repeat for all coils. Near the collector to pull the wires with thick thread from x / b fabric (the COOP is prohibited, as it melts when heated).
- Check the quality of winding. At the end of the laying of all windings, check the multimeter no intercity closures and possible breaks.
- Finish processing. The finished coil is treated with varnish or epoxy resin to fasten the winding. In the factory conditions, impregnation is dried in special furnaces. At home it can be done in the oven. As an option - to use quick-drying varnishes for impregnation, catching a coating in several layers.
Replacement anchors yourself at home
Practice shows that if it is decided to replace the anchor of the Bulgarian, then it is best to change it together with the support bearings and the impeller cooling engine.
For replacement, you will need:
- New anchor ush. Must match your model. Interchangemented with other models is unacceptable.
- Shugs, wrench.
- Soft brushes and rags for wiring mechanism.
How to remove anchor
The replacement of the anchor begins with the disassembly of the grinder. The following steps are performed:

Video: replacement of bearings on the grinder
How to put anchor into place
To set a new anchor of the grinder to place a new part, then collect the tool in the reverse order. The following follower:
- Anchor shaft is installed on the fixation disk.
- The method of pressure is installed by the bearing.
- A small gear is satisfied and fixed by a locking ring.
- Anchor starts in the gear body, the docking holes are combined.
- The gearbox mounting bolts are twisted.
- Anchor with the gearbox is inserted into the body of the grinder and fixed.
- The brushes are deposited into their places, closed with covers.
After performing these actions, Bulgarian is ready to work. Replacing anchor produced.
Video: How to check the grinder
Ancient Sufi wisdom reads: "That person who is able to go out with dignity from a difficult situation. But the wise one who does not fall into such a situation. " Observing the rules of operation of household appliances, not allowing the overheating of the motor, you can avoid breakdowns and troubles in the work of the Bulgarian. The content and storage of the instrument in cleanliness and dryness will prevent its mechanisms from contamination and oxidation of the conductive elements. Timely maintenance of the tool is guaranteed to relieve unpleasant surprises during operation.