Insulated floor on logs made of OSB sheet material using warm paint in your apartment. How to make a wooden floor on logs in an apartment.
Read also
Installation of floors, like any other work, consists of several stages. The first stage is preparatory. At this stage:
- the scope of work is determined;
- an estimate is made;
- material is purchased;
- a place for work is being prepared.
The second stage is the main work, the installation of floors. The third is cleaning after the completion of the work.
Determine the scope of work and draw up an estimate
For the device of floors, we need:
- board or floor strip;
- lag;
- waterproofing;
- plinth.
We will talk about the materials themselves below, while we are talking only about the estimate.
We calculate the volume of the board we need. To do this, first find out the area of the room. It is best to calculate it yourself, since the data given in the registration certificate for the apartment often do not coincide with the actual data. The resulting area is multiplied by the thickness of the board and we get the required volume. The board is released in cubic meters, therefore, it is necessary to determine the cubic capacity. The rest of the materials are calculated in linear meters. To determine the required amount in this case, it is enough to know the area of the room and its dimensions.
Having received the calculated data, we calculate the costs and purchase materials.
Purchase of materials
In our country, only coniferous wood is used in housing construction for the installation of floors, the manufacture of joinery. Hardwoods, such as linden, are used in decoration, sometimes for the manufacture of interior doors.
Of conifers, pine is mainly used. Not only because it is the most common tree, but because it:
- plastic;
- well processed;
- keeps the shape given to it for a long time;
- durable.
The floor is made of two types of boards. The first type is planed edged board... In section, it is a parallelepiped. The front side has already been processed. Floors from such a board are made mainly in rural areas.
In cities, the so-called floor slats are used. The front side is also processed in advance. There is a groove on one side, and a ledge on the other. Solid, along the entire length of the board. The width of the rail is 16 or 24 cm. The standard length is 6.5 meters. The thickness must be at least 40 mm.
Laga is a timber made of pine. The main dimensions of the timber are 50 by 50 or 50 by 70 mm.
Set "Adjustable log - Standard Plus"
(lag 45 * 45 * 1000 mm, bolt 150 mm-3 pcs., dowel - nail or self-tapping screw-3 pcs.)
(lag 45 * 45 * 2000 mm, bolt 150 mm - 5 pcs., dowel - nail or self-tapping screw - 5 pcs.)
(lag 45 * 45 * 3000 mm, bolt 150 mm - 7 pcs., dowel - nail or self-tapping screw - 7 pcs.)
When drawing up a cost estimate and buying lumber, it should be borne in mind that the price for a board is set per cubic meter. meter. The floor rail can be sold both in cubic meters and in running meters. There is one small trick hidden here. The fact is that wholesalers supplying lumber always sell their products in cubic meters. When converting the cost per cubic meter into the price per running meter, the unit cost of the product increases.
| Thickness | Width | Length | m3 in the 1st board | In the 1st cube of boards, pcs | 1 board sq.m | Price per m2 |
|---|---|---|---|---|---|---|
| 0,021 | 0,096 | 6 | 0,012096 | 82,67195767 | 0,576 | 280 |
| 0,028 | 0,096 | 6 | 0,016128 | 62,00396825 | 0,576 | 360 |
| 0,028 | 0,14 | 6 | 0,02352 | 42,5170068 | 0,84 | 360 |
| 0,036 | 0,096 | 6 | 0,020736 | 48,22530864 | 0,576 | 420 |
| 0,036 | 0,12 | 6 | 0,02592 | 38,58024691 | 0,72 | 420 |
| 0,036 | 0,14 | 6 | 0,03024 | 33,06878307 | 0,84 | 420 |
| 0,046 | 0,14 | 6 | 0,03864 | 25,87991718 | 0,84 | 520 |
Most often, lumber is sold by stores that specialize not only in them. Therefore, it is better to buy a board or rail from specialized trade enterprises, for example, from timber trading bases and the like. Firstly, the price gain, and secondly, the materials sold in such stores are always treated with both an antiseptic and a fire-fighting agent. Processing with these agents is a mandatory step in the construction of floors. But, if you have to antisept and process the lumber yourself, then it is not difficult to find these funds. They are commercially available. Consumption per sq. m and the method of application is indicated on the label. You can also do an antiseptic yourself. The recipe is easy to find on the Internet.
The skirting board is made of wood or plastic. In our opinion, plastic skirting board much more convenient and practical. It is not as capricious as wood, it is easier to assemble, stronger and more durable. The standard skirting board length is 2.5 meters. If we put a plastic skirting board, then the kit will have to buy additional corners, internal and, if necessary, external, screws and dowels.
After installing the floor, you may also need wood filler. It is used to close cracks, cracks, chips and the like.
Note, by the way, that the fewer bitches on the board or rail, the better. There should be no more than two knots per meter.
The lumber in front of the flooring must be dried and treated with an antiseptic and fire-fighting agent. They dry it at a temperature of at least 10 degrees Celsius and at least a day.
Any waterproofing is suitable, up to roofing material.
For installation, you will also need fastening material. We'll have to buy either self-tapping screws or screw nails.
Preparing a place for the installation of floors
We remove the old flooring in the old apartment. To do this, remove the plinth, take out the nails. Then we disassemble the flooring. If we have boards in front of us, then we simply remove them and the lags. If the floor consisted of a rail, then we disassemble the floor, like a constructor, moving it to the side of the rail in turn.
After the floor is cleaned, we clean the vacant space from debris and old waterproofing.
We lay the floors
First, let's mark the level at which the floor will be located. To do this, we will place beacons along the perimeter of the walls in the corners and in the center of each wall. It is best to draw a straight line between them so that right angles form in the corners. If we are replacing a floor in one room, then the top edge of the new floor should be flush with the top edge of the old floor in the next room or corridor.
Next, we check the level of the floor slab. If there is a slope, then it can be straightened using waterproofing or special linings that are placed under the logs. Next, lay the waterproofing. We install lags on it. The distance between the two ends should be 30 cm and no more. Between subsequent lags - 50 or 60 centimeters. Check the level. If there is a bias, then we correct it with lining or insulation. After the correction, you can also lay the floor. But first, from the side edges, especially the board, you need to remove all burrs and other irregularities.
We begin to lay the board. We lay the board tightly, so that the gap between the boards is minimal. If we use a floor strip, then the first strip is laid with a tongue against the wall, the next is connected to it with a tongue that is inserted into the groove of the first, the subsequent ones are mounted in the same way. Reiki is folded with a mallet. Simply put, they get confused as tightly as possible. Ideally, there should be no gap between them.
The floor is usually laid along a blank wall, from the entrance to the window. A small gap is left between the wall and the floor. Its size is no more than 3 cm. This slot is needed so that the board or rail can expand freely when the temperature rises.
Video - Laying the floorboard with your own hands
Video - Wooden floor. Benefits and installation
Video - Flooring
Once the floor has been laid, it can be secured. But screws or nails must be placed in such a way that when sanding the floor, they do not damage the sander. That is, they will have to be buried into the floor to a depth of several millimeters. You do not need to cycle the planed board, but it is worth grinding. Before grinding, gaps, gaps, scratches, chips must be repaired. To do this, we need a wood putty, pre-selected for the color and texture of the wood. All damage must be cleaned of dust and dirt. The putty is applied with a spatula. It is carefully leveled, residues must be removed from the floor surface. The putty dries for a day.
After it grabs, we sand the floor. You need to do this operation two times. The first time - with a coarse skin, the second - with a small one. After each operation, be sure to clean the floor with a damp cloth.
If you plan to use a wooden plinth, then you need to install it after sanding, since it will be painted or varnished at the same time as the floor. The wooden skirting board is fixed to the floor with screws or nails. It is leveled using a level. It is better to choose a plastic skirting board to match the color of the finished, painted or varnished floor. Such a plinth is attached to the wall using a puncher and self-tapping screws. A plastic skirting board is installed after painting.
We paint or varnish
After the floors have been sanded, be sure to wash them. This will remove the remaining dirt. Let the floors dry thoroughly. After they are dry, we proceed to the last stage of installation. To paint or varnish - everyone decides for himself. Technologically, both operations are not very different from each other. Let's briefly describe both of them.
Let's start with painting. Before applying the first coat of paint, the floors must be primed. To do this, we apply a special agent called a primer for floors and wooden surfaces. The primer is used to ensure better adhesion of paint to wood, better penetration of paint into the floor, more even distribution over the floor surface. Depending on the brand, the primer dries from an hour to a day. After it dries, paint can be applied. If necessary, apply several layers of paint. But we must remember that the next layer can be applied when the previous one is completely dry. It is better to apply paint and primer with a roller.
The floors are varnished in two stages. The first layer is applied and allowed to dry. The varnish dries for at least 12 hours. After the layer has dried, the floors are treated with fine sandpaper. This is done in order to remove all dust and dirt that got into the varnish during work, remove minor irregularities, etc. Then the floor is wiped with a damp cloth. After wet processing, the floors are allowed to dry again, then a new layer of varnish is applied. It must be remembered that the varnish will finally gain strength not earlier than in a week. But it will be possible to use the floor after the last treatment in a day. You can't just put heavy things on the floor for a week, move furniture, walk in shoes with high and sharp heels.
Video - Floor painting
Lags are boards or beams on which floorboards are laid. For the flooring, you will need high-quality high-strength wood. Preferred species: oak, birch, larch, pine, beech.
What kind of lumber is required for flooring on logs?
First of all, you need to decide whether a timber or a board will be used as a log. In the first case, the optimal solution would be wood with a cross section of 10/10 cm, in the second - 15/5 cm or 20/5 cm. As floorboards, boards with a cross section of 4/15 cm or 4/20 cm are used. They must be carefully planed. and polished.
Stages of work on the flooring on the logs in the apartment
Start of work - dismantling of the existing flooring. After the more unnecessary material is removed, they begin to inspect the base on which the logs will be laid. Currently, there are two ways to arrange such a floor: with the ability to adjust the height of the log and by attaching the beams to the base. In the first case, special racks are used to raise and lower the floor to the desired level. Due to its high cost and laboriousness of work, it is rarely used for floor installation in an apartment.
The next stage is filling. Having cleared the concrete screed from dirt and debris, a layer of sand 4-5 cm thick is poured onto it. To level the bulk material, take a long, even rail. Then slag or expanded clay is poured and the base is again leveled. Then the soundproofing material is laid.
Next, start laying the lag. They should be installed in the direction of the longest walls of the room. In an apartment, the optimal distance between the beams is 50-60 cm. The correctness of the installation is checked using a building level. The lags are fixed to the concrete with anchors of a suitable size. Insulation is placed in the space between the lumber lines. If foam is used, gaps will inevitably form between it and the wood, which must be filled with polyurethane foam. For mineral wool this is not required.
The next step is to lay the floorboards. They should be laid strictly perpendicular to the joists. If the boards are grooved, the process of installing the floor is greatly simplified: it is enough to lay the first floorboard and attach the subsequent ones to it using the tongue-and-groove method. If boards are mounted without grooves and protrusions, make sure that there are no gaps between them. Nails are used to attach the floorboards to the logs. The final stage of the installation of the floor on the logs in the apartment is the installation of the finishing floor covering.
A wooden floor in an apartment is a fairly convenient and reliable coating option. Possessing a number of advantages:
- It is possible to raise the floor to any level;
- The costs of building materials are not so high when laying wooden floors;
- No need to wait until the screed hardens (as is the case with concrete);
- You can lay the floor on the logs yourself, without the help of specialists;
- Wood aging and fire are unlikely due to the presence of ventilation voids.
Floor base
Lags are the basis, most often used from wood, although the option of reinforced concrete or metal beams is possible... Wooden ones are quite cheap and quick to install. If it is not possible to lay timber, then you can use boards sewn together. With this option, the lag is installed on the edge.
Everything you need about the material for the floor in the apartment - lags:
- Material for logs: spruce, fir, pine or larch. The latter option is expensive compared to others. average price per m3 lag - 100 rubles;
- The moisture content of the wood is approximately 20%;
- Wood of the second or third grade;
- The height of the lag is twice the width - it allows you to withstand heavy loads;
- For strength, you can make a log perpendicular to the first layer and the second. Such a need also arises when the beams are located far from each other;
- The size of the lag is selected in accordance with the span (the distance between the bars of the lower trim) and the thickness of the insulation;
- The distance between the joists depends on the thickness of the flooring. The thicker the boards, the less often the logs can be placed. Usually, the distance is made up to 400 centimeters.
If the logs are laid not on the beams, but on the concrete coating, then first the installation of the waterproofing layer takes place, then the insulation and sound insulation. Only after that a dry screed is made and, finally, logs can be laid.
Floor laying tricks
The logs are installed and the question arises, how to make the floors in the apartment? Let us dwell in detail on the flooring of wooden floors.
- Boards must be stored in bundles, not in bulk, so as not to change their shape, and to avoid moisture ingress;
- Before laying the floor, you need to expose the logs using a building level. They are attached thanks to dowels and self-tapping screws;
- Before installation, soak the logs with an antiseptic in order to further protect them from the harmful effects of insects and microorganisms;
- The very same flooring of the boards must be started, leaving distance from the wall in 10-15 millimeters(remember about ventilation and seasonal swelling of the tree);
- For installation, you will need screws or nails;
- After fixing the first board, it is necessary to put 2-3 boards next to it and drive in near the last bracket into the log;
- Between the bracket and the lag be sure to drive a wedge- this will ensure a tight pressing of the boards;
- When the subsequent boards, after the first, are fixed, you can screw them with a self-tapping screw;
- Further - floor grinding and varnishing;
I think now the question of how to properly lay a wooden floor will not arise for you! Also, you can always contact specialists who will do a quality job.
Deck flooring will cost 450 rubles. per m2, laying a pillar for logs - 350-450 rubles. per piece, lag installation - 100-200 rubles. m2, laying floorboards - 200-450 rubles. per square meter.
We insulate the floor
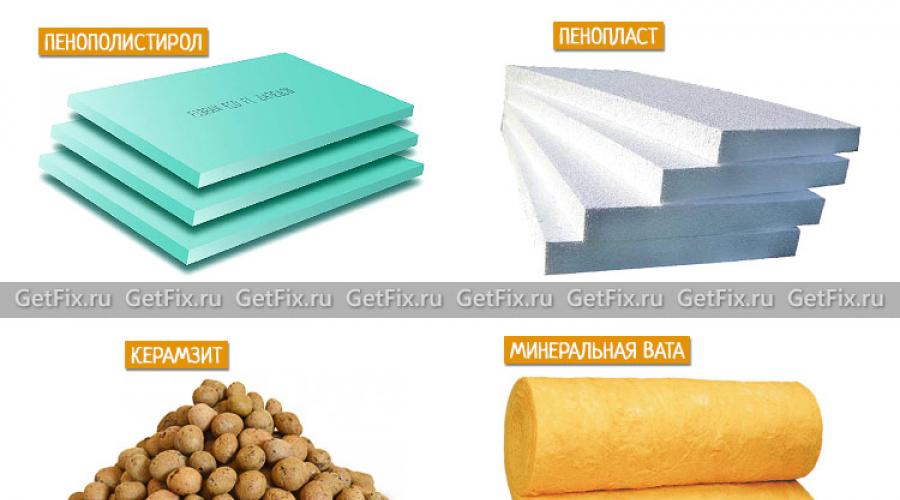
One of the main questions during the repair of the owners concerns the thermal insulation of the floor in the apartment. Although in fact, if we are talking directly about wooden box, option one - lay insulating material between the lags... This could be:
- Expanded clay;
- Expanded polystyrene;
- Extruded polystyrene foam;
- Styrofoam;
- Mineral wool.

The main indicators of these materials are the lack of heat transfer and durability.
Special attention should be paid to the insulation of the wooden floor with penoplex. He's called "New generation insulation", made of foam, the advantages include a minimum degree of moisture absorption, high strength, ease of installation and, of course, low thermal conductivity. But there are also some disadvantages: it does not resist high temperatures- deforms and loses its basic properties, attracts rodents and has a rather large price from 4050 to 4500 rubles.).
Avoiding noise
Noise-insulating materials for the floor of an apartment can be considered foam plates, mineral wool (that is, by insulating the floor, at the same time, you can fence yourself off from noise), as well as thermal and sound insulation (the price depends on the thickness: minimum - 2 thousand rubles)
Leveling wood floors
Some time after the installation of the wooden floor, the problem arises that the floor is uneven - it went in a wave. If you are sure that in such a situation everything is fine with lags and boards, they do not creak and no cracks appear, then you can loop the floor. But if scraping (manual firm cycle Veritas costs approximately 2 thousand rubles) will not solve the problem, then there is another option - laying fiberboard, chipboard, OSB on a wooden floor.

But not all of these three slabs have the same density and durability. Fiberboard will eventually take shape curved floor. Particleboard will be stronger (within RUB 320-760 per piece) and OSB (price from 500 to 1000 rubles per sheet). Fastening them is very simple - using self-tapping screws or screws.
After laying the floor, soundproofing and insulating it, you can start finishing the floor in the apartment.
Before planning and installing the floor on the logs with your own hands, think about whether this is the best option for your home? After all, it is possible to make a wet sub-floor, a screed under the floor covering.
So an outdoor construction with joists or a screed? Yes, when building your own home or overhauling an apartment, the question always arises - what kind of floors to make in an apartment on logs or on the basis of a screed. If the height of the room allows, or additional thermal insulation of the floor is needed, then very often the floors in the apartment on logs are the best solution to such a dilemma.
Of course, it's up to you to choose which building materials to use, taking into account your needs, capabilities, as well as the size and characteristics of your home.
Construction documentation
Before planning, purchasing building materials and the installation of this floor structure, it is recommended that you familiarize yourself with some problem-oriented documents:
- SP 29.13330.2011 Code of rules "Floors" (updated edition of SNiP 2.03.13 - 88).
- Manual to SNiP 3.04.01 - 87 "Recommendations for the construction of floors" (as updating SNiP 3.04.01 - 87 "Insulation and finishing coatings").
- GOST 18288 - 87 “Sawmill production. Terms and Definitions".
Installation of the floor with sheet material on logs with an insulated base
Note! When choosing, remember that, covered with sheets of plywood, OSB (OSB - a board made of oriented wood shavings) allows you to provide more thermal insulation for housing than a cement (concrete) screed, but requires more labor and certain carpentry, construction knowledge and skills when you decide to mount floors on logs with your own hands. It's up to you to decide and choose.
How can you insulate
The issue of insulation arises sharply when the floors in an apartment on logs are, for example, on the ground floor above cold basements.
The types of insulation, both artificial and natural, when constructing a new floor or repairing a floor on logs, can be different:
- bulk(slag in the form of granules, foam glass, expanded clay, processed sawdust and other loose thermal insulation materials);
- sprayed heat insulators(polyurethane insulation, liquid foam - penoizol, cellulose ecowool);
- in the form of plates, mats and rolls(mineral wool, stone wool, penofol, cork material).
Attention! After applying each layer of warm paint "Korund-Classic", you need to wait about 1 hour for it to dry.
- The owners of the housing refused to lay soundproofing and fill in additional thermal insulation, as they say "the owner is the master". Another argument in favor of such a solution is that natural ventilation of the entire structure will be better.
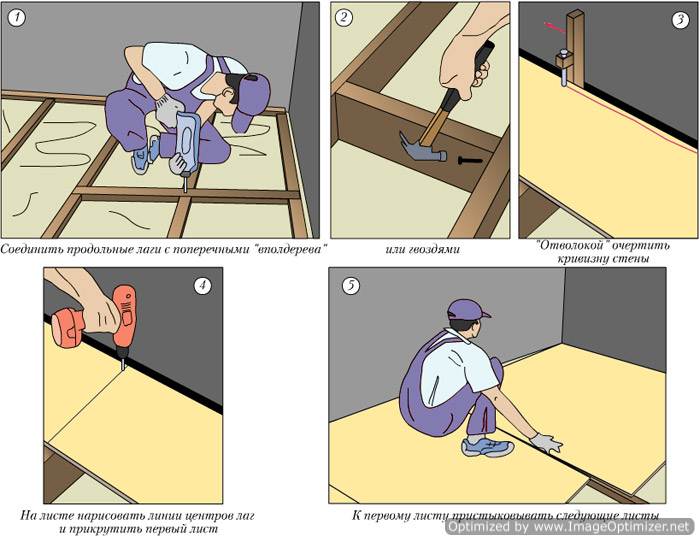
- A timber structure (lag) was mounted. Since we decided to make the floor from OSB on logs, we placed them relative to each other (0.5 meters), taking into account the thickness of the oriented strand board (18 mm).
- The slabs themselves were laid across the logs so that their long side was relatively perpendicular to them, and so that their joints "meet" on the logs.
Mix for self-leveling floor: composition, varieties, features ”href =” http://shkolapola.ru/drugie/zalivnie/693-smes-dlya-nalivnogo-pola ”> self-leveling floor with BODEN NIVELIR mixture.
Attention! After applying each layer of warm paint "Korund-Classic", you need to wait about 1 hour for it to dry.
- The owners of the housing refused to lay soundproofing and fill in additional thermal insulation, as they say "the owner is the master". Another argument in favor of such a solution is that natural ventilation of the entire structure will be better.
- A timber structure (lag) was mounted. Since we decided to make the floor from OSB on logs, we placed them relative to each other (0.5 meters), taking into account the thickness of the oriented strand board (18 mm).
- The slabs themselves were laid across the logs so that their long side was relatively perpendicular to them, and so that their joints "meet" on the logs.
>

conclusions
Choosing a subfloor for subsequent floor coverings, consider not only the size (height) of the room, the material from which the floor is made, but also the labor costs for its installation, the need for costs to attract experienced workers.
In the case of doing work with your own hands, be sure to familiarize yourself with the relevant building codes and regulations, GOST for materials, consult with competent specialists and professionals with the appropriate experience and skills.
Pay special attention to the performance and consumer characteristics, the properties of the materials that you plan to use. Stay tuned for new offers.
Opt for durable materials. Today, for example, there are already not only, but also polymer, composite, and OSB boards are already produced with a convenient fixation to each other during their installation. Happy renovation!
We sincerely hope that the work we have done will be of practical use to you.
Good luck in the repair!
Most of the houses in the 70s-80s. finished with parquet board along the logs.
The technology is not very successful, the appearance of the board and the creak of the floors constantly makes you think about replacing the coating. As a rule, the parquet board creaks, sagging between the logs. The creak occurs from the friction of the groove of one board against the ridge of another.
Repairing a parquet board is impossible, you just need to remove it. The board is nailed to the logs, when you try to disassemble it, it starts to crumble. The upper strips glued to the base of glued pine strips fly off. It will not be possible to assemble such a board back. You can fix the parquet board to the logs with self-tapping screws, the squeak in this place will stop. You can stuff hardboard or plywood over the old floor, the general condition of the floor will become better, but you will have to lay linoleum or laminate to cover the hardboard or plywood.
Under the board there are logs and sand mixed with construction debris. The layer of debris is 5cm-7cm.
The logs lie freely, without attachment to the concrete base. The creak can be emitted by the logs laid with an inflection.
It is not at all necessary to take out all the debris and logs, and then buy sand concrete or dry screed.
I propose to align and fix the logs and lay the plywood. The logs are fixed to the concrete with nails and plastic dowels, 6 mm in diameter. The nails are better than brittle, steel self-tapping screws to withstand side swinging during the operation of the floors. By the level of the logs they are cut off or installed on lining made of wood, plywood, hardboard. The space between the concrete and the log, previously cleaned of debris and dust, is filled with polyurethane foam. The foam fixes the linings in place, glues the log to the concrete, insulates the floor from vibration of the plywood floor. The logs are installed with a step of 50 cm. in the center, for plywood laying 150cm. by 150 cm. Plywood is laid in whole sheets, in two layers. The first layer is attached with screws on wood to the logs, the joints are located in the center of the log. The second is laid on the first with an offset of half a sheet. The plywood layers are glued together with KS type glue and fastened with self-tapping screws on wood. The sheets are laid close , without gaps, the result is a room-sized sheet of plywood glued under a nail press. Such a coating is much more effective than one layer of plywood, where each sheet works in a structure separately and as a result, many sheets in the room are obtained. The space between the logs can be filled with mineral wool.