Flexible template for milling its. Homemade fixtures for manual milling. Learn how to work with a manual milling. Template for Molloser "Lastochkin Tail"
It is very difficult to imagine any plumbing event without using a mill. But not so long ago, people did the grooves, mastered the volumetric figures with the help of a ruble, chisels and hacksaws. In modern times, various milling devices are becoming increasingly popular, including those made independently. Patterns for a milling handle make it possible to facilitate the control of the mechanism, help to carry out surface processing as accurately as possible and gently.
Such a device is necessary where you need to do the hole, smooth the edge of the product, cut volumetric figure. Milling is used when cutting ornaments, patterns, preparation of niche to set the corners, locking mechanisms, loops. This tool allows you to remove the chamfer, rounded the edge of any part. In terms of its characteristics, the mill reminds the actions of the Rubanka.
This processing device works with wood, plastic and aluminum. However, each of the cases involves the installation of specified speed modes and the corresponding equipment. Despite the active use of the milling mill, such attributes of the building value, like the chisel, hacksaw, the cutter are still used in operation. The use of templates for these settings is often associated with the manufacture of furniture.
Making a homemade furniture template

Any worker of the furniture organization knows how it is not easy to make an angular kitchen. Installation of the table top requires accurate connections, rounding the front edge and flattening other parts. It is known that a flat face attached in the form of a rounded principle will acquire a non-psychotic appearance with a noticeable coarse seam. So that the trimming was carried out correctly and gently apply the milling device and a specially made pattern for furniture. Create independently such samples are not so difficult.
The main devices, without which the installation will be impossible, will be:
- sheet dvp;
- manual milling mechanism;
- blueprints.
Back to the category
Stepitary Making Template for Furniture

Details of furniture, drunk on the template, have the same shape and size.
- Such a template made with your own hands will exercise your functions at all worse than the purchased in the store. To create it, you need to prepare a drawing and cover to the processing machine. Then the trial homemade of the Fiberboard sheet is made, its thickness is equal to 8 mm.
- Next, the diameter of the cutter and the machine itself is measured. Then 2 intersecting lines are drawn, the angle of which is 135 °. To smooth these indicators, the arc is taken. To calculate its radius, find out similar testimony from the cutter and rings. From the magnitude of the first device, the resulting variety of radii rings and cutters should be subtracted.
- The inner arc is obtained. According to her, there is a milling of an even post-forming end. As the ring moves along a given radius, the cutter describes such an arc, the diameter of which is equal to its own.
- Two lines parallel to each other are parallelled from the segment. The distance between these points is equalized by the ring diameter of the rings of the freserver. This testimony is added 5 mm. The line originates from the middle of the preceding arc.
- The connection point of the segments is smoothed with an arc. Its radius corresponds to similar indications of the resistant ring of the device. During the movement, the cutter will no longer be able to carry out arcuate movements.
- You need to draw 2 equivalent rectangles, imitating the contours of the table top. They are superimposed an angle, after which its elongation is carried out for a certain distance.
- The markings put on the template will noticeably simplify work. The arcs of the upper and lower rows will not be combined. Therefore, it is necessary to spend the reconciliation for each detail.

Back to the category
Templates for manual milling
- The first thing is to make a pattern from solid breed organic, the thickness of which is equal to 6 mm. The height of the stencil from the MDF corresponds to 12 mm. These materials are very comfortable in processing and not inferior to wood. However, their angles are easily defeated from random strikes or drops. To serve templates long termIt is necessary to take a birch of high quality. Despite its high cost, unlike MDF, it has greater strength and constancy of characteristics.

On the surface of the template, the boundaries of parts with the observance of natural proportions are stuck. Then the starting grooves are drilled, the unnecessary material is cut in the jigsaw, observing near the contour line indent to 1 mm. The edges of the edges are thoroughly grinding, the paper stencil is cleaned.
- Using the template, a specified number of parts is created. Then this element is put on the product and will be burned with a pencil. Unnecessary material is cut down, leaving the contour by 1.5 mm. Similar actions are carried out with other billets.
- Using bilateral tape based on fabric, the template is fixed on one of the products. In order for the work as quickly as possible, it follows the machine to insert a milling cutter on the shank. This item rolls along the edge of the stencil.
- Then you need to select the type of cutter. All varieties with bearings are used for milling according to templates, the device holds in the hand and is installed on the surface. With the help of a copy cutter, the machine is controlled at the moment when the item moves on the table, the template is located on top.
- The space between the edge and the shank is optional to handle the cutter with the bearing in one pass. This can be done 2-3 times, applying a cheaper cutter option. Milling is carried out when the bearing is aligned with the middle of the thickness of the stencil.
- Close to the cutter is a resistant rod device. The machine turns on, the part is pressed against this part and gradually moves to the twisting milling mill until the bearing contact the template. The milling of external contours is performed against the movement of the clockwise, the internal outlines - in the opposite direction. At the time of contacting the bearing, the cutter with a template, the part is removed from the rod resistant device.
The copying device at the shank functions similarly, however, it is required to turn the part to stencil look at the table surface. Milling is carried out similarly to the table. In the process of conducting manipulations, it is important to monitor the integrity of the base of the workbench.
Back to the category
Wedge-shaped patterns for manual milling

Make a pattern in the form of spikes or wedges can be on its own. This compound is characterized by elegance and is most often used in the manufacture of furniture. And there, as you know, high quality assembly is required. Applying such primitive adaptations in the work, as a saw and a chisel, it is not necessary to do without a certain experience in the construction sector, which you can not say about the manual fresher. It allows you to conduct a given job even to beginners.
How to get a connection of templates for a milling driver so that it clearly designate the wedges on all the workpieces? To do this, you can use a manual machine with decent characteristics. The ring must be approached by size to the machine, otherwise it should be purchased.
A wedge-shaped device of partially hidden type can be seen from one of the sides. The connection of a pass-through character is traced from both points. To align two parts, the light element is installed strictly vertically. Periodically, the interdental space of the template is cleared of sawdust. Upon completion of the work, the available roughness needs to be treated with a sandpaper.
Update 2017: Post brutally outdated, order CNC templates.Absolutely nothing remarkable: I make an acrylic template from the sheet for a groon under the cutter with the upper bearing. But there is some number of nuances, and in general for some reason it was hard for me difficult to come to the fact that the templates should be done on their own, and not to order from a stubmaker or in special people. So I write in detail, let the procedure itself and boring.
Actually acrylic (I do not remember the thickness, in my opinion something about 4-5 mm):
I put the heel of the grid, I bury it with a marker without much accuracy, because at this stage there is no need for it, and more so - the danger appears to crop something superfluous tool. So I make a small margin for all measurements.

By the way, the groove in the template will be significantly longer than the heel of the grip - Minimum for a couple of centimeters. It is necessary in order to calmly work with a mill and have a support for it even when processing the edge of the case.
I fix the template on the workbench, I begin to cut acrylic with my Japanese woodcut. The canvas does not deteriorate from this, but I still add some oil, first of all - to reduce heating.

Yes, before sawing, it is necessary to circle marker lines with a sharp selection, reading a deep groove according to them. It greatly facilitates the work, because the marker can be accidentally erased, and most importantly, it blends badly with some angles noticeable. Scratches are always perfectly visible.

When the departure of the saw ends (or it finites up to the corner, everything depends on the saw design), you need to go to the jigsaw with a large departure.

Lobzik cut line must be saved by oilbecause it heats acryl very much: while the pedel moves, everything is fine and without lubrication, but if the jigscription stops at least for a moment, then the swept plastic will immediately freeze around the peel and snaps it. When I saw a similar template for the first time, I broke five pylons in a row before realized that it was necessary to add oils.

When the cutting is finished, the magic oscillating spindle-grinding machine, resembling some terrible witch torture, reminiscent of the witch torture.


Large irregularities and deviations are removed on this machine. The diameter of the drum gradually decreases. At this stage, you already need to regularly stick to the pattern of the heel of the grid and watch how things are going. On all subsequent, it is done constantly, mince back is not turning!
(Almost. In principle, small pits can be pouring at least the same superclaim (thick), after which it is rejected again. But it is better not to bring it to this)
Since even the smallest grinding drum is not climbing in the corners of the template, I clean the machine and align them with a conventional round file:

And the side of the groove can be submitted with a flat file, if necessary.

Apply the template to the vulture. I observe the bottom, the edge of the heel, awesome gap. So, it is necessary to save the groove angles as soon as possible.

Fly to the file there for a long time and sadly, so I take the borders with a grinding roller. Glasses are required, boys! And even better there will be a protective mask shield from transparent plastic. Otherwise, the whole muzzle will be in the plastic crumb.

For another twenty-thin fit - and ready.

With the help of a long line and sewed a cherior three lines: edges and center of the grid.

Now you can, not in a hurry, milling here such a miracle-jolan with an implanted stool in the center of the housing and the edge of marijuana, stirred in epoxy.

True, on this photo the template is just crooked - it does not matter, I'll still correct it.
Products created from wood are distinguished by their uniqueness and environmentally friendly, which is why they are so appreciated. But do it yourself a wooden masterpiece without a manual milling mill will not work. In addition, it will be necessary to adapt to it, with the help of which the aircraft acquires the specified form.
They can be done even with their own hands, and the special forces and skills will not need. Before working with a milling mill, you must first familiarize yourself with each of these devices, as well as find out the principle of their work. In the article, consider the most necessary structures for the mill.
Device - Parallel Pop
This device is usually sold together with a mill. Consequently, there is no need for its independent development and creation. To reliably, the material being processed is used precisely this element. With it, the movement of the cutter becomes straightforward relative to the base surface, which can act as a guide table, rails or direct edge details.
Such a device makes it possible to quickly carry out the milling of a variety of grooves and edges processing, tightly holding the material.
Shine guide
If you need to perform straight reserves, then without this device can not do. For its manufacture, any smooth board will need, for example, you can use a piece of pelp.
First you need to find out the distance from the edge of the milling base to the center of rotation, and it is always the same. To do this, it is necessary to fasten the guide to the unnecessary part of the material and produce trial cut. Then you should measure the gap from the edge of the cut to the tire, to which the radius of the cutter is added. As a result, it will be possible to obtain the desired value. For example, it is 59 mm, and the diameter of the groove mill - 14 mm, that is , its radius is 7 mm.
Then you should read the cut line from which the distance of 52 mm (59-7) is retreating, and we carry out another one. By it, fix the guide and carry out the cut.
Milling circles
For such purposes use circus. With their help, the mill can move around the circle. The simplest of them is a device consisting of a bar, one end of which is equipped with a screw with a pin, and the other is bonded with the base of the tool. Of course, it is better to use a circulation equipped with two rods.
In general, there are many devices of branded and even self-made to cut circumferences, which differ from each other for the convenience of use and dimensions. Quite often, the circuses have a mechanism, changing the radius of the circle. As a rule, it is a screw with a pin at the end moving along the roller turn.
When you need to complete the milling of a small circle, the pin must be located under the base of the tool. In these cases, other devices are still used, fixed by the database of the device.
But to cut the circles it is not necessary to buy a milling circulation. Instead, you can use a parallel focus. For this, the device is attached to the groove on the sole. It is screwed into it, which is recommended to equip the sleeve so that its diameter corresponds to the size of the hole. That's all the circus made. The radius can be adjusted by focus.
Devices for replication and copy
 To create a series of identical products use:
- Angular lever;
- Copy probe.
On the corner lever there is a scale, the division price of which is 1/10 mm. It allows you to center the stubborn ring under the cutter, which helps to accurately reproduce the part form on the workpiece during copying. It is often equipped with chip protection and reference for the best processing of edges.
Using copy templates and rings
Copy rings are a round plate with a protruding side, sliding along the base surface along the template. Such a device provides an accurate pathway pathway. Basically, this element is installed to the sole of the workbench. In this case, exist several methods for its fastening:
- Installation of special mustache into the holes on the sole;
- Screwing the rings in the thread recess.
The use of the template also allows you to achieve more efficient and accurate work. It is attached directly to the billet with double-sided scotch, and then both parts of the fixtures are pressed to the machine with clamps. Moreover, experienced milloverings advise to check how tightly the ring to the edge of the template is pressed.
In addition to such a device, you can process not all edge, but only angles. Hence, procedure for processing material by template - Excellent option to cut the grooves for the product.
Dust adventures
 Professional masters to ensure dusting, specially buy a technical vacuum cleaner, connecting through the adapter hose to the milling. Moreover, it does not interfere with the tool, and the markup and place of processing the product are always open for visual inspection.
Without suction installation, it is very difficult to work. But not everyone is being solved on a similar purchase, as it is too burdensome for money, besides, it is not always justified. True, there is another solution, you can get rid of dust by a household vacuum cleaner.
Between the milling machine and vacuum cleaner install hermetically closed bak. He will capture the bulk of dust. Equip it with an additional hose, and insert the tissue grid insert. And these designs can be purchased ready or do it yourself. By the way, the homemade device will help to collect a household vacuum cleaner even a large construction garbage and woody dust.
Device for milling grooves
Such a device is used to process longitudinal grooves on pillars, balusters and other bodies of rotation. The principle of his work is next. Balasine is installed in the housing and fixed. Using the lock screw and disk, the workpiece is fixed in a strictly defined position.
After which the carriage is given in motion, and executed milling groove for the length of the product. Then the part is made, its rotation to the desired angle, stopping and the creation of the next groove.
Instructions for wood threads milling
Beginner masters work with a manual instrument may seem difficult, since the management process seems to be difficult. That is why, before proceeding with milling, you need to get acquainted with the principle of his work.
Assembly of the mill
First of all, you need to check the place of fastening the cutter in the machine, as a rule, a collet cartridge is used for this. To begin, select the desired cutter corresponding to the size of the cartridge. If required, you can replace it.
But when deep processing is needed, a variant with an elongated shank is used, which is inserted into the opening of the cartridge and fastened by the key. Do it should be neatly not applying forces, otherwise we will overtake that is not the norm for proper work Mill. Although it is worth trying to reach a good stop so that the cutter does not flaw. It will only be left to clamp the spindle lock and you can go to work.
After that, the milling mill is turned on, you need to get used to the sound and feel the start. Often, precisely because of the surprise, many begin to make marriage.
Select depth
 In addition, you will need to establish a milling depth limiter. First, the machine is applied to the product from the edge, while the cutter should not touch the material. It will have to push it until it reaches the necessary depth, after which the position is fixed.
For more accurate values \u200b\u200buse a phased limiter. You can find out his step in the melt manual. In this case, the regulator turns to the desired number of degrees.
First of all, the required speed is determined. This is done on the table in the instructions, based on the diameter of the cutter and the material being processed.
If the mill has never been worked with the mill, then it is better to try out my strength on the draft version. In addition, this will help install the desired parameters. right in processing mode.
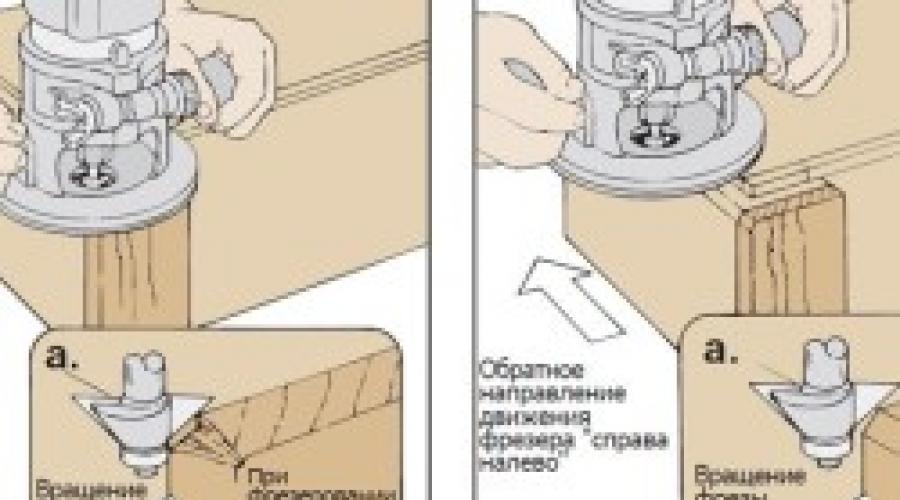
It is also advisable to compare the results after the turn of the tool clockwise and against it, and on yourself. When milling the product around the right direction is counterclockwise, and on the flat side, on the contrary, from ourselves. Then you can already start the thread of the main workpiece.
In order to ensure the normal operation of the milling machine, it is necessary not only to contact the device used correctly, but also competently apply in other words - devices for this tool to have the ability to form a preparation product in accordance with the requirements of the master (i.e., cutting edges and other material locations Where necessary, and not where "so happened"). So, it is for giving the material to be treated with a clear planned form in the farm and "adjusions" are used for a manual milling mill.
The complexity of the manufacture of homemade fixtures
Often the manufacturers themselves do their products themselves at the production stage, but the full set of all required toolsAlas, not every company will be able to please consumers. And why do it, if at any time you can make a suitable tool with your own hands in the garage conditions. It is possible to do this even without prior drawing: their design is so primitive that even a beginner master can cope with such work. To make a parallel focus or any other item, it is enough to have a drawing with yourself this device And the minimum set of tools. But if you want to make a homemade table for a manual milling, without drawing, you definitely do not do. It is necessary to calculate everything correctly, designate the size of the table, after which it is already moving to work.
How to work manual milling?
Before performing milling works on a tree, you need to make sure that:
- Is the mill in Cangge fixed.
- It is true for the workbench an additional adaptation of its power and turnover.
- Is the required milling depth configured (when working with submersible devices, this indicator is measured using a special immersion limiter).
- When working with, make sure that whether the guide ring is set or the bearing, which provides the desired path of the device (the thickness of the cutter should be no more than three millimeters).

We pay attention to the supports for parts when performing work
When considering the question "How to work manual milling"It should also be noted that the partable item should always have some kind of support. For example, before turning on the engine, the edge of the sole or the bearing is pressed to the guide part or template. Only then the master turns on the machine and starts milling.
Below we will look at which there are devices for the millingrer, and what they are especially.
Parallel emphasis
Parallel emphasis is one of the few devices that are already included with each mill. Therefore, there is simply no need for their independent development and manufacture. As for functions, it is possible to make a reliable stop for the material being processed, thereby providing a straightforward movement of the cutter relative to the base surface. The latter can act as a direct edge of the part, guide rail either table.

If there is this device for a manual milling, you can quickly process the edges and milling of various grooves, while holding the material in almost the "dead point" position.
Shine guide
This tool has similar functions with the previous one. Like parallel focus, the tire provides an exceptionally even straight movement of the device. Work with a manual wood milling with a guide tire allows to significantly reduce the time spent on the processing of a particular part. In addition, using the specified equipment, you can install the mechanism almost at any angle relative to the edge of the table.

In some cases, the design of the tools under consideration provides for the presence of special elements that facilitate the execution of certain operations (for example, it can be a function of cutting holes at the same distance opposite each other).
Copy Rings and Templates

Such devices for manual milling rings, like copying rings, are a round plate with a protruding border, which can slide along the surface along the template, thereby providing an accurate trajectory of the movement of the cutter. Often, this element is attached to the sole of the workbench. At the same time distinguish several ways to install it:
- Ring screwing into a hole with carvings.
- Installing special techniques of the device into the holes on the sole.
If there is such a device for manual milling, as a template, you can also achieve more accurate and efficient performance. Fixed meant

the element directly on the billet after which both parts of the device are pressed to the machine using clamps. Upon completion of the work, experts recommend checking the state of the ring - to see if it was reliably pressed against the edge of the template or not.
Another feature of the instrument under consideration is the possibility of processing not the entire edge, but only its corners. At the same time, some devices for a manual milling make it possible to make roundings at once of four different radii. Thus, the process of processing material by the template is an excellent way to cut the grooves for the part.
Circular
Data Homemade devices for manual milling are intended to move the entire machine by a specific circle. The design of the specified tool includes the main part (circula consisting of one rod) attached to the end to the base of the milling and the secondary - screw with the pin inserting into the hole hole. The value is installed directly on the displacement of the machine relative to the design of the device. Before starting work, it is necessary to carefully consolidate the tool to the base and verify the condition and normal functioning of the mill. It is worth noting that the cyrchul has the most efficient and easy to use, and there are not alone, but at once two rods.

Most often, this tool is made from a transparent plexiglass. A small metric scale is additionally applied on its surface. It should be noted that some models of circulas can have a circle up to 150 centimeters long. With the help of such a device, you can easily make a round tabletop for several people.
However, back to the principle of work. With the help of an angular lever with an accurate scale, copying through the workpiece. At the same time, you have the ability to center the ring directly under the cutter. The angular lever, which is complemented by a special reference board, also provides accurate milling edges.
The entire design of this device consists of a support plate, a set of probe and chip protection devices.
Fixtures for copying identical devices and parts
This feature implies a set of tools consisting of an angular lever and special copying probes that are needed for the manufacture of a party of identical parts. Most often, such equipment is applied in cases where the need for replication occurs wooden devices Small sizes. But before starting work with such a mill, it is necessary to prepare a corner lever in advance (division price is 1/10 mm).

After the scale is exhibited, you will be 100 percent that you will be confident in the correct center of the stubborn ring under the cutter, the location of which depends on the values \u200b\u200bdisplayed on the corner lever. Also, this adjustment element can be supplied with a reference plate and a special mechanism that protects the surface of the device from chips. The use of such parts will significantly accelerate and secure the processing of the edges of products.
One of these devices is parallel focus. This is a component of the basic set of any millingrer, and the tool owner does not have to make focus itself. It is necessary for direct reveament along the surface of the base, which can serve as a smooth edge of the part or workbench.
The stop allows you to process edges and grooves, fixing the detail fixing.
It consists of a useful addition to the milling tool from the following parts:
- included in the removal on the rod millingrere;
- screw fasteners, tightening them in the desired position;
- tuning screw for fine adjustment of the distance axis of the cutter from the edge;
- the reference part that holds the design on the base.
To emphasize the wood milling driver ready, it is necessary that the rods take the position in the grooves on the tool body and were tightened by a stopper. Having loosening the tightening of the stopper, you can make a small adjustment if necessary.
With a small addition, the parallel stop allows you to do, in addition to straight cuts, and more complex. Adding It is a wooden bar with one smooth side. The other side has an angular or round excavation. The bar is inserted between the reference part and the edge of the material having a curved shape.
The bar comes with a support with its smooth edge. The side where the excavation is in contact with the curved base. Manipulate a tool with such a device should be extremely closely, as the bar makes an element of instability.
Shine guide
Having a similar purpose with parallel focus, the tire is responsible for the accurate stroke of the cutter in a straight line. The time spent during the use of the tire is noticeably reduced. It also allows you to direct the tool on the table at any angle to the edge.
Note! Fix the tire on the table top or material can be clamps.
Some serial production tires have a separate component - shoe. It connects with the milling rods and, passing over the tire, moves the milling head according to a given trajectory.
Best tire is combined with a tool whose base is standing on retractable legs. This allows you to eliminate the height difference between the tire and the mill.
It happens, the functionality of the tires produced by the serial, does not suit the user. You can always create an individual version of the guides for a milling hand. The most elementary represents a long smooth bar, - simply speaking, a ruler. The master is only needed to provide her fasteners, and the tire, in fact, ready. For the manufacture of simple fixture, it is not even required.
Of course, such a homemade version will not be distinguished. A more stable in the work will be a combination of plywood base with a blackboard nailed to it. The edge of the milling base will rest in the board, and the edge of the base denotes the processing zone. This design is used in the case of the use of cutters of the same diameter.
Another option works when wood cutters can be different size. Here the board, protruding the line, is not nailed to the base, and is reinforced by the clamps. Due to this, it can adjust the distance from the working area according to the diameter of the cutter.
Templates and copy sleeve
The copier is a circle with a protrusion, moving along a template that guarantees the accuracy of processing. The ring can be screwed to the base of the milling and fixed by the mustache. The diameter of the device is selected with such a calculation so that it does not come into contact with the working part of the tool.
The ring pattern is fixed on the material being processed, firmly adjacent to the tabletop. Reliable clamp is provided with bilateral scotch and clamps. Having finished the item, you need to make sure that the sleeve when working tightly passed along the edge of the template.
Made with your own template for a milling mill will find application and for processing the corners of the part, when it is necessary for them to be round. Depending on the location and dimensions of the template, the radius size of the rounding can be any.
In the template design, the bearings or ring are often turned on. If this is a ring, then it should be selected according to the size of the cutter. When difference in diameters, it is necessary to add the stops into the design template, with which you can move the device from the edge of the part.
Among the auxiliary devices for a milling device, the most flexible patterns, except for processing the edges of the material, also allow drinking complex grooves. Special accessory layout makes it possible to effectively create recesses under the door loops. With the template, you can even carry out a mill decorative work, for example, cut wooden patterns.
Compass
This auxiliary tool is designed to create round and oval cuts. The base circulation scheme includes a rod with a pin mount at the end. By inserting the mount in the hole in the center of the circle, according to which the grooves is made, you can change the size of the circle with a simple rod displacement.
Note! Convenience and reliability of the design increases the addition of the second rod.
There are different utility elements operating on the circular principle. They provide an advantage in creating a different radius of circular grooves. The required component of such auxiliary devices is a pin with a screw for adjusting the radius length.
If a small hole is cut, the circular design must be adapted for fastening on the base of the mill. The pin when processing the part is directly under the instrument.
Flower on wood, in addition to round, is able to cut and elliptical holes. The device for this can be collected with your own hands from the following parts:
- base with fixation on the material from screws or suckers;
- movered on cross-moving guide shoes - 2 pcs.;
- rods for mounting - 2 pcs.;
- bracket for connecting a structure with a tool.
The fastening bracket thanks to the grooves intended for this allows the structure of the structure to be in the same plane as the base of the mill. Cutting round openings comes using one shoe. If the hole needs oval - both are used. Similar auxiliary design makes it possible to perform holes more precisely and faster than other tools, such as band-saw or jigsaw.
For grooves on narrow surfaces
Notches for locks or door hinges can be performed and a fluster with a flush, but the milling is suitable for this much better. You only need to equip the tool to a certain device. It consists of a flat plate, which is attached on the base of the device. The shape of the plate can be rounded or rectangular. It makes 2 pins, providing a smooth tool while during operation.
The main parameter to which must be followed in the manufacture of such an element - the axis of each pin must be on the same line as the center of the cutter. With the condition of compliance with this parameter, the groove will be carved precisely in the middle of the workpiece of irrepassive thickness. If you need to displace the groove to the right or left to the appropriate pin, a bushing of this size is worn, which is needed for the desired shift.
Using this design, the milling mill is carried out with a tight press of the pins to both sides of the workpiece.
The same effect is achieved if we use two parallel stops with a mill.
Even one stop can be enough. It is necessary to strengthen the workpiece between the two surfaces, such as boards, so that all three elements are in the same plane. The problem of insufficient width of the part in this case is eliminated.
When often it is necessary to work with narrow surfaces, a special decision will be built with a special table of two half. Clearing the material between them, the master will easily achieve the effect of one plane.
Body of rotation
In working with round-section billets, such as pillars or balusters, a design is compiled from the frame, the part is placed inside the part, carriages under the mill and rotary disk. The part is inserted into the frame, reliably fixed, after which the carriage with the tool is extended to the processing site. The position of the part in the frame can be changed by means of a swivel disk.
The same frame with a milling carriage can serve as lathe. Just need to rotate the disk with the simultaneous work of the milling ride by the guides. Make it can assistant master or drill connected to the disk.
Separase devices
Such devices ensure the creation of joints based on spikes. Requires high precision material processing similar profiles easily performed by a mill.
Using a manual milling mill, the wizard brings it to the material freely. Consequently, the material needs a reliable fastening for unmistakable adhesive.
Such conditions can create a simple device made from the following details:
- tough fixed guides, lower upper and side;
- planck with one degree of freedom that will limit the sample.
Parameters of parts depend on the specific tool under which the device will be collected. The order of assembly is next.
At the edges of the plywood base are set equal size vertical ribs with cutouts in the center. These rails are attached to rails on which the tool will move. For the safety of the motion of the milling mill on the rails, they are locked up by limiters that are simple wooden slats.
A moving part is attached to the plywood basis - the part of the edge of the part of the part. The fixator can be a barish screw or another mount to choose a wizard.
Regardless of the manufacturer, the hand mill with the addition of such a structure is able to easily ensure the cutting of a simple spike profile.
Another means for producing spikes is a conductor. Make up its base, stops and moving part in the form of a sled. Embed to its manufacture and use already experienced users for very shallow and accurate work.
Hidden opportunities
The listed case of utility facilities may seem unnecessary when the wizard performs the mill only the simplest operations. But if you look at this tool at an angle of its potential opportunities, then a number of directions arise before the user.
Those works that the master did not think that he could carry out, turn out to be quite accessible - it is only worth building several auxiliary structures. Like this is not a simple hand mill, but the coordinate machine with CNC.