Work with a wood milling engine where to buy a template for a mill. Hand mill on wood: Which it is better to choose and how to work with it. Development of hand cutter on wood in practice
Read also
Very often, homemade masters perform a number of works, for which it is impossible to do without a manual milling mill. The most common and versatile is a manual submersible milling mill.
With the help of a manual milling mill from wood, you can make the figures of the most different shapes, from straightforward to very difficult, which is more likely to be art than just work.
List of works that can be performed using the specified tool
As already mentioned, there is an opportunity to do manual milling Details of the most different forms, and all operations that are performed by the specified equipment are conventionally divided into such categories:

- Perform grooves, quarters and grooves. In order to make any grooves in the workpiece that can be open or closed, it is very difficult to do without a manual milling mill. Most often, such elements need to be manufactured when they make in-no one or detachable connections.
- Edge execution. This operation is performed in the case when items such as strokes, eaves, platbands and other handling elements are manufactured. It can be performed at the design of furniture and other crafts from the tree. In addition, such elements are carrying a functional load, they also enter both decorative elements.
- Perform complex contours and surfaces. This operation is performed during the manufacture of exclusive furniture and other artistic works of wood. In the manufacture of furniture when you need to repeat with high accuracy, several elements use templates. In this case, it turns out to be almost perfectly repeating complex forms on different blanks.
- Performing special elements. It is also possible to perform special elements such as spikes, clamps, grooves, and others, which are only a functional load. With mass production, special machines use special machines for their manufacture, but if you need to make several elements at home, you can also be performed with a manual milling.
Back to the category
What cutters are used and their purpose
This tool conducts wood processing with a cutter, which consist of their shank and working part. The diameter of the shank is usually 6, 8.12 mm, and the shape of the cutting part may be different and made of different materials. If you need to handle soft wood, then the cutters from the tool steel are used, and for more solid rocks or aluminum, the cutters must be of solid alloys.

To properly perform work, you need to accurately fix the mill. Its fixing in a vertical position provides a dive mechanism. To ensure this position use different devices. This can be a guide bearing, which is fixed on the cutter or guide sleeve, fastening on the surface of the milling and other devices can also be used.
If the guide roller is used, then during operation it moves over the surface of the part being processed and thus the constant distance between the cutter and the workpiece is provided, such cutters are called edge, they may be of the following types:
- profile, they are intended to perform figure profiles;
- cones, they are used to perform edges at an angle of 45 degrees;
- calea, are used to round the edges, their diameter can be 3-16 mm;
- disk, they are designed to perform horizontal or vertical seam;
- fold, apply to the creation of quarters;
- gallery, allow you to pick up to give the edge a decorative look.

If the cutter does not have a bearing, then it is called groove and can be used to handle parts anywhere. In order to use such a tool, an additional device is necessary.
Slip cutters:
- rectangular, they are used to perform grooves, this is the most common tool used;
- tale, they are used to create semicircular decorative grooves and grooves;
- V-shaped, allow you to make a groove with a wall that is tilted at an angle of 45 degrees, they are used to embed letters and decorations;
- The "Lastochka Tail" is usually used during furniture production, it is created using closed or open connections using a spike.
Back to the category
Configure milling
In order to work, you need to adjust the depth of the cutter. The essence of this setting is that after reaching the cutter of a certain depth, the limiter works and then it cannot move. If work should be carried out on a greater depth, then it is necessary to make it in several stages.
If you compare a milling mill with other electrical instruments, it works at much greater speed, it usually exceeds 10,000 rpm.

It is necessary in order to obtain a better surface of the cut. It is necessary to adjust the speed, since if it is very high, the partition can occur. The rotational speed of the cutter depends on its diameter and on the material with which the work is performed.
The surface quality does not affect the speed of rotation of the cutter, as the speed of its linear movement. The larger the diameter of the working tool, the higher the speed of its movement should be. The higher the hardness of the work being processed, the less the speed of rotation of the working tool should be set. If the cutter has a diameter of 40 mm, then its rotational speed should be within 10,000 rpm, and for a cutter with a diameter of 10 mm, it can be 20,000 rpm.
To perform various works, you can use the associated or opposite rotation of the working tool, the counter milling is usually used, in which the milling mill is moving in one direction. Passing milling is rarely used, only in cases where the probability of deduction occurs. This can lead to the fact that the mill will break out of the hands, so it is necessary to work with even greater attentiveness.
How to work on the lathe.
Turning wood or turning work is one of the varieties of mechanical wood processing. With the help of a lathe, wooden bodies of rotation are made. Folk masters have long been manufactured with accurate dishes, spindles - spots, spindles, details of furniture, toys, etc. The accurate products and parts are used in the visual and decorative art. Many lathes have predecessors. So, accurate mises, british and cups were preceded by a rubber bred dishes; Turning wooden toy, popular and in our time, is the immediate successor of carved toys, such as the Northern Panks.
- Home\u003e
Turning on wood
(section in the filling stage)
Full range of car lathe services
Wooden windows
Tubes on the windows
Fireplaces carved
Bed elements

Mirrors and Rama

Carved icons


Panel from wood

Turning wood work on your sketches.
Turning products are made simply and quickly. For them, the completeness of the forms, beauty and the perfect smoothness of the surface are characteristic. Large fantasy expanse give sculptural techniques to create a turning souvenir when the artist uses accurate and carved parts. After all, the form of any subject can be decomposed on the geometric volumetric body: cube, parallelepiped, pyramid, ball, cone, torus, four of which are accurate. To enhance the expressiveness of the accurate products from the tree in the composition, the bark, cracks and other formations on the tree are included. Worn wooden lathes and painting. Who does not know our famous matryoshek or expressive khokhloma painting!? Wooden accurate products use wide fame.
The acculation of artistic products is very close to turning works for technical purposes. Applicable equipment, tools and techniques are no different.
To study a turning case, a spacious room is needed, in which there would be a lathe lathe, small wood reserves and others necessary materials. So that the lighting was smooth and scattered, the latter is best set closer to the eastern or northern window and at the same time protect against heat source.
Turning machines for the manufacture of wood products apply various both in design and by the degree of mechanization. In the art industry, the TP-40 lathe is widely used. It is universal, it is possible to produce various turning works with outdoor with cutting and with internal pumping. However, it is possible to pull the wooden lathes on the easiest, hand-made lathe, applying homemade tools and devices.
The view is that beautiful refined things make only jewelers and only from precious metals deeply mistaken. A blacksmith can post not only horseshoe on happiness or heavy sledgehammer, but also an elegant rose. The milling machine on a piece of iron cuts a real volumetric picture. A simple wood turning turns out patterned chess pieces.
The presented six-minute video shows how it is possible to get a comfortable and completely unique winechable on a long curly leg with the help of a milling mill of a tree and two thin chisers. Put such a table, and even better not one, but a whole set - it means to delight your guests.
But the main thing is not even in this. The author of the video proves that applying some uncomplicated skills and a creative approach can be addressed not only to dishes or chess. Door handles, clothes hangers, yes just some souvenir crafts. The super power and the trimmed lathe is not needed for this. An endless set of incisors too. Fantasy, accuracy and hard work will help to decorate an apartment, a dining table and gifts to colleagues to friends and relatives to break the head will not have to break. Well, who knows, maybe your work will find his buyer. Watch the video "Turning on wood" in good quality 720 HD. All materials are contained on the YouTube.com service and are available on our website without registration and SMS.
The mill is a tool for treating a lumber making many rotations at high speed. It happens both professional equipment and self-processing, requiring certain skills and knowledge. With training videos on the site will help qualitatively carry out operations for treating a tree with a manual electric power.
Work manual wood milling helps carry out the following carpentry operations:
- Processing of flat and shaped surfaces, profiling edge of platbands, plinths, eaves, headquarters.
- Formation of technological and curly recesses (grooves, ridges, etc.).
- Production of through and blind holes.
- Cutting complex parts made of wood, copy them.
- Application of inscriptions, drawings, patterns on the surface (engraving).
- Cutting locks and loop on the door.
- Production of a thickening connection. This is a complex process that requires special skills, as a result of which the high strength assembly of wooden products is obtained.
Depending on the type of work performed by a manual wood milling, the video lessons of which can be viewed at the end of the article, you will need adaptations:
- Cutter
- Electropolitanzik
- Electric drill and drill
- Templates
- File
- Protective overalls and respirator.
A beginner master with the help of such a tool to return the old furniture for life, carry out small carpentry and decorative work with wood house.
Choosing an electric power
In order to mill at home, it is recommended to choose a universal tool that is an electrofer with a replaceable base - submersible and edge, thanks to which it performs any type of wood work, depending on the chosen type of cutter. It is better if it will have speed adjustment, working with a cutter with a diameter of at least 8 mm, the optimal power should be 800-1300 W. When choosing a tool, pay attention to the real depth of dive cutter, from which the maximum depth of the resulting groove will depend.
The best option for the clip of the cutter is the conical collet, and the locking button is fixed. The smooth operation of the rod mechanism, the longer the tool.
An important point of the operation of the electric power is the correct selection of the cutter, which consists of a cylindrical shank of various diameters (6.8 or 12 mm) and parts with a cutting edge.
The designs are separated by cutters into the following types:
- Monolithic
- Collected
- With replaceable blades.
Depending on the type of processing performed by the cutter, it also happens a few varieties:
- The dummy mill is used to form grooves.
- Profile - to give the edge of the decorative profile.
- The edge and folding milling cutter are used to process the edges of the product.
- Galling - for cutting "U"-like removal on the product.
- The conical milling cutter sticks the edge of the product at an angle of 45 degrees.
- Calevous - forms a rounded edge.
Work manual milling: Instructions for beginners
Working with a manual milling, whose video lessons will help the novice master may seem difficult only at the beginning of the process. With the acquisition of the first skills to process the wood, you can get bolder.
- Working with a manual milling starts from the instrument assembly. Suitable on the diameter of the collet cartridge, the cutter is inserted into it. If necessary, the cartridge itself is replaced by another in diameter. Then the shank is tightened in the cartridge using a special key with a clamping force sufficient to make the cutter not hanging in it. After that, the spindle mechanism is clamped, the tool is ready for operation.
- Next sets the necessary depth of milling. To do this, you need to fix the position of the cutter, pressing on it. The exact depth is installed using a limiter regulator having several degrees.
- The speed of the flares is set based on the table data from the instructions and parameters of the material, as well as the size of the cutter itself. The work by a manual milling tree should first be made on the draft version to test the turn of the tool, the depth of milling and speed. The correct movement of milling is the movement of the tool from itself on a flat basis, and counterclockwise with a circular processing of the product. A manual milling is described in more detail in the learning video.
Manual Milling: Work Methods
Depending on the type of processing performed, the choice of techniques for manual milling is depends. The following is a manual fresher (training video), methods and techniques.
Work techniques with manual milling: groove formation
When forming a groove from the edge itself, the tool should be installed so that the cutter hang over the edge of the product. Next, it descends to the required depth and fixed, after which the tool starts to work. After processing the edge to the end, you need to weaken the lock, lift the cutter, the tool motor can be drown. The formation of a deaf groove is made in the same way, only starts from the edge of the product.
Deep groove is formed by adjusting the new cutter depth. With each approach of the processed area, a depth of no more than 5 mm, when processing the last layer - is not deeper than 1.5 mm.
Additional ways to form grooves and working lessons with manual milling (video in Russian) are presented below.
Processing end surface
The work of the tree milling mill (video below) is often accompanied by the processing of the end surface at which they need a pure cant. For this, a gentle cut is pre-performed, while the electrophusper moves in the direction of rotation of the knife, and then against its rotation. After that, the end will acquire clear outlines.
Processing using templates
To form curvilinear edges, templates with a thrust ring are used, which is a plastic plate moving along the template for the correct trajectory of the milling mill. The stubborn ring is attached to the sole of the millingrer with the help of special fasteners. Using templates, you can copy wooden parts in the desired quantity.
Working manual milling: Decorative processing video
For artistic milling, in addition to the cutter, you will need a jigsaw, vice, chisels, a canvas of a tree with a pattern. It is fixed on a well-stable surface, and the figure is carried out with an electrophusmer, equipped with a special cutting nozzle, gradually removing the wood layer until the desired volume of the ornament is reached.
Facilities for manual milling and the machine itself turn the treatment of wood at home in a completely professional process. To achieve maximum efficiency, you need something to know about this tool! Tell together.
1 manual electric milling mill - when you need such a tool?
Having at its disposal an electric manual milling mill, you can easily apply the grooves to wooden parts, create holes of various kinds, process edges and paint wood shields. With this tool it is easy to install accessories on the furniture and even engage in artistic processing of material.
In production, as a rule, all these tasks are engaged in a bulky machine, which is clearly not suitable for household use, so for a long time the operations listed were only a dream of a home master, although something and something managed to be carried out manually using other tools (, chisels, etc. ) The feature of the manual option is that such a device has small dimensions and relatively low weight, which means that you will not need a spacious shop to implement your plans.

In addition, often the work spectrum covers not only the processing of wooden parts, some mechanisms under the power of plastic and even metal. Of course, a manual milling mill will be more expensive to you, because all the devices should be made from durable alloys, and the motor is to have an increased power. After the advent of the tool itself, he immediately began to expand the functionality through additional devices and nozzles. Now some manual milling machines are able to more than industrial samples.
2 devices for manual milling - for what will they use?
Among additional devices The milling mill is distinguished both commercial and homemade options. Sometimes your ideas are so intricate that the manufacturers have not provided a suitable auxiliary design, then you will have to catch it up and make it yourself. Among the popular fixtures are isolated parallel focus, which keeps the cutter strictly at a certain distance from the surface, and the guide bus that can perform the same work, but also at an angle. You can also sometimes need copy rings, with the help of which you without errors will spend the cutter on the desired curvilinear trajectory, and templates also serve.
![]()
A special device exists for creating elliptic and, as a special case, rounded grooves. They call them circulas, and they also share their different types. It is not difficult to guess that this mechanism will help cut the correct circle. Those who at least once made the groove on the door of the door for the castle, know that this process is not fast. This is true when the chisel is used and, but the milling cutter is able to do this in a few minutes, if there is a special device that is quickly attached to the sole of the machine. For such narrow surfaces, most often, make a small auxiliary detail manually.

Alone will also have to make a device for creating grooves and grooves in the bodies of rotation, for example, balasins or pillars, then you will not need a lathe that usually performs such a task.
3 Selecting a manual milling meter - how not to get lost in the characteristics?
When buying a tool for your own use, you should keep in mind some features of choice. First of all, consider the technical characteristics. Power is considered the most important indicator, and the more, the better. But with him a pair you should watch the cutter, if these parameters do not correlate, the tool will not meet your expectations. High power with small turns does not make sense and vice versa. It is important to pay attention to the accuracy of the device, the error of about 0.5 mm is quite enough for good quality of work in living conditions.

Answer the question how to choose a handmade freer quality at low cost, quite difficult. In no category of goods it is impossible to implement, it is better to search for the "Golden Mid" version, then the price is not very "bites", and the material cutters and fixtures will be good. Mandatory functions for high-quality and convenient operation are a smooth start and revolver regulator. It will not hurt to assess the mechanism of fastening the cutter and the locking device, reliability is important here, first of all, for your safety. And the choice of a hand mill with a stubborn bar, an elevator regulator and a spacing for a vacuum cleaner will be.

It remains only to talk about what kind of freesometers are there, not to overpay for extra opportunities without receiving the desired. If you have already looked at the windows with this tool, they found three main types - upper, for edges and lamella. The first option is not the most miniature, but it is easier to master newcomers, since the auxiliary devices help control the position of the cutter relative to the part, removing part of the load from the wizard. The upper mill can be immersible or fixed. The edge machine speaks for itself, it is preferably treated with the edges or cut chamfer. The lamella tool is suitable for creating any kind of grooves.
4 Wood carving Manual milling - Instructions for beginners
The work by a manual wood milling film first seems difficult, because it is difficult to control the entire design process, but several of our recommendations will allow you to get up to work.

Tree carving manual milling - step-by-step scheme
Step 1: Collect the tool
Survey the place of fastening the cutter in your machine, most often, for this serves as a collet cartridge, therefore we will discuss this option. First, choose the necessary cutter, it must match the cartridge in diameter. If deep processing is required, the option with an elongated shank is suitable. It is also possible to replace the cartridge itself (in manual tools are often offered options with a diameter of 6 mm and 8 mm), if necessary.
The shank is inserted into the hole of the cartridge and is delayed with a special key. There is no need for a lot of power, it is possible to accidentally pass, which is not the norm to operate the tool. However, do not be afraid to reach a good stop so that the cutter does not hang out. Then heal the spindle lock, and the mechanism is ready for operation. Run the tool to feel the start and get used to the sound, because sometimes the surprise is the cause of marriage from beginners.
Step 2: Depth Adjustment
Tree carving manual milling must begin with setting the milling depth limiter. To do this, apply the machine to the part with the edge, so that the cutter is so far not in contact with the material. Put on it so that it reaches the depth you are planning to process, and fix this position. A more accurate value is installed using a phased limiter, its step is specified in the instrument manual, turn the regulator to the desired number of degrees.
Step 3: Milling
Determine the required speed on the table in the instructions, based on the material being processed and the size of the cutter. It is advisable to start work on the draft version to try out the work style of your mechanism, if you turn it on for the first time. If your tactic is familiar to you, then the draft version will help you to set the necessary parameters already directly in the mode of operation, it is now necessary to bring to the exact value of the milling depth.
Also, if you have not tried to work on your instrument, compare the results after the turn of the milling from yourself and on yourself, clockwise and against. Right when processing the details around is considered a direction counterclockwise, and on the flat side - from itself. Next, you can move to the milling of the main billet.

Processing of sawn timber, pockets, manufacturing of technological holes and recesses, wood carving - all this can be a device as a mill. Moreover, it can not only professional equipment, but also relatively inexpensive manual copies. But the work by a manual milling tree requires knowledge of some techniques and rules. About all this - in the article.
What is a mill and what is it needed for what
The mill is a device for processing a tree or metal. They process flat and shaped surfaces, also forms technological recesses - grooves, comb, removing under the installation of loops, etc. By the installation method there are stationary machines (there is different types To perform different operations), and there are manual milling mills. Manual electrifresters are a universal tool that allows any operations. To change the operation, only you only need to change the nozzle - mill and / or its location on the details.
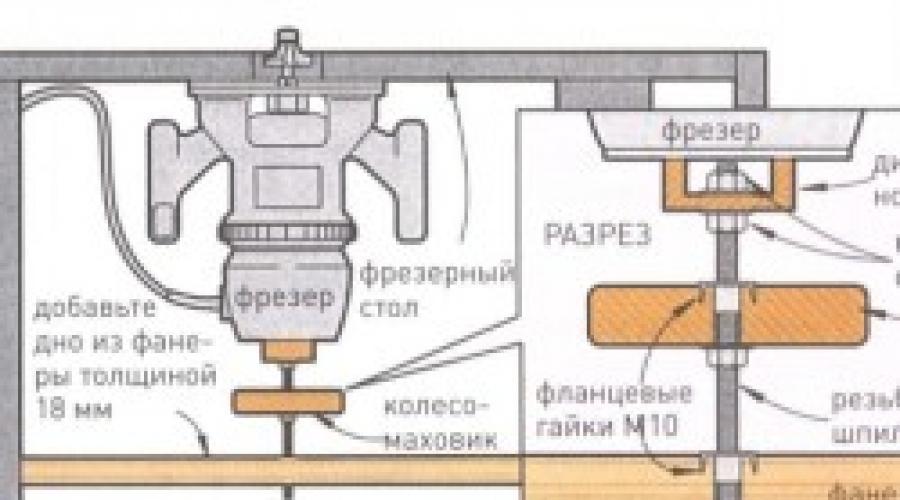
Machines are used mainly at mass production. The milling cutter is installed motionless, and the workpiece is moving - according to a certain trajectory. When working with a manual milling, the situation is the opposite - fix the workpiece, move the milling mill. When processing large volumes of the same details, it is more convenient to fix the hand mill on the horizontal surface by making something similar to the milling machine.
Homemade milling machine - horizontal plane with a hole in the midst, to which the hand mill is mounted below
There are many different types of milling machines, but for a home master or for semi-professional use more universal fit. They are installed different cutters and special devices, which allows you to perform any operations. Just for their execution requires more time and skill than on a specialized machine.
What can be done with the help of a hand mill:

Such operations are used in carpentry business, in the production and assembly of furniture. Even to cut the lock or loops on the door - it can also handmade milling mill. And it will make it much faster and elegant than similar operations, but performed using a hand tool.
Preparation for work and care
To deal with the principles of working with a manual milling, it is desirable to have at least a general idea of \u200b\u200bits structure and the purpose of the part.
Building and appointment of main nodes
It consists of a manual electrophower from the housing in which the motor is hidden. From the body there is a holder where the collet is inserted. Canggi is small adapters that allow the use of cutters with shanks of different diameters. The milling cutter is inserted into the collet and delayed with the clamping bolt (on some models is fixed with the button).

Another important detail of the manual milling is a platform that connects to the housing using two rods. The platform is usually made of metal. On the bottom side of the platform there is a sliding stove. It is made of a smooth material that ensures the smoothness of the tool when it is moved across the part.
Setting the parameters of the freesomeer occurs with:
- Pens and shakes setting depth of milling. Setting step - 1/10 mm.
- Adjusting the number of revolutions. Changes the speed of rotation of the cutter. To begin with, it is worth trying to work on small or medium turnover - it's easier at first to lead the instrument.
It is also necessary on the case there is an on / off button, there may be another blocking button. Here, briefly all the nodes. In addition, there is still quite convenient parallel emphasis. It may be simple or with the possibility of adjustment - you can slide the cutting portion to the right or left.
Care
From the factory, the equipment goes in the lubricant, so in principle, no additional operations not required. But it is necessary to support equipment in cleanliness - it is necessary to consider dust more often, change with lubrication if necessary. Lubrication is needed for moving parts - guides. Liquid aerosol lubricants can be used (preferable), but conventional Litol-type consistency types can be used. But, when using thick lubricants, you will have to periodically delete them, as chips stick and dust, it becomes difficult to work. With the use of light aerosol compositions, there is practically no nagging.
In order for the sole easily slid, you can lubricate it with silicone lubrication. This is especially useful when working with templates. Then the tool literally slides, goes smoothly and without jerks.
Rotational speed
Work manual wood milling, composite, plywood, etc. Begins with the placement of basic parameters. First set the speed of rotation. It is selected depending on the selected cutter and stiffness of the material and the characteristics of the millingrer, so that accurate recommendations must be signed in the instruction manual.

Filling cutter
Next is installed milling cutter. On most corporate cutters, there are tags for which you can navigate. If they are not, then the minimum must be clamped at least 3/4 of the shank length (cylindrical part). Insert the cutter into the required depth (if necessary, after installing the collet - the adapter cartridge for different diameters of the cutter), fasten the shaft, tighten the wheel key until it stops (but do not drag).

If the model is simple, two keys are needed. They do not provide a shaft blocking mechanism, the second key will need to hold it. In the middle class devices there is a lock button. Pulling it, tighten the carkin key. In expensive models besides blocking, there is a ratchet in which you can navigate.
Setting the depth of milling
Each model of a manual freresser has a certain departure - this is the maximum depth to which this unit is able to process the material. The depth of milling is not always required to be maximum, then its adjustment is required. Even if it is necessary to mill to a greater depth, so as not to load too much and the unit, you can smash it on several levels. For this there is a revolving emphasis. This is a small disk under the barbell with a certain number of stops of different heights - legs. The number of legs - from three to seven, and more - does not mean better. It is much more convenient if there is the possibility of adjusting the height of each leg. This shows the ability of the equipment. To secure the revolving stop in the desired position there is a retainer, which is usually made in the form of a checkbox.
The rewarding depth of milling on a manual milling happens in several stages:
- The tool put on a flat surface, free the clamps, press the cutter to overflowing into the surface.
- Release the revolving focus, reloading its lock.

- Depending on which milling depth is needed, the leg of the revolving stop is chosen. The disc with the legs rotate to the desired position.
- The screw is not fixed, but hold the bar with a finger, move the movable pointer so that it coincides with zero (in the photo above).
- The bar is raised to the milling depth, after which the record of the revolving stop is lowered (in the photo below).

Now, when installing on the workpiece and jamming on the top, the cutter will enter the detail to the exhibited distance.

On good freshers there is a wheel of accurate adjustment of the depth of milling. It allows you not to knock down the settings (you do not need to repeat the entire operation) Correct the depth, albeit in small limits (in the photo above it is a green wheel).
Cutters for manual milling
Cutters are a cutting tool that processes and forms the surface. They consist of a cylindrical part, which is clamped by the colors in the hardener of the unit, and the cutting part. The cylindrical part may be different diameter. Choose such a collet under which there is in your device. The shape and location of the knife of the cutting part defines the type that the wood receives after processing. In some mills (for edges) there is a persisting roller. It sets the distance from the cutting surface to the material being processed.

The work of the tree with a manual milling tree involves the presence of a certain amount of cutters. This is a small part of what exists
Make cutters from different metals and alloys. For handling soft wood - pine, spruce, etc. - Use ordinary nozzles (HSS), for hard rocks - oak, beech and others - from hard alloys (HM).
Each milling cutter has a certain resource and the maximum speed on which normal operation is provided with minimal beating. Excess recommended speed is not worth it - this can cause a mill breakdown. It also makes no sense to sharpen the mill, if it fastened. Do it on special equipment (worth about $ 1000), where you can set the desired sharpening angle. Manually nothing will succeed. So that focused easier (and cheaper) replace, as they are relatively few.
Popular species
There are some types of pumps for the millingrer, which are used most often.

There are malls simple, formed from a single piece of metal, there are typical. Sets have a shank - the basis, some set of different cutting planes, a set of washers of different thickness. From these parts you can independently form the required relief.

A set cutter - a set of several cutting surfaces and washers, from which you can make a mill of the required form
These are the most popular types of cutters, but in fact there are a lot of them. In addition to different diameters of shanks, there are various diameters of cutting surfaces, their height, the arrangement of knives relative to each other, etc. In general, for milling with their own hands, it is usually required about the five most chassis cutters. They are usually present constantly, and the rest are purchased for specific types of work.
Principles of working with manual milling
The eletcroter is a rather dangerous thing - rotating at high speed sharp cutting parts can cause serious injuries, and the chips flying from under the instrument too. And at least on most models there is a protective flap, reflecting the main stream of chips, the safety glasses will not interfere. So the work with a manual milling wood requires attention and concentration.

One of the models - with a connected vacuum cleaner to remove chip
General requirements
The work with a manual milling tree will be easier and more enjoyable, the product will turn out normal, if you perform some conditions:

Not such complex requirements, but their implementation is a guarantee of good work and security. Well, the main requirement - the milling mill must be carried out smoothly, without jerks, jerks. If a strong beating is felt - change the frequency of rotation. Most often it must be reduced, but in general it is necessary to focus on the manufacturer's recommendation (there is on the package).
Edge Processing - Working with Template
Processing the edge of the ordinary board is easier and faster on the flight, but if it is not, the manual milling mill will also cope, that's just takes it more time. There are two ways: without a template and with a template. If this is the first experience with a milling mill - it is better to use a template. When processing the edges of the boards, straight edge cutters are needed, and most likely two - with the bearing at the beginning and at the end of the cutting part (in the photo).

For the edge processing - make a smooth surface
As a template, you can use the already processed board or, for example, the construction rule. The length of the template must be slightly larger than the length of the workpiece - on 5-6 radius cutters on each side. This will give the opportunity to avoid the "Viska" cutters into the material at the beginning and at the end. One important moment: The horizontal plane (perpendicular to the treated) must be smooth. In any case, its curvature should not be greater than the gap between the bearing and the cutting part, otherwise the cutter will touch the pattern, and this is very bad - it becomes non-ideal and inflicted irregularities will appear on other copies.
If the width of the part no longer cutting edges
The cutting part of the milling mills there are different lengths, but the more cutting part, the more difficult it is to work - more efforts have to be applied to hold the aggregate. Therefore, it is easier to start with a middle cutter. The processing order of the edge with a mill (with a template) is:
- The template is installed so that it sets the required smooth surface - retreating the desired distance from the edge.
- The workpiece with the template is securely attached to the table or any other horizontal surface.
- Install the mill with a roller in the middle part. It is exhibited so that the roller rolling on the pattern, and the cutting part is the detail. For this, the milling is installed on the fixed blank with the template, they put the mill disconnected from the network, adjust the position of the nozzle, clamp it.
- Install the mill into the working position - they lower the case, clamp.
- Include a manual milling machine, lead them according to the template. The speed of movement is determined by the depth of processing. You all feel yourself.
- And how to drive a mill? Pull or push? It depends on which side you are standing. If the workpiece on the left - pushing, if on the right - pull. You can also navigate on the departure of chips - it must fly forward.
On this, actually everything. After the passage finished, evaluate the result, remove the clamps.
This, by the way, is still a way to take a quarter along the edge of the workpiece or in some part of it. To remove a quarter, exhibit the cutting part so that the processing is a given depth.

Changes the cutter on the curly (gallop) and shifting the template or using the stopping stop, you can apply a longitudinal drawing on the workpiece (in the photo below).

In general, this milling technique is quite comfortable. For the first steps in woodworking is the best way "Find your hand", then you can even raise the edges even without guides.

Width more cutting length
What if the thickness of the workpiece is not longer than the cutting part of the cutter? In this case, the work of a manual milling tree continues:

Now the edge is completely processed on the one hand. If necessary - repeat with the second party. In general, in order to master the work with a manual milling tree, a few "draft" blanks will be required. Choose from those that it is not sorry to throw away - at the first pores of the shoals will be much, then gradually learn.
Getting a figured and curvilinear edge
If you need not even, but a rounded or any other shape of the edge, you have to look at the state of the existing edge. If the billet is more or less smooth, take the necessary edge milling, install it and process the surface, as described above. If the surface is too curve, it is first adjusted to a normal state, and then milling.

It is necessary, since the roller of the bearing is rolled over the surface and if there are flaws, they will be copied. Therefore, act consistently - first drop, then - give the curvature.
If the nudna is generally a curvilinear surface - the pattern is cut out. The drawing is applied on the phaneer with a thickness of 8-12 mm, first it can be filled with an electrolybiz, because the edge to bring to the perfect state by the milling line.

In this case, too, we will have to work with a mill, but so far without a template. When the surface is perfect, the template is fixed to the workpiece and further described above the work with a manual milling tree. Only one point: if you need to shoot in some places you will need a large amount of material, it is better to do the jigsaw, for example. Otherwise, the milling cutter fastens.
Video lessons for working with manual milling
When installing doors, it is necessary to cut the loops, how to do with the help of a mill - in the next video (there is also about how to make a groove, for example, under the installation of a good).
How to make a homemade milling machine from laminate samples (can be plywood) and how to make a thickening connection for boxes (tables, for example) - in the next video
The work by a manual wood milling line is well shown in the following video, but it is in English. Even if you do not know English, do not regret the time, look. Many operations will become clearer.
Millies are multilateral use tools with high performance. They are used in sampling grooves, creating curly cuts and various forms of profile edges. Diversity, capabilities and quality of operations performed depend on how the cutter on a tree works, what kind and profile of cutting teeth is used.
Types and types of wood cutters
To ensure high-quality execution of works using a manual milling, it is necessary, first of all, a snap-in with a rigid fastening of the processed part in the device for its positioning, as well as a suitable type of cutter. The simplest device asking for positioning is the cutter, equipped with a support bearing, located under or over the cutting profile. Configuring the correct vertical position of the milling tool, you can cut the grooves to connect the parts or receive a shaped edge using such a snap.
The operation of the usual terminal type of cutter that does not have a support bearing requires the use of either a parallel stop, or a copier ring. These devices initially completed any manual milling mill.
To understand how the cutter works on a tree, led by the hard, you just need to try to perform the exact direct groove. Immediately becomes obvious that without hard positioning with the use of a template or stop to do this will be almost impossible. Depending on the cutting profile, the cutters moving at the extra, have the following varieties and are used for various operations:
- groove - to obtain a rectangular recess in the workpiece;
- conical - to perform various inner corners recess;
- gallean - for the formation of semicircular grooves;
- swallow tail - for cutting hidden thickening connections;
- V-shaped - to select grooves with an angle of 45 degrees;
- calavas - for rounding edges and create profile bends in a quarter of a circle with different radius;
- profile - or decorative, allowing the execution of various profiles;
- disk - allowing the grooves in the billets of various widths and used for lock connections.

It is important for the production of certain works. right view Cutters that can be found in finished sets specifically designed to process materials from wood. In them, usually, both types are both - edge, with a support bearing, and end.
Obtaining specific decorative profiles or grooves may require presence of non-standard cutters that have to buy additionally. In addition, it should be borne in mind that cutters with elongated shanks should be needed to perform deep sinks.
Milling groove and its optimal depth
To avoid squeaks of material when the milling is operated and ensure a clean slice, during the processing of the part it is required to monitor the sharp cutting edges of the tool. The milling cutter works correctly, you can judge the products on the wooden surface of the product. As a result of friction accompanying the work process, the cutters are heated to high temperatures, which significantly affects the hardness of steel cutting edges and leads to the blurring of teeth.
In order to avoid this, the sample of a deep groove should be carried out for several passes, with a reconfiguration of the depth of the cutters immersed in the material after each cycle, and in one pass, it is recommended to remove a layer to 3 mm. For manual milling machine having a greater power, the reservoir is allowed to choose 4-6 mm. But at the same time it is necessary to ensure that the milling driver goes exactly on the guide template or by parallel.

To prevent the manifestation of negative moments, you need to consider several factors:
- density of wood treated;
- the diameter and the number of turns of the cutter;
- flower feeder.
All these factors are interconnected. The number of revolutions of the cutter is selected depending on the wood breed, as well as the diameter of the instrument used. For this, there are special calculated tables that determine the optimal mode of operation of the milling machine.
The larger the diameter of the cutter, the less the turnover of the spindle of the flares should be, and the faster the resulting linear feed rate over the surface of the material.
The feed rate with which the mill moves is to a greater extent depends on the skill, but here an important point is to prevent overheating of the cutter as a result of too slow promotion through the material. An important nuance in the work is the choice of the right direction of movement of the cutter on the processed part. The most effective removal of wood occurs in the case when the tool is carried out in the direction of the incision of the cutting parts of the rotating cutter. Such a movement does not lead to tightening chips and is considered safe.
Safety when working with a cutter

Manual milling machines have a high speed of spindle rotation, so when working with them requires certain accuracy and attentiveness. Avoiding injuries will help adherence to elementary security rules, which must be adhered to when working with any power tool.
- Installation or change of cutters in the cartridge should be made with the full dispensing of equipment from the network to avoid spontaneous inclusion.
- The shank cutter must be completely clamped in the chuck of the cartridge. Otherwise, its deduction will not be reliable enough and can lead to injury.
- The presence on the shank cutters of oil pollution, resins or rusty spots, which provoke its slip from the chuck of the cartridge is not allowed.
- Before installing the cutter, it is necessary to make sure how the collet mechanism of the cartridge clamp is working.
- The item must be rigidly fixed, and from the treated surface it is necessary to remove all foreign objects.
- Keep the tool is needed firmly and confidently, since when the cutter is first touched the cutter, push and return to which you need to be prepared.
- Not allowed in clothing in clothing, which can lead to dangerous injury.
When working, it is not necessary to neglect the means of protection - glasses for the eyes, respirator and gloves, as very small wood dust is formed in the process.
Expand the functionality of the manual power tool, make it use more comfortable, comfortable and safely allowed tools for manual milling. Serial models of such devices are quite expensive, but you can save on their acquisition and make fixtures for equipping a tree milling with your own hands.
Various kinds of fixtures can make a truly universal tool from a manual milling
The main task is to solve the fixtures for the milling maker is that the tool is located in relation to the surface being processed in the required spatial position. Some of the most commonly used machines for milling machines are included in the standard package of such equipment. The same models that have a highly specialized appointment are purchased separately or manufactured by their own hands. In this case, many fixtures for a milling mill in a tree such a design that they do not represent any particular problems. For homemade devices for manual milling, it is not even necessary for drawings - there will be quite enough of their drawings.
Among the fixtures for a milling mill in a tree that can be made and do it yourself, there are a number of popular models. Consider them in more detail.
Parallel focus for performing direct and curly cuts
Parallel focus for or other base surface, allowing to perform straightforward cuts in the tree relative to surface data, is one of the most popular fixtures and is included in the standard set of many models. Using such a fixture, the base element for which, besides the desktop, the side side of the processed part or guide rail can perform the processing of the grooves on the workpiece, and the milling of its edge part is carried out.

The design of the parallel stop for the milling is includes the following compound elements:
- rods that are inserted into special holes in the milling case;
- a locking screw by which the rods are fixed in the desired position;
- the screw of the accurate setting that is needed to more accurately adjust the distance on which the axis of the cutter will be from the base surface;
- supported overlays that the device rests on the base surface (in separate models of parallel stops, it is possible to change the distance between the supporting linings).
To prepare the focus for the milling of work, you need to make the following actions:
- insert the stopping rods into the holes at the base of the milling and consolidate them in the required position of the locking screw;
- having loosening the locking screw and using the exact adjustment screw, adjust the distance between the axis of the cutter and the supporting surface of the device.


Supplementing the parallel focus of one simple detail, you can use such a device to create in the tree not only straight, but also curvilinear cuts. Such a detail is a wooden bar, one side of which is straight, and the second is made of a round or angular form. It is placed between the supporting linings of the stop and the base surface of the treated billet from the tree, which has a curvilinear form.
At the same time, naturally, its straight side of the bar must be restored to the supporting pads of the adaptations, and the side with the excavator - to the curvilinear base surface. Working with parallel focus, additionally equipped with such a bar, it should be extremely accurate, since the position of the flares itself in this case will be quite unstable.

Shine guide
The tire guide, as well as parallel emphasis, provides a straightforward movement of the milling relative to the base surface during the processing of the tree. Meanwhile, in contrast to the parallel stop, such a guide for a milling can be located at any angle to the edge of the product being processed. Thus, the guide tire can ensure the possibility of accurate movement movement during the treatment of wood in almost any direction in the horizontal plane. The guide tire equipped with additional structural elements is also useful when milling holes located in a tree with a certain step.
The fixation of the guide bus on the desktop or processed billet is provided by special clamps. If there are no such clamps in the basic configuration of the device, ordinary clamps are suitable for these purposes. Separate models of guide tires can be equipped with a special adapter, which is often called a shoe. The adapter connected to the base of the milling vapor by two rods, during the processing process slides along the bus profile and thus ensures the movement of the working head of the freumers in the specified direction.

Such a milling device, as a guide bus, is best used complete with roller mills, the supporting platform of which is equipped with height-adjustable legs. This is explained by the following. In cases where the support surfaces of the mill and tires are in different horizontal planes, which can occur when the device can be too close to the treated billet from the tree, adjustable tool legs make it possible to eliminate such a discrepancy.
Guide devices for the equipment of the mill, which, despite the simplicity of its design, will differ in high efficiency of use, without particular difficulties, you can make it yourself. The simplest of such devices can be made of a long wooden bar, which is fixed on the product being processed using clamps. So that such a fitting has become even more convenient, one can add it lateral stops. If you put and fix the bar simultaneously on two (and even more) billets made of wood, then you can perform the milling of the groove on their surface in one pass.

The main disadvantage that differs the device of the above-described structure is that it is not easy to accurately fix the bar on the future of the future cut. Similar disadvantage Lained guide tools of the two designs proposed below.
The first of these devices is a device made from interconnected boards and plywood sheets. To ensure the alignment of this device with respect to the edge of the groove performed, the following conditions must be observed: the distance from the edge of the stop to the edge of the plywood (bases) must accurately correspond to the distance on which the tool used is located from the extreme point of the Melver base point. The adaptation of the proposed design is used if the tree is processed by the cutters of one diameter.

For milling operations performed by tools of different diameters, it is advisable to apply the devices of another design. The peculiarity of the latter is that the milling is in contact with the focus of all soles, and not just its middle part. In the design of this stop there is a folding board on the hinges, which provides the correct spatial position of the device with respect to the surface of the treated product from the tree. The purpose of this board is to ensure fixation of the stop in the desired position. After such a procedure is completed, the board is folded and thus frees the place for the working head of the milling wheel.

Machining such a device for a milling hander with your own hands, it should be borne in mind that the distance from the center of the tool used to the extreme point of the milling point must correspond to the magnitude of the width of the folding board and the gap between the board and the focus, if it is provided in the design of the device. In the event that, in the manufacture of this device, you only focused on the edge edges and the edge of the groove, which must be formed with it, to use such a device can be used only with the cutters of one diameter.
Often milling the grooves in the billets from the tree accounts for across the fibers of the material, which leads to the formation of scaling. Reduce the magnitude of the jackets allow tools that, pressing the fibers in the place where the cutter comes out, do not give them to stupidly from the surface of the treated tree. The design of one of these fixtures consists of two boards, which are connected to each other with screws at an angle of 90 °. The width of the groove, made in such an adaptation, must coincide with the width of the excavation created into the product from the tree, for which the cutters of different diameters are used from different sides of the stop.
Another milling device, the design of which consists of two L-shaped elements that are fixed on the workpiece from wood with clamps are required for milling open grooves and provides a minimum number of jackets during the processing process.
Copy Rings and Templates
The copying sleeve for the milling is a device with a protruding side, which slides along the template and thus sets the movement of the cutter in the desired direction. On the sole of the milling mill, such a ring can be fixed in various ways: to be screwed down with screws, turn into a threaded hole, inserted by special mustache into the holes in the tool sole.

The diameters of the copier ring and the tool used must have close values, but it is important that the ring does not concern the cutting part of the cutter. If the ring diameter exceeds the transverse size of the copier cutter, then such a template for compensating the difference between its size and the diameter of the tool should not exceed the size of the product being processed.
The milling pattern, made in the form of a ring, can be fixed on a billet from a tree with two-way tape and clamps, which both parts are pressed against the desktop. After complementing the template, it should be verified that the ring in the process of performing the milling operation tightly pressed to the edge of the template.

Milling templates can be used not only for processing the entire edge of the product, but also to give it the corners of the rounded form. Using such a template for a milling ager, can be performed on the corners of the treated product from the tree rounding of various radius.
Templates used to work with a manual milling can be equipped with a bearing or ring. In the latter case, the following conditions must be observed: the ring must accurately correspond to the cutter diameter or in the design of the device must be provided with stops that allow you to move the pattern from the edge of the workpiece and thereby eliminate the difference between the radius of the tool and the ring.
With the help of templates that can be adjustable, you can not only milling the edges of the treated product from the tree, but also create curly grooves on its surface. In addition, if you make a pattern of the appropriate design, which does not represent big difficulties, it will be possible to quickly and accurately cut the grooves for the door loops.
Cutting the grooves of a rounded and elliptical shape
To cut the grooves in the form of a circle or ellipse in the tree or ellipse tree, use circular devices. The simplest circuit for the milling mill consists of a rod. One end of it is connected to the base of the mill, and the second is equipped with a screw and pin. The pin is inserted into the hole, acting as the center of the circle, along the contour of which the groove is formed. To change the radius of the slope of the groove, to execute such a circular for the milling agener, it suffices to shift the rod relative to the base of the mill. Circular devices are more convenient to use, in the design of which two rods are provided, and not one.

The equipment operating on the principle of the circular is a fairly common type of fixtures used to work with the mill. With their help, it is very convenient to perform milling of figured grooves with different radii of rounding. As mentioned above, the typical design of such a device, which can be made and with your own hands, includes a screw with a pin, having the ability to move along the device's groove and thereby allowing you to adjust the radius of the generated groove.
In cases where the wall by a tree or other material, it is necessary to create a small diameter hole, a snap-in of another type is used. A feature of the design of such devices that are fixed on the lower part of the core of the freesometer is that their pin installed in the central hole on the workpiece processed is located under the base of the power tool used, and not beyond it.

Corner base guides
Circula centering pin assembly. View of the bottom of the circus assembly. View from above
Using special devices, manual milling can be created in a tree not only round, but also oval holes. The design of one of these devices includes:
- the base that can be fixed on the treated wood with vacuum suckers or screws;
- two shoes that move through the intersecting guides;
- two mounting rods;
- bracket connecting the base of fixtures with a milling mill.
Due to the special grooves in the bracket of such a device, its support plate is easily exhibited in the same plane with the base of the mill. If this equipment is used to perform milling on a round circuit, then one shoe is used, and if on oval, both. Made by such a fixture with a higher quality than if it was performed using a jigsaw or ribbon saw. It is explained by the fact that processing using a milling machine used in this case is carried out by a tool that rotates at high speed.

Facilities for fast and high-quality milling grooves on narrow surfaces
To the question of how to make grooves for door loops or castle, can answer any home master. For these purposes, a drill and usual chisel are used. Meanwhile, it is much faster to fulfill such a procedure and less costs if you take a milling mill for this with a special device. The design of such a device, with the help of which on narrow surfaces, you can create grooves of various widths, is a flat base fixed on the sole of the mill. Based on which there may be both round and rectangular shape, two pins are installed, whose task is to provide a straightforward mover movement in the processing process.
The basic requirement to which the nozzle on the milling of the above-described structure should correspond, is that the axes of the guide pins should be on the same line with the center used for the wood processing. If this condition is performed, then the grooves performed on the end of the workpiece processed will be located strictly through its center. To shift the groove into one of the parties, it is enough to wear on one of the guide pins of the sizer's sleeve. When using a similar nozzle on a hand mill, you need to ensure that the guide pins in the processing process are pressed against the side surfaces of the product being processed.

To ensure the stability of the milling processing during the treatment of narrow surfaces can be without special devices. Decide such a task using two boards that are attached on both sides of the treated product in such a way as to form with the surface on which the groove is performed, one plane. The mill itself when using such technological reception is positioned using a parallel stop.
Milling devices for rotation bodies
Many devices for manual milling machineMade by users under their needs, do not have serial analogues. One of these devices, the need to use which occurs quite often, is a device that facilitates the process of cutting the grooves in the bodies of rotation. Using such a device, in particular, you can easily and accurately cut longitudinal grooves on the posts, bales and other products from a tree of such configuration.

Milling and frame assembly carriage for milling disc
The design of this device is:
- housing;
- mobile milling carriage;
- disk, with which the rotation angle is set;
- screws that ensure fixation of the workpiece treated;
- stop screw.
If such a device is additionally equipped with the simplest drive, as a conventional drill or screwdriver can be used, then the milling on it can successfully replace the processing performed on the lathe.
Ship milling fixture
The nipseral adaptation for the milling maker allows the processing of parts connected on the principle of "spike-groove" with high accuracy. The most universal of such devices make it possible to carry out milling of thorns of various types ("Swallow tail" and straight). In the work of such a device, a copy ring is involved, which, moving along the groove in a special template, provides accurate movement of the cutter in the specified direction. To make such a hand, you must first choose the templates of grooves to execute which it will be used.
Several additional options for expanding the functionality of the milling
Why do you need to create additional devices for equipping a manual millingrer, which is so a fairly functional device? The fact is that such devices will allow you to turn your hand mill in a full-fledged processing center. Thus, fixing the manual milling mill on the guide (it can be), you can not only facilitate the process of use, but also improve the accuracy of the operations performed. The design of such a beneficial device does not contain complex elements, so make it for a mill and for a drill with their own hands will not be much difficulty.
Many homemade masters, asking how to work with a manual milling with even greater efficiency, make a functional desktop tool. Naturally, it is possible to use such a table for other equipment (for example, for circular saw or electric drill).

If your disposal does not have a hand mill, then this problem is solved using special devices that allow you to successfully perform milling on a serial turning machine. Using the milling device for the lathe, it is possible to significantly expand the functionality of the serial equipment (in particular, to carry out the processing of planes, to make a sample of grooves and grooves, process various parts by contour). It is also important that such a fixture for the lathe does not differ in the complexity of the design, and it will not make it independently a big problem.
Those who love a joiner, i.e., work on a tree, should be known how to handle a hand mill. With the help of such a device, you can create real masterpieces, not at all accompanying for this effort. However, this will require skills in the work and knowledge of what this tool consists of how to collect and disassemble it. With the help of a manual wood milling mill, you can create a beautiful door, decorative furniture or other original items. You can even open your business, making a variety of wood products.
Types of milling work
The mill is a unique device that makes a large number of rotations per second, while creating holes of the required diameter and form. Performed work divided into several categories. Holes that are created by the mill, are almost always part of the detachable or in-view design adorning the product.
It should be considered in more detail the operations carried out using a milling mill.
- Profiling such products such as cornices, platbands, plinth, strokes, etc. is carried out by edge. Such work are suitable for furniture manufacturers. This is a wonderful solution for wood decor.
- Decoration of edges of complex products using a milling mill helps to create an exclusive product. A professional is able to even create a masterpiece. Newbies in this case will help the video. Such a process is necessarily performed using templates. They contribute to creating identical patterns on large areas.
- Using a milling mill, simple household problems are solved. For example, it is necessary to make a deepening for locks or under sheds. This uses a special milling machine, but a hand tool can be used for homework.
How to choose cutters
 All wood work is made by special cutters. They are chosen, focusing on the type of work, which will need to be carried out, and the type of wood, which is milling. On the Internet you can find a large number of video that explains in detail and clearly shows how the cutter looks like and how to choose it correctly.
The cutter is the component of the milling and represents shank and work element With cutting edge. They are distinguished by:
- cutting edge shape;
- the type of material from which they are made;
- magnitude;
- designs.
Thus, lightweight materials are needed to work on the wood of soft rocks. And for the manufacture of a solid wood item, preference is given to the "solid" cutter.
- cone-shaped;
- V-shaped;
- disk;
- mills "Swallow Nest";
- profile;
- rectangular grooves;
- calevinary;
- folding;
- gallery.
In addition, the cutters are divided into those that direct the movement have bearings and on those whose not. With the help of a manual milling cutter without bearings in mills, work is performed anywhere in the workpiece.
Installing cutters
As soon as the desired template is found, further work on the tree should be carried out by a manual milling. To do this, pick up and set the correct cutter. It is performed in such a sequence:

How to perform work with a manual milling
A large number of electrical appliances for construction and repair work their work by rotation of the shaft. A hand mill commits a large number of revolutions per second. It is believed that the tree work will be performed by the mill, if the revolutions are as much as possible. In fact, this is an erroneous opinion. The subject can be charred and break when the frequency controller is incorrectly installed and when performing a large diameter cutter.
That is why under each type of work and material it is necessary to select and install a certain number of revolutions per second. Works will be performed much cleaner, if correctly selected the ratio of the speed of the milling cutter relative to the wood, which is cut.
A manual milling work is carried out by installing it on a special table or just keeping in hand. Small blanks usually frewell at a stationary table. This contributes to the performance of work without any defects. On such a table, the milling mill is installed with spindle up.
So that milling on the table was performed without errors, it is necessary:
- on the surface of the table, install rules, under the form that it will be necessary to cut;
- the narrow rules with an oval end are necessary for working with the parts of an alternating profile and to the surface of the table they are attached perpendicular to the workpiece.
It should be remembered that by working by a manual milling, it should be moved necessarily in the opposite direction relative to the movement of the cutter. Otherwise, the tool often breaks out of the hands and makes injuries.
Compliance with safety
Manual wood milling mill requires safety. In order not to harm health:

Conclusion
It is fairly difficult to learn how to make wood products with a manual milling. Best to explore video lessons with the necessary instructions. Do not forget that this is a rather dangerous tool that can cause serious injury. That is why it is important to comply with the safety technique, be attentive and careful.
How to work with a mill
Many well-known firms are engaged in the production of wood processing equipment. Hand mills always enjoyed the greatest demand and popularity with which you can get exclusive and unique in the form of the product.

Basic rules of work + (video)
Anyway can work with a mill, but when working you need to follow certain rules:
- The processed item must be carefully fixed on the desktop, which will improve the quality of processing, and reduce the risk of injury.
- You need to move the tool so that the blades of the cutters move towards wood, this direction is called counter. In the opposite direction, the tool will break out of the hands, the processing line will be uneven and not high quality.
- For milling of various circles, ovals and ellipses, special circles can be used, allowing the circle of a rather large radius. There are several types of nozzles that quickly attach to the sole of the mill.
A manual milling can be performed a number of works, ranging from simple household tasks on the cutting of locks and ending with complex decorative operations on road furniture, cutting patterns, wood threads. Of course, the newcomer should not start working with a difficult task, it is better to start with something simple and gradually, gaining experience to complicate the tasks.
Additional tools
With a permanent operation with a milling mill, various additional tools and devices will be required. First of all, this list includes:
- Electric drill with drill set.
- Various self-tapping screws.
- Electric jigsaw with different over the length and thickness of the saws.
- Set of cutters.
- Set of files.
- Various patterns.
- Protective clothing, respirator, glasses.
This is a minimum set that allows you to perform the main types of work with a mill. As you need, each wizard complements it with its own tools, nozzles, templates, which allows the use of a milling mill 100%.
Setting the device + (video)
 Before starting the tool, you must correctly install its depth. This follows:
- Set the tool to the item.
- Install the revolving stop next to the end of the limiter.
- Release a locking screw for moving the mill in the right direction.
- Lower the engine to the treated surface.
- At the desired level, the depth limiter is set.
- Stop screw clamp.
- Setting the depth is finished.
The selection of the rotational speed of the cutter must be determined on the basis of the density of the surface treated, the diameter of the cutter itself. Usually for the processing of wooden products, the speed of about 10,000 revolutions per minute is used, which allows you to get a smooth and smooth cut. A very high rotational speed of the cutter can be caused by charging the treated surface and lead to a breakdown of the part.
Very solid surfaces are treated on small turns of the cutter, and from time to time you need to drive the engine without load on maximum speed, which will allow it to cool.
The selection of a linear movement speed of the cutter is based on its diameter than it is greater, the smaller the speed applied, which is set by the regulator. When the cutter is installed, you need to be guided by the instructions of its manufacturer, in which the speed of rotation and the recommended linear speed will be indicated.
Selection cutter
 For each type of work performed by the mill, you must correctly pick up the cutter. This will allow not only to process the material qualitatively, but also to fulfill all the work much faster. You can purchase entire sets from different cutters that allow you to perform a wide range of operations.
Structurally, any mill cutter consists of a shank, which is clamped in the cartridge of the tool and a special, cutting part. The cutters are different both in size and the material, in the form of the cutting part. When processing soft wood breeds, cutters made of conventional metal are used, for solid rocks are choosing stronger cutters with attacks. Several types of cutters are separated:
- Applied to handling various types of grooves - rectangular.
- To decorate all sorts of products - profile.
- For wood processing at different angles - cone-shaped.
- To perform inscriptions on the surface treated - V-shaped.
- To perform grooves in the horizontal plane - disk.
- To perform quarters in the tree - folded.
- For the roundabout of the working edge - calevinary.
- To perform cartoons - Gallery.
- To perform any thickening compounds - type "Lastochka Tail".
Cutter installation order + (video)
Installing the cutter on the tool does not constitute any complexity and is to perform simple steps:
- The selected cutter shank is inserted into the cartridge to a depth of about 20mm.
- The cartridge is snapped and tightened with a nut.
After fixing the cutter, the milling mill is installed on the desired depth using a movable limiter. Then they perform a test res, allowing you to make sure that the settings are correct and then proceed to work.
Safety regulations
 Receptions of safe operation with the device are necessarily written in the manufacturer's instructions, you should not neglect them in order not to get injured. The main rules of safe work include:
- Be sure to work in protective clothing without hanging parts that can be winding on the mill.
- Protect eyes from chips from entering, for this use safety glasses or mask.
- Protect respiratory organs with respirator.
- Be sure to pull the device from the outlet for the break time in operation.
- Keep tight tool in your hands to avoid its slip by touching the workpiece.
- Be sure to explore and follow all the requirements of the manufacturer's instructions.
Performing these simple requirements will allow to avoid injuries when working with a milling mill, because it is a rather dangerous apparatus. Training in working with wood requires not only strong desire, but also of special patience and care. Only the combination of all these qualities will allow to gain experience and achieve high peaks of skill.
(1 estimates, average: 5,00 out of 5)
Independent milling of wood and wood
Processing of sawn timber, pockets, manufacturing of technological holes and recesses, wood carving - all this can be a device as a mill. Moreover, it can not only professional equipment, but also relatively inexpensive manual copies. But the work by a manual milling tree requires knowledge of some techniques and rules. About all this - in the article.
What is a mill and what is it needed for what
The mill is a device for processing a tree or metal. They process flat and shaped surfaces, also forms technological recesses - grooves, comb, removing under the installation of loops, etc. By the installation method, there are stationary machines (there are different types for performing different operations), and there are manual milling mills. Manual electrifresters are a universal tool that allows any operations. To change the operation, only you only need to change the nozzle - mill and / or its location on the details.
Machines are used mainly at mass production. The milling cutter is installed motionless, and the workpiece is moving - according to a certain trajectory. When working with a manual milling, the situation is the opposite - fix the workpiece, move the milling mill. When processing large volumes of the same details, it is more convenient to fix the hand mill on the horizontal surface by making something similar to the milling machine.

Homemade milling machine - horizontal plane with a hole in the midst, to which the hand mill is mounted below
There are many different types of milling machines, but for a home master or for semi-professional use more universal fit. They are installed different cutters and special devices, which allows you to perform any operations. Just for their execution requires more time and skill than on a specialized machine.
What can be done with the help of a hand mill:
- grooves and grooves of any shape (curly, rectangular, complex forms);
- through holes and blind;
- process edges and ends (can be made straight, curly);
- cut compound details;
- apply inscriptions, patterns, drawings on the surface;
- copy details.

Copy parts - one of the features of the electric power
Such operations are used in carpentry, in the production and assembly of furniture. Even to cut the lock or loops on the door - it can also handmade milling mill. And it will make it much faster and elegant than similar operations, but performed using a hand tool.
Preparation for work and care
To deal with the principles of working with a manual milling, it is desirable to have at least a general idea of \u200b\u200bits structure and the purpose of the part.
Building and appointment of main nodes
It consists of a manual electrophower from the housing in which the motor is hidden. From the body there is a holder where the collet is inserted. Canggi is small adapters that allow the use of cutters with shanks of different diameters. The milling cutter is inserted into the collet and delayed with the clamping bolt (on some models is fixed with the button).

Main nodes of manual milling and their purpose
Another important detail of the manual milling is a platform that connects to the housing using two rods. The platform is usually made of metal. On the bottom side of the platform there is a sliding stove. It is made of a smooth material that ensures the smoothness of the tool when it is moved across the part.
Setting the parameters of the freesomeer occurs with:
- Pens and shakes setting depth of milling. Setting step - 1/10 mm.
- Adjusting the number of revolutions. Changes the speed of rotation of the cutter. To begin with, it is worth trying to work on small or medium turnover - it's easier at first to lead the instrument.
It is also necessary on the case there is an on / off button, there may be another blocking button. Here, briefly all the nodes. In addition, there is still quite convenient parallel emphasis. It may be simple or with the possibility of adjustment - you can slide the cutting portion to the right or left.
From the factory, the equipment goes in lubricant, so in principle, no additional operations are required. But it is necessary to support equipment in cleanliness - it is necessary to consider dust more often, change with lubrication if necessary. Lubrication is needed for moving parts - guides. Liquid aerosol lubricants can be used (preferable), but conventional Litol-type consistency types can be used. But, when using thick lubricants, you will have to periodically delete them, as chips stick and dust, it becomes difficult to work. With the use of light aerosol compositions, there is practically no nagging.
In order for the sole easily slid, you can lubricate it with silicone lubrication. This is especially useful when working with templates. Then the tool literally slides, goes smoothly and without jerks.
Rotational speed
Work manual wood milling, composite, plywood, etc. Begins with the placement of basic parameters. First set the speed of rotation. It is selected depending on the selected cutter and stiffness of the material and the characteristics of the millingrer, so that accurate recommendations must be signed in the instruction manual.

Approximate processing speed when using different cutters
Filling cutter
Next is installed milling cutter. On most corporate cutters, there are tags for which you can navigate. If they are not, then the minimum must be clamped at least 3/4 of the shank length (cylindrical part). Insert the cutter into the required depth (if necessary, after installing the collet - the adapter cartridge for different diameters of the cutter), fasten the shaft, tighten the wheel key until it stops (but do not drag).

Work manual wood milling and other materials begins with milling cutters
If the model is simple, two keys are needed. They do not provide a shaft blocking mechanism, the second key will need to hold it. In the middle class devices there is a lock button. Pulling it, tighten the carkin key. In expensive models besides blocking, there is a ratchet in which you can navigate.
Setting the depth of milling
Each model of a manual freresser has a certain departure - this is the maximum depth to which this unit is able to process the material. The depth of milling is not always required to be maximum, then its adjustment is required. Even if it is necessary to mill to a greater depth, so as not to load too much and the unit, you can smash it on several levels. For this there is a revolving emphasis. This is a small disk under the barbell with a certain number of stops of different heights - legs. The number of legs - from three to seven, and more - does not mean better. It is much more convenient if there is the possibility of adjusting the height of each leg. This shows the ability of the equipment. To secure the revolving stop in the desired position there is a retainer, which is usually made in the form of a checkbox.
The rewarding depth of milling on a manual milling happens in several stages:
- The tool put on a flat surface, free the clamps, press the cutter to overflowing into the surface.
- Release the revolving focus, reloading its lock.

Choose the leg of the revolving stop
- Depending on which milling depth is needed, the leg of the revolving stop is chosen. The disc with the legs rotate to the desired position.
- The screw is not fixed, but hold the bar with a finger, move the movable pointer so that it coincides with zero (in the photo above).
- The bar is raised to the milling depth, after which the record of the revolving stop is lowered (in the photo below).

Exhibit depth on scale
Now, when installing on the workpiece and jamming on the top, the cutter will enter the detail to the exhibited distance.

Now it will be a blank for the desired depth
On good freshers there is a wheel of accurate adjustment of the depth of milling. It allows you not to knock down the settings (you do not need to repeat the entire operation) Correct the depth, albeit in small limits (in the photo above it is a green wheel).
Cutters for manual milling
Cutters are a cutting tool that processes and forms the surface. They consist of a cylindrical part, which is clamped by the colors in the hardener of the unit, and the cutting part. The cylindrical part may be different diameter. Choose such a collet under which there is in your device. The shape and location of the knife of the cutting part defines the type that the wood receives after processing. In some mills (for edges) there is a persisting roller. It sets the distance from the cutting surface to the material being processed.

The work of the tree with a manual milling tree involves the presence of a certain amount of cutters. This is a small part of what exists
Make cutters from different metals and alloys. For handling soft wood - pine, spruce, etc. - Use ordinary nozzles (HSS), for hard rocks - oak, beech and others - from hard alloys (HM).
Each milling cutter has a certain resource and the maximum speed on which normal operation is provided with minimal beating. Excess recommended speed is not worth it - this can cause a mill breakdown. It also makes no sense to sharpen the mill, if it fastened. Do it on special equipment (worth about $ 1000), where you can set the desired sharpening angle. Manually nothing will succeed. So that focused easier (and cheaper) replace, as they are relatively few.
Popular species
There are some types of pumps for the millingrer, which are used most often.
- Edge. Serve to handle lateral surfaces of blanks. With their help, you can make smooth or curly edges, you can form notches and spikes for docking parts. It is this type of cutter that happens with the bearing at the end - it rests on the part, asking the distance from the edge of the workpiece to the cutter.

Some types of edges
- spirals (a) are mainly used to form technical grooves, for example, a joint / groove compound;
- gALICAL (B, D) - to decorate the surface with the help of grooves of different shapesmay be rounded, v-shaped or figured;
- swallow tail (B, d) - to form a groove in the form of a trapezium, this groove is used for an open and hidden connection of parts;
- shaped (D) - with their help decorate the surface with grooves of complex forms.

Slip cutters - for the formation of recesses anywhere
There are malls simple, formed from a single piece of metal, there are typical. Sets have a shank - the basis, some set of different cutting planes, a set of washers of different thickness. From these parts you can independently form the required relief.

A set cutter - a set of several cutting surfaces and washers, from which you can make a mill of the required form
These are the most popular types of cutters, but in fact there are a lot of them. In addition to different diameters of shanks, there are various diameters of cutting surfaces, their height, the arrangement of knives relative to each other, etc. In general, for milling with their own hands, it is usually required about the five most chassis cutters. They are usually present constantly, and the rest are purchased for specific types of work.
Principles of working with manual milling
The eletcroter is a rather dangerous thing - rotating at high speed sharp cutting parts can cause serious injuries, and the chips flying from under the instrument too. And at least on most models there is a protective flap, reflecting the main stream of chips, the safety glasses will not interfere. So the work with a manual milling wood requires attention and concentration.

One of the models - with a connected vacuum cleaner to remove chip
General requirements
The work with a manual milling tree will be easier and more enjoyable, the product will turn out normal, if you perform some conditions:
- The mill must be acute. It is difficult to estimate this parameter "to the eye", therefore it is necessary to navigate on working moments: if the motor is greatly heated and / or the treated surface is not smooth (they say "dirty"), then the cutter stupid. It must be replaced.
- The processed billet should be firmly and securely fixed. You will not get anything good on the jumping and twitching workpiece.

Billets should be firmly fixed. Best use clamps
Not such complex requirements, but their implementation is a guarantee of good work and safety. Well, the main requirement - the milling mill must be carried out smoothly, without jerks, jerks. If a strong beating is felt - change the frequency of rotation. Most often it must be reduced, but in general it is necessary to focus on the manufacturer's recommendation (there is on the package).
Edge Processing - Working with Template
Processing the edge of the ordinary board is easier and faster on the flight, but if it is not, the manual milling mill will also cope, that's just takes it more time. There are two ways: without a template and with a template. If this is the first experience with a milling mill - it is better to use a template. When processing the edges of the boards, straight edge cutters are needed, and most likely two - with the bearing at the beginning and at the end of the cutting part (in the photo).

For the edge processing - make a smooth surface
As a template, you can use the already processed board or, for example, the construction rule. The length of the template must be slightly larger than the length of the workpiece - on 5-6 radius cutters on each side. This will give the opportunity to avoid the "Viska" cutters into the material at the beginning and at the end. One important point: the horizontal plane (perpendicular to the treated) must be smooth. In any case, its curvature should not be greater than the gap between the bearing and the cutting part, otherwise the cutter will touch the pattern, and this is very bad - it becomes non-ideal and inflicted irregularities will appear on other copies.
If the width of the part no longer cutting edges
The cutting part of the milling mills there are different lengths, but the more cutting part, the more difficult it is to work - more efforts have to be applied to hold the aggregate. Therefore, it is easier to start with a middle cutter. The processing order of the edge with a mill (with a template) is:
- The template is installed so that it sets the required smooth surface - retreating the desired distance from the edge.
- The workpiece with the template is securely attached to the table or any other horizontal surface.
- Install the mill with a roller in the middle part. It is exhibited so that the roller rolling on the pattern, and the cutting part is the detail. For this, the milling is installed on the fixed blank with the template, they put the mill disconnected from the network, adjust the position of the nozzle, clamp it.
- Install the mill into the working position - they lower the case, clamp.
- Include a manual milling machine, lead them according to the template. The speed of movement is determined by the depth of processing. You all feel yourself.
- And how to drive a mill? Pull or push? It depends on which side you are standing. If the workpiece on the left - pushing, if on the right - pull. You can also navigate on the departure of chips - it must fly forward.
On this, actually everything. After the passage finished, evaluate the result, remove the clamps.
This, by the way, is still a way to take a quarter along the edge of the workpiece or in some part of it. To remove a quarter, exhibit the cutting part so that the processing is a given depth.

Filled a quarter on the furniture facade
Changes the cutter on the curly (gallop) and shifting the template or using the stopping stop, you can apply a longitudinal drawing on the workpiece (in the photo below).

The principle of working with a manual milling
In general, this milling technique is quite comfortable. For the first steps in the woodworking - this is the best way to "fill the hand", then you can even raise the edges even without guides.

Smooth edge without guide requires experience
Width more cutting length
What if the thickness of the workpiece is not longer than the cutting part of the cutter? In this case, the work of a manual milling tree continues:
- Remove the template, pass the same cutter again. Only in this case the template will be the processed part of the workpiece - the bearing will roll on the only part of the part. Mill rearrange so that you can process as much as possible. Strongly to move to you will not let the departure of the holder, but some part will still turn out.
- After that, we take another nozzle - with the bearing at the end, the workpiece turn over so that the processed part is below. Fasten on the table with clamps. The nozzle with the lower roller is installed so that the bearing is rolling over the treated part. Thus, you completely copy the already processed part.

Bearing roll over the treated part, the cutting part levels the rest
Now the edge is completely processed on the one hand. If necessary - repeat with the second side. In general, in order to master the work with a manual milling tree, a few "draft" blanks will be required. Choose from those that it is not sorry to throw away - at the first pores of the shoals will be much, then gradually learn.
Getting a figured and curvilinear edge
If you need not even, but a rounded or any other shape of the edge, you have to look at the state of the existing edge. If the billet is more or less smooth, take the necessary edge milling, install it and process the surface, as described above. If the surface is too curve, it is first adjusted to a normal state, and then milling.

It is necessary, since the roller of the bearing is rolled over the surface and if there are flaws, they will be copied. Therefore, act consistently - first drop, then - give the curvature.
If the nudna is generally a curvilinear surface - the pattern is cut out. The drawing is applied on the phaneer with a thickness of 8-12 mm, first it can be filled with an electrolybiz, because the edge to bring to the perfect state by the milling line.

On the plywood draw the desired drawing
In this case, too, we will have to work with a mill, but so far without a template. When the surface is perfect, the template is fixed to the workpiece and further described above the work with a manual milling tree. Only one point: if you need to shoot in some places you will need a large amount of material, it is better to do the jigsaw, for example. Otherwise, the milling cutter fastens.
Video lessons for working with manual milling
When installing doors, it is necessary to cut the loops, how to do with the help of a mill - in the next video (there is also about how to make a groove, for example, under the installation of a good).
How to make a homemade milling machine from laminate samples (can be plywood) and how to make a thickening connection for boxes (tables, for example) - in the next video
The work by a manual wood milling line is well shown in the following video, but it is in English. Even if you do not know English, do not regret the time, look. Many operations will become clearer.
Work manual wood milling: video lessons

The mill is a tool for treating a lumber making many rotations at high speed. It happens both professional equipment and self-processing, requiring certain skills and knowledge. Detailed instructions with training videos on the site will help qualitatively carry out operations for processing the tree by manual electrofer.
The use of electrical cutter
Work manual wood milling helps carry out the following carpentry operations:
- Processing of flat and shaped surfaces, profiling edge of platbands, plinths, eaves, headquarters.
- Formation of technological and curly recesses (grooves, ridges, etc.).
- Production of through and blind holes.
- Cutting complex parts made of wood, copy them.
- Application of inscriptions, drawings, patterns on the surface (engraving).
- Cutting locks and loop on the door.
- Production of a thickening connection. This is a complex process that requires special skills, as a result of which the high strength assembly of wooden products is obtained.
Depending on the type of work performed by a manual wood milling, the video lessons of which can be viewed at the end of the article, you will need adaptations:
- Cutter
- Electropolitanzik
- Electric drill and drill
- Templates
- File
- Protective overalls and respirator.
A beginner master with the help of such a tool to return the old furniture for life, carry out minor carpentry and decorative work with a tree around the house.
Choosing an electric power
In order to mill at home, it is recommended to choose a universal tool that is an electrofer with a replaceable base - submersible and edge, thanks to which it performs any type of wood work, depending on the chosen type of cutter. It is better if it will have speed adjustment, working with a cutter with a diameter of at least 8 mm, the optimal power should be 800-1300 W. When choosing a tool, pay attention to the real depth of dive cutter, from which the maximum depth of the resulting groove will depend.
The best option for the clip of the cutter is the conical collet, and the locking button is fixed. The smooth operation of the rod mechanism, the longer the tool.
An important point of the operation of the electric power is the correct selection of the cutter, which consists of a cylindrical shank of various diameters (6.8 or 12 mm) and parts with a cutting edge.
The designs are separated by cutters into the following types:
Depending on the type of processing performed by the cutter, it also happens a few varieties:
- The dummy mill is used to form grooves.
- Profile - to give the edge of the decorative profile.
- The edge and folding milling cutter are used to process the edges of the product.
- Galling - for cutting "U"-like removal on the product.
- The conical milling cutter sticks the edge of the product at an angle of 45 degrees.
- Calevous - forms a rounded edge.
Work manual milling: Instructions for beginners
Working with a manual milling, whose video lessons will help the novice master may seem difficult only at the beginning of the process. With the acquisition of the first skills to process the wood, you can get bolder.
- Working with a manual milling starts from the instrument assembly. Suitable on the diameter of the collet cartridge, the cutter is inserted into it. If necessary, the cartridge itself is replaced by another in diameter. Then the shank is tightened in the cartridge using a special key with a clamping force sufficient to make the cutter not hanging in it. After that, the spindle mechanism is clamped, the tool is ready for operation.
- Next sets the necessary depth of milling. To do this, you need to fix the position of the cutter, pressing on it. The exact depth is installed using a limiter regulator having several degrees.
- The speed of the flares is set based on the table data from the instructions and parameters of the material, as well as the size of the cutter itself. The work by a manual milling tree should first be made on the draft version to test the turn of the tool, the depth of milling and speed. The correct movement of milling is the movement of the tool from itself on a flat basis, and counterclockwise with a circular processing of the product. A manual milling is described in more detail in the learning video.
Manual Milling: Work Methods
Depending on the type of processing performed, the choice of techniques for manual milling is depends. The following is a manual fresher (training video), methods and techniques.
Work techniques with manual milling: groove formation
When forming a groove from the edge itself, the tool should be installed so that the cutter hang over the edge of the product. Next, it descends to the required depth and fixed, after which the tool starts to work. After processing the edge to the end, you need to weaken the lock, lift the cutter, the tool motor can be drown. The formation of a deaf groove is made in the same way, only starts from the edge of the product.
Deep groove is formed by adjusting the new cutter depth. With each approach of the processed area, a depth of no more than 5 mm, when processing the last layer - is not deeper than 1.5 mm.
Additional ways to form grooves and working lessons with manual milling (video in Russian) are presented below.
Processing end surface
The work of the tree milling mill (video below) is often accompanied by the processing of the end surface at which they need a pure cant. For this, a gentle cut is pre-performed, while the electrophusper moves in the direction of rotation of the knife, and then against its rotation. After that, the end will acquire clear outlines.
Processing using templates
To form curvilinear edges, templates with a thrust ring are used, which is a plastic plate moving along the template for the correct trajectory of the milling mill. The stubborn ring is attached to the sole of the millingrer with the help of special fasteners. Using templates, you can copy wooden parts in the desired quantity.
Working manual milling: Decorative processing video
For artistic milling, in addition to the cutter, you will need a jigsaw, vice, chisels, a canvas of a tree with a pattern. It is fixed on a well-stable surface, and the figure is carried out with an electrophusmer, equipped with a special cutting nozzle, gradually removing the wood layer until the desired volume of the ornament is reached.
Dad master! \u003e Types of work\u003e
Basic rules of work with a wood milling machine for beginner masters
 Beginner masters who have just begun to join such an interesting and difficult thing as the manufacture of furniture and other wood products are often lost and cannot understand what tool they are needed in one way or another. Yes, and deal with the rules of their operation completely independently very problematic. We offer to read a brief instruction on one of the most essential tools in the joinery.
Main types of nozzles used when working in a tree milling and their appointment
There are only two main types of cutters, the separation of which goes at the place of use:
Each of these species has a wide range of subspecies used for different purposes. The main difference between the main species is that the first has a guide bearing, which rests on the edge of the details and does not allow the blades of the nozzle on the required. In the second form, this element is absent, so it can be used on any site of the product.
 Main types cutter for manual milling
  Types of cutters for manual freesome Part 3
There are such edge nozzles:
Not used in order to create elements responsible for the integrity or fortress of construction. Their appointment - the creation of purely decorative elements, Decoration of the edges of the product.
Most often apply to smoothing sharp edges. They cut a rectangular edge at an angle of 45 degrees.
As well as the previous option are used to smooth the corners. Cut the edge and turn it into a profile of a quarter of the circle. The nozzle radius can vary from 3 mm to 1.6 cm.
It is applied when it is necessary to cut a straight-in-dumped groove with the same in the entire length of the breadth.
We are needed in cases of creating a rectangular edge along the edge of the product.
They carry a strict decorative purpose, create rounded recesses along the edge.
Types of cutters for manual milling cutter Part 2 Operation with a wood milling mill with a set of cutters
The following cutters are counted to the groin:
In most video about the operation, the manual milling is shown to use these nozzles. With their help, smooth rectangular channels are created in the product. Used to create connecting grooves.
Cut smooth channels with a rounded bottom. By and large, only used in decorative purposes.
3. Triangular (V-shaped).
During the operation, smooth channels are cut on the tree with such a nozzle with such a nozzle, the vertex of which is directed deep into the product. It is better suitable for clipping groove connections on fine billets.
They cut the channels, the bottom of which is wider than their top part. With their help, very strong groove connections are made.
Training video about working manual milling driver, which will help avoid mistakes
After watching the video about the manual milling operation, it will be easy to figure out how the instrument is correctly configured, how to adjust the landing depth and location of its cutter. In addition, you will master the safety regulations that must be respected during operation. And now consider other important nuances.
Direction of movement of the instrument
During the operation of a tree with a milling mill, many wizards do not advise using this method, since the risk of a tool is risk with the work being processed. But it is the most optimal option that helps to avoid fiber cleavage, as well as pressing the edge of the product that does not need to be processed. The nozzle rotates clockwise, it means that the tool should go counterclockwise. Moving in the direction of movement of the blades is a large risk of the aforementioned problems.
Speed \u200b\u200bof rotation of the nozzle
This tool works on sufficiently large revs. But depending on which wood is processed and from what size nozzle is used, the speed of rotation will be selected. The softer the tree of the tree, the greater the speed is selected. The larger the size of the nozzle, the less speed will be. The exact indicators are usually given in the instructions.
It's not so difficult to work with this tool, but in return you will get the widest opportunities. They successfully replace even special professional equipment that is used in large factories.
Interesting on the site
If you compare with other materials for the roof, metal tile can be called a clear favorite. It is durable, quickly and just stands, and the color palette of different manufacturers ... Next. "
Heating of private houses through two different systems has become normal. Most often on the first floor, the installation of the warm-white system has mastered the latter popularity for the last decade. "
Competently approach the choice of this floor covering a simple man in order to make an order of magnitude more complicated than it could seem. To take into account the many existing nuances, the buyer must be aware of ... Next. "
Actively used in America a manner to use materials that have not intended for such purposes, and came to us. And at the moment is designed ... Next. "
Absolutely, all owners of private houses wish to get a setup that will most effectively use resources from combustible fuel. But at the same time I do not want to be significantly overpayed ... more. "
ATTENTION, only today!