Circular saw stationary with their own hands - according to our drawings and leadership for everyone. Circular cut from the engine from a washing machine Connecting a circular emergency stop button
Homemade a circular saw It is a kind of girlfriend tool that can cope with a number of construction tasks in living conditions. In principle, it is not difficult to make a circular, even if you do not own any special skills, the main thing is to have at least a small idea of \u200b\u200bworking with the metal. Required Material It is usually possible to find in the garage or domestic workshop, and the steel corner is suitable here, the profile pipe of the rectangular section and the engine. The collected circular can be put on the existing workbench or, for the absence of such, we will have to build a table for circular saw with your own hands. As for the motor, you can use the unit from the old erasing or motor-block, but about everything in order.
Hand-made corner grinder
If the farm has "Bulgarian", then not to find a better device for the manual disk saw. Do not know how to make a mini circular saw of the house from such a popular tool? Do not despair, because its manufacture implies only the provision of sliding stop and the axial handle to the already existing unit. Sliding emphasis includes two constructions two segments of a metal corner of a small section located on both sides of the saw disk. With the help of bolts and nuts, the corners are connected from the front and back side by the transverse bundle, and the technological gap between the sidewalls of the resistant design and the working element will be provided with washers.
On the grinder it is necessary to wear a metal ribbon clamp so that its screw screed is located below, and the galvanized metal strip is fixed to it with a hole under the sliding stop, folded twice. In principle, a special clamp with a rack can be done as a single whole, but in this case the thickness of the metal strip ideally will be at least one and a half years. Next, in the device of the gearbox, the future circular will have to do a pair of bolts holes, for which it is disassembled, and the drilling points are determined. Through the holes, the axial handle for the circular saw collected from the grinder is attached, since the existing handle will not allow quality propyl, even if the master has short physical strength.
The axial handle that will supply the circular from the grinder is made of a metal rod or tube. The design in the form can be a transverse bracket or a kind of horn. The ends of the metal part, which the handle is attached to the gearbox, are supplied with holes under the fasteners. There is one here important moment: Ends can not be cut to exclude the deflection of the handle in the process of working the circular, with their own hands. It is also necessary to make an adjustment rod from the cut of a metal rod (4 - 6 mm), for which one end is bending into the loop, they cut a little and form a hole under the front bolt of the stop. Uniform gap, as usual, adjusting the washers.
At the other end of the bar, the carving is cut, thanks to which it connects with the handle. There is one nut on the thread, one nut is screwed, and after assembling the design - the second. Tightening and lowering the nuts of this device for homemade manual circular saw, adjusts the depth of the cut. This is how at home you can remake the grinder in a full-fledged disk tool designed to cut various materials. By the way, reworking the circular from the drill, you can achieve a similar result.

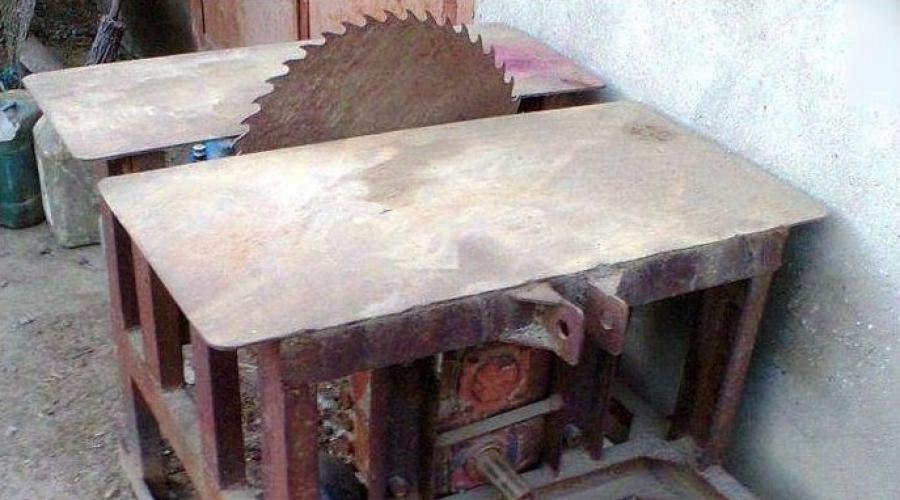
Miniature Circular Table Type Machine
The mobility of the element is achieved by sawing the horizontal segment into two uniform parts, which after installation are fastened by clamps. A disc-saw saw to the vertical part of the face on the clamp. The table from the manual circular saw assembly can function as a cutting machine if you install a regular cutting disk on the grinder. It is worth noting that the pass-through propyl here will not exceed 80 mm, and for the processing of larger sawn timber, the homemade circular machine is more serious, which will be discussed further.
Stationary machine

The circular machine, as close as possible to factory models, requires a competent approach to the assembly, so before making the circular saw of a stationary type, it is necessary to think over everything to the smallest detail. In principle, the desktop mini circular saw from stationary is characterized by a height of the bed, which directly depends on the nature of the work performed and the dimensions of the billets that will process the device. One-time work can be carried out on a compact table saw, while the circular from the manual saw saw can be easily hidden in a shed or storage room, and the stainary that constantly conducts manipulation with the sawn timber will need a stationary homemade circular. The following is the scheme on which all the elements and devices for the circular saw of this type are described in detail.

As can be seen from the figure, the homemade circularities of this type have a clear design, and the drawings like the above presented above will significantly facilitate the process of their assembly. Before making a circular, as well as mount circular table With your own hands, consider each unit of the unit separately to know all the subtleties of its work and installation.
Table for circular

The table for the manual circular saw with the slot in the center is sometimes reworked from ordinary kitchen or collected from bars or metal profiles. The table for the disk saw Specialists are strongly recommended to cover a galvanized metal sheet, since without coating the base, abrasion in the center of the constant friction of the sawn timber faces, which in turn will negatively affect the quality of the propyl, and the depth of the cut will be uneven. Cross bonds that strengthen sawing table, it is better to produce from a steel corner 60 - 80 mm with a horizontal segment outside to simplify the installation of the side limiter. The homemade table, on which the circular will be installed from the disk saw should be durable and stable, and it must be securely fixed in a fixed position.
Sawmill

The toothed disk should rise above the surface of the circular table with a third of its diameter, otherwise it will not cut the tree as it should, and the process itself will become dangerous. If you need to cut the timber with a diameter, for example, 100 mm, a similar cutter parameter should not exceed 350 mm, however, the engine here will be required with a power of 1 kW. For billets with a diameter of more than 150 mm mini circular, made manually, is unlikely to suit. On some factory circular machines, a split knife is provided, which is installed behind the disk at a distance of 2 - 3 mm from the saws of the saw. It eliminates the encumbrance due to the closure of parts of the sawn blank, so it can be very useful and in the case when the homemade circular is collected.
Side focus with the ability to adjust

Put high-quality emphasis, it is possible from a steel corner with a cross section of about 80 mm, which is 3 to 4 cm long table design. Flat sides of the corner are flexing down so that their width is one and a half cm more thickness of the table. After mounting, the emphasis is fixed on the homemade circular table in the specified position using bolts. The adjustment of this element is carried out according to the template placed between it and the cutter.
Shaft

The shaft, which is mounted on the circular, is the most responsible node, so exclusively specialist in special equipment should be calculated and testing with the disk. The product from the pipe with a casually fixed circle is excluded immediately, because the slightest errors in the work of this element will turn into large troubles like breakdowns of equipment, damage to the workpiece and injury by the operator. The optimal solution will be the purchase of a finished shaft with a landing place for a cutter. It is better to give preference to ball self-resistant bearings having a curvilinear shape of the inner surface, otherwise the hand-made knot made quickly collapses and the shaft mounted on a homemade circular will be in disrete.
Broadcast

In our case the ideal option There will be a clinoremable transmission, but from the gear hard mechanism it is better to refuse, as such a homemade does not guarantee security. If the lumber suddenly gets a nail, the engine rotor will provoke the destruction of the disc, which can lead to injury. If the inner diameter of the pulleys of the belt transmission is small, then slipping will be provided, and the stretched belt will serve as a kind of damper. The gear ratio is usually chosen based on the engine speed, be sure to consider the resolved number of revolutions. The smaller the diameter of the saw circle, the greater the frequency of its rotation, and the cleaner the converted unit will be cleaned.
Motor

Among homemade devices, the circular was most popular, assembled from the engine from washing machine. This choice is explained by the fact that the scheme of its work is best listed such purposes. Unlike collector units, which is usually supplied with a power tool, the engine from the washing machine works in less high revs, which means that it shows longer work, has an increased efficiency and is not so subject to different sorts of clogging. You can also use three phase engineBut then additional costs will be required to purchase a starting and working capacitor, so it is more economical to do the device from the washing machine. Here, in general, and all the wisdom.
I wondered this topic to open for a long time - but all the time he was slow, I wanted to "gather with thoughts", to gaze more material and bring it to a separate playlist, but today I came to my viewer, and I decided to start the topic right now, and new Material - I can add as it appears :)
So where to start? At first I want to determine the range of tasks, which will be done by the machine. Several directions:
- The first type - saw for "cutting firewood", oddly enough, but such a type of machine is also in demand, especially in villages and in dachas, where there is no gas, but there is a need to cut firewood for heating or fireplace.
Why is the circular, and not a chain saw? Firstly, if it is necessary to cut a "thinker" and the firewood of a small diameter - then a simple pendulum machine (frame, a pair of enclosures with bearings, shaft, belt transmission, disk without attack I.asynchronous engine) - it will cost cheaper with a chain electrical saw.At the same time, it is safer and easier to maintain (does not require oil for lubrication chain), has a much greater resource (an asynchronous engine is much longer than the collector).
And thanks to narrow propyl - requires less power (respectively, less eats electricity)
Of course, this is a highly specialized machine and build it makes sense if the need for firewood is large. In other cases, you can make a simple tracing carriage and use a circular saw by installing a disc for transverse Cut.
Go ahead
Simple machine "balcony" type. The machine on which minor work is made, for example, for modelists, home masters and "young technicians".
This machine does not have adjustment in the depth depth, therefore it is only suitable for the simplest tasks, but using the tile cutter drive (engine), you can quite easily construct a machine that has a depth adjustment.
The second variant of the donor for the homemade machine I will name the USM (Bulgarian). Why exactly the corner grinding, I will tell below. For the machine "Initial Level", you can use the ESM under the circle of F 125 or 150 mm, it is desirable that the grinder has a speed controller.
Many build homemade machines based on manual disk electronics.
Such a scheme has its advantages - small efforts can be obtained a full-fledged machine with a depth adjustment and a propil corner.
But this scheme has several large, difficult disappearances:
This is the complexity of diverting sawdust (it is possible to solve the problem only radically converted a regular fence of the saw, which makes it difficult to operate in the "manual" mode)
Another disadvantage is the small stiffness of the design, because of which the saw is difficult to fix so that there is no backlash, and the depth adjustment in such a machine is quite uncomfortable.
The next type is the "general purpose" machine - Universal Sawing machine for the farm - Make a simple sawing work - Cut the boards on the fence, make a garden bench, drink firewood for the fireplace - yes, you never know in private farm)
The universal machine is often built as a combine: Fuganok + Circular saw, I also have such a machine that I built more than 20 years ago. Then I considered such a promising scheme, but now I consider it rational to divide the functions of the Fugank and saw. Separate scheme has more advantages and safer.
A few words about the design requirements for the machine.
1 - Mobile line with quick fixation system.
Options for execution of the line I showed in your video. The simplest (with screw) on the video about the tile cutter, more complex (with an eccentric) - on video with a manual saw.
Options with fastening of the line with clamps, screws (in longitudinal grooves) and in a similar way, which requires constant checking of the line parallelism - I consider it, since the ruler must "automate" to become parallel to the saw, and fixed one move.
2 - Adjusting the depth of propil. This feature must be mandatory.
And it is desirable that the adjustment takes place as simple as possible and quickly. What type of adjustment to choose, you need to decide on the basis of your own capabilities, options may be somewhat-chassing screw, lever, longitudinal groove with bolt fixation.
3 - adjusting the slope of the saw - the function is useful and necessary, but without it it can be done, as it is used only in several percent cases.
I want to consider a more scheme - a machine from "primary materials", using available materials. Now I will not tell about the technical moments, but I will stop only 2 x design types. Each of them has its advantages and disadvantages.
The first option is a homemade construction consisting of an engine (asynchronous), a saw shaft, bearing housing, belt transmission and a frame itself, on which it is all mounted.
The frame hangs under the table and has the ability to swing in the same plane - to adjust the depth of the cut. The design with an asynchronous engine allows you to get a machine with a long operation mode for a large amount of work.
The working motor from the washing machine - the machine must not be dust in the garage. Even house master May find it use. We will tell how to make a homemade circular from the engine of the washing machine.
Such a tool will help to drink firewood, master the joinery. However, be attentive: careless use homemade machine may cause unpleasant consequences. Therefore, before you take for work, you must be completely confident in your abilities.
The selection of the engine to create a mini-circular depends on its power. It is advisable to use a wedge-shaped engine that will allow its turnover to the machine saw disk.
For a disk of 350 mm, 1 kW energy will be needed for launch. The disk with a diameter of 170 mm will require about 500 W. Therefore, you can put the motor from the old washer.
It is important to adjust the number of engine speed, otherwise the instability in the paper will lead to the fact that the disk will tear the material.

In the washing machine, the turnover is controlled by a tower that controls the control module. But it is impossible to connect the module to the circular, so install the voltage regulator. Use the connection scheme to properly install the motor.
Circular with the engine of the washing machine with their own hands
You figured out which engine is needed and how to connect it. Now consider the circulation of the circulation saw design.

For the circular, made at home, the absence of a bearing node is allowed, which will significantly simplify the design.
The main load will be on moving elements. It:
- saw saw and electric motor;
- motor pulley and saw shaft;
- drive belt.
Consider the features of each of them:
- The drive belt is not necessary to take from the washing machine, you can use other belts. The main thing is that they have zabolin, like a wedge-shaped belt.
- On a small pulley you need to make flowing furrows. The belt will be cling during operation, which will avoid slipping.
- A larger disk is welded on a large pulley that will not give a belt to jump.
- For fastening the disk saw, the shaft is used, where it is satisfied, as well as the washer and the nut, which is fixed. It is recommended to pick up or take this kit from the factory setting so that the disk is fixed as secure as possible.

Creating a design, you need to take into account that it is designed for a three-way disk. Of course, the circular machine is made only for domestic use. So try not to overload the engine.
Preparation of electrical parts
You can set the starting device to start the saw. If you provide for the heat shield to exceed the current, then when the switch is activated, the switch will turn off automatically. Suitable button from the door lock.
Often such machines are stored in the yard, on the street, so protect electrical part From moisture from entering.
Making frame and bed
The bed is made of a metal sheet with a thickness of 3 mm. Before making a frame, prepare a metal corner of 30 mm.

As shown in the photo above, the wizard installed the frame in homemade racks from the pipes. Now it is possible to adjust the height of the device. However, it is recommended to perform a solid frame, welding pieces of a corner among themselves. Strong vibration over time overlaps fastening bolts and other elements.
In the manufacture of circular, also refer to its repair. All moving parts must be comfortably lubricated. Before starting work, it is advisable to prepare detailed drawings.

Consider that the mini-circulation saw differs in dimensions. It is much smaller than usual and can fit when stored in the storage room.
How the device works
The engine is launched, which drives the shaft with the pulley. As a result, the drive belt rotates, transmitting revolutions to the pulley of the disk saw. The saw begins to rotate, allowing you to cut the material.

The homemade circular machine will always come in handy in the household. Due to the fact that it is possible to make it from the girlfriend, it will cost you almost free.
The household often lacks a circular saw, especially if the overhaul or construction is taken. Industrial products not everyone for pocket is too expensive. But you can make a circular to yourself using those materials that are available in the household.
Design - main nodes, their purpose
Circular saw stationary with their own hands is created with Promotion in several possible directions:
- device of an existing manual tool using a motor and a disk saw for new features;
- improving industrial products to expand the functional;
- assembly of individual parts made, mainly on its own.
The stationary circular machine includes several main nodes: the table, shaft, engine and some others whose characteristics are not so important.
The table serves to attach woodworking mechanisms. It can be collected entirely of metal, which is preferable, especially for machine tools with high power engine. From the tree, too, good tables for circular. But it is necessary to take into account that the countertop should be covered with a metal sheet, otherwise the tree will soon wear out. Tables should be very rigid and stable, able to withstand a considerable load when working. The surface is made perfectly smooth, the installation of protection flaps is required above the rotating items.
For homemade circular, it is not bad for the engine from a washing machine. The portable tool is suitable less: their collector engines are calculated only for short-term work. They have very high speeds, a small efficiency, afraid of clogging. You can apply a three-phase electric motor, but if there is no 380 V in the farm, you will need to purchase condensers so that it works from 220 V.

The most responsible node is the shaft. Using ready, if available, or pulled out from metal-rounded. Work on turning machine Perform one installation, then assembly with the working bodies check the centering. It is even unacceptable even the minimum beating, otherwise it will become stronger in which it is unacceptable to work. Planting places include landing places: under the disk saw and under the pulleys on the other side. You can also make grooves for planing knife.
Main parameters - Calculation of power, revolutions, transmission
Characteristics of the disk saw, engine and maximum timber thickness, which can be cut, mutually reduced. On purchased circular disk, the maximum turns on which it is designed is indicated. The number of revolutions transmitted by the engine to the shaft must be less. The engine power affects the maximum allowable diameter of the toothed saw. The diameter should be at least three times the thickness of the material, otherwise it will be difficult to cut. It is believed that for sawing materials with a thickness of 100 mm, a motor is needed at least 1 kW of power.
The transfer is made only by the clinorenny - when foreign items enter the saw, the joint, the belt slippers on the pulleys. Injury in such cases is practically excluded. It is important to choose the right gear ratio. We take into account two indicators: engine turnover and the maximum allowable number of circular saws. Calculate the necessary diameters of pulleys. A pulley with a large diameter is installed on the engine, and the shaft for the circular is smaller to increase the number of revolutions.
The turnover of the shaft with a disk saw in as many times the engine is as much as the diameter of its pulleum from the pulley diameter on the engine.
Woodworking machine - Capital product for home
For work with wood in large volumes it is better to have a machine that allows you to cut the material, to strict, choose a quarter. A powerful electric motor is required, a hard table. We present the design made of steel corner and sheet steel. It provides a depth of reduced 60 mm, you can plan the boards with a width of 200 mm. The three-phase engine is used 1.1 kW, 2700 rpm. Confersers are required to connect to 220 V.

1 - Machine frame; 2 - panel; 3 - starter; 4 - a height adjustment device; 5.7 - desktop of two half; 6 - base; 8 - engine; 9 - playground; 10 - Studs M10; 11 - circular disk; 12 - shaft; 13 - stops of the lifting mechanism; 14 - slave pulley; 15 - belt; 16 - leading pulley; 17 - switch.
The desktop has dimensions of 700 × 300 mm. The drawing see that the height of the entire design is 350 mm. The height is insufficient for convenient operation, the circular will have to be installed on an additional platform, it weighs only 35 kg. You can increase the length and width, increase the height to 1200 mm. The remaining sizes are adjusted for them, but the design features remain unchanged.
First we make the frame of the beds from the steel corners of 25 × 25 mm. If we are not going to increase the height, we make another such lower frame. For a frame with a greater height, first to the upper frame weld four legs from the same corners, and then we make their strapping at a height of 15-20 cm from the bottom. On the bottom frame there are grooves for locking bolts of the engine. Two studs going into holes on the rear part of the lower frame are welded to the back side of the site. Tightening the studs, stretch the belts, then stop the platform, spinning nuts on the studs overlooking the grooves.
To adjust the table height with respect to the saw, we use a simple lifting mechanism. It consists of racks, at the top of which we cut the grooves at an angle of 45 °. Total need eight racks - four on each side. They are welded to the frame with grooves located in the mirror reflection. To the external racks are concerned. In the middle of each of them drill holes, we screw the nuts. Threaded shafts for lifting control will be moved.
The end, they rest in the racks welded to the kings collected from the corners of 75 × 50 mm. On the side of them we weld the studs opposite the grooves for the adjustment mechanism. The table consists of two equal halves, attached to the tsargam bolts with second heads. The adjustment mechanism works like this:
- let go nuts on the racks;
- twist screw, which presses focus, lifting or lowering the table;
- tighten the nuts of the spills;
- we carry out similar adjustment for the second half of the working surface.

The design can be simplified without installing the adjustment shaft. We raise and lower the table manually. If you collect the table not from two halves, but solid, you will need only four racks for the lifting mechanism.
Manual disk saw - transformation into stationary
From the manual disk saw is easy to make stationary, expanding its capabilities. First of all, you will need a table. The Finnish plywood will serve as a convenient material, which, unlike the usual, laminated - the workpiece when processing well slides on the surface. It is thick enough to withstand a lot of weight, moisture-resistant, well-processed. You can use the usual paneur 20 mm, only you need to paint, and it is better to cover with sheet steel or textolite.
It should be understood that the depth of the cut will decrease on the thickness of the lid. It will take a large diameter disk so as not to reduce the functionality compared to the portable tool. The sizes of the table top are sufficient for the workpiece accommodate in width. It should be added that on a wide table you can additionally strengthen the electrobuck and jigsaw, which will make the machine universal.
Using drawings and explanations, it is not difficult to make additional devices for the disk saw, which will expand its capabilities.

Location on a sheet of plywood, the rectangle of the required sizes, cut out, process the edges. The sole applies the manual circular to the surface and placing the fastening site pencil. We make a slot for a disk saw. You can deepen the place of attachment using the mill, but not more than 10 mm, so as not to weaken the countertop. This method of manufacture will reduce the depth of the disk saw specified in the passport.

From the boards we make a frame (Tsargi), which will set the bottom to strengthen the design. Four boards fasten into the box, glue to the tabletop, securing clamps. Through the table, screw the screws in the boards. Holes for them from above Zenku, so that the heads of the screws are hidden. To the kings of the stationary saw Fresh legs, better bolts with washers and nuts. The table should provide additional stiffness, so in the bottom of the legs we make struts.
We produce a restrictive bar equal to the length of the working surface. Two perpendicular disks of the groove drill in it, in which the bar will move and fix at a certain distance from the saw disk. It remains to make changes to the control system: fix the control button in the power on the power isolate. At the king, install a socket connected to the network. In the gap of the wire going to the saw, mount the switch.
Some moments of execution of homemade devices
No matter how well a circular was done, individual errors may lead to the fact that its performance will be limited. This concerns, at first glance, it seems like little things. Let's start with the bearings for the shaft. Installation of ordinary is justified if the machine is used from time to time. For a homemade device with constant use is better to establish self-aligning bearings. They consist of two rows of balls, adjustable by pulling the clamping nut. Install the lid to protect against dust, chips.
On the working surface we apply a scale in a step in a centimeter. It will make it much easier for wood when determining the width of the cut. Many neglect the installation of a protective shield above the disk, and in vain - treatment from chips from entering the eye or in more serious situations is more expensive.
When working with various materials, it is often required to adjust the circular saw turns. A homemade design, as a rule, does not have the possibilities of regulating the number of engine speed. Output one is the use of pulleys of various diameters. They are installed on the shaft of the engine. If you take to order the pulleys from the turner, immediately make a solid pulley with two or three different diameters.
Many wish to install a three-phase electric motor on a sawing machine, not having 380 V. The capacitors designed for the minimum operating voltage of 600 in a paper or oil-paper type.

The capacitance of the capacitors we calculate, based on the power of the electric motor: per 1 kW - 100 μF for the working condenser CP. The capacitance of the starting joint venture takes twice the greater. The SB starter is a button that is returned to initial position. Run is simple: SQ is activated, SB is pressed for a couple of seconds. After starting, the button is released as soon as the engine is rotated, you can cut.
If the circular machine began to work worse, it is possible that the equipment is simply not serviced. Spend a little time to prophylactic cleaning and make a number of settings with your own hands. You will immediately see the difference in your "Circular".
Before servicing, remove the power plug from the socket and do not turn on the circular saw until the end of the work.
First of all - cleaning from pollution
Even with an effective dust removal system, sawdust and resin deposits are inevitably accumulated on the details of the machine. Pollution makes it difficult to work mobile mechanisms and adjustment nodes.

Start the service with your own hands of the circular machine from the saw blade: fastening the replace, and clench cleaned by a special or white spirit.

The photo shows the purified area of \u200b\u200bthe disk used to cut conifers for two months.
Now check the spindle flange - its surface must be smooth and clean, because the uneven boarding of the disk leads to the appearance of vibration. Steel burgers remove the file, and remove the solvent dirt.

Council. Take the saw discs on the size of the spindle of your circular machine, and do not use transition rings. The latter are made of soft alloys and are often deformed during re-installation.

Using the vacuum cleaner with a slit nozzle, remove the sawdust and dust from the housing of the saw machine. Cleaning to shine all surfaces are not necessary, pay more attention to moving elements: gears, pulleys, gear sectors, threaded parts and adjusting stops. Solidal sediments remove with a metal brush moistened in a solvent, but make sure that the fluid does not get into the bearings.

After careful cleaning, lubricate the threads, the mechanisms of the angular inclination and the vertical lift. Apply a few drops on the details, scroll through the flywheels so that the lubricant is distributed evenly.

Council. Dust and sawdust is quickly sticking to ordinary oil. The problem is solved by the use of "dry" antifriction lubricant hardening on the surface and not attracting contamination. Similar composition, but on silicone basis, you can wipe the table of circular machine and guide bars.
Setting the circular machine for accurate work
It is clear that not in every domestic workshop there are micrometers and time indicators. We will learn to do without high-precision measuring instruments.
Check belt and pulleys
First check if the belt pulleys are located on the same line by attaching a ruler to them. If this is not possible due to the drive design, close one eye and appreciate the alignment accuracy visually. To eliminate the malfunction, loosen the locking bolt and slide the pulley.
Check the belt tension, pressing the middle finger. Permissible deflection with an average effort - not more than 6 mm. For belt tension loosen the suspension bolts.

Turn the adjusting screw to the desired number of revolutions and fix the fastener of the electric motor.

Customize the inclination of the disc
To begin with, make sure that the saw liner is flush with the surface of the table, putting the rule or drawing square over it.

Adjust the position of the insertion by adjusting screws, when they are missing, put the washers or thin plates. Lower the liner can be swollen from the bottom side of the material.

After performing the settings, check the plane by the salt in several places.

Raise the full saw blade, rotation of the tilt handle until you stop exhibit angle of 90 ° and check it with a carbon.

Adjust the hexagon through the hole in the table exact perpendicular position.

Rotate the flywheel in the opposite side to an extreme position and make sure that the adjustment of the stop is 45 °. Adjust the position of the saw disk if necessary.

Adjusting the turning stops, check the tilt scale and correct the pointer, weakening the screw.

Checking Pilted Table Up
Circular cutting machines will be impeccable when the saw disk is parallel to the slide of the transverse stop and the longitudinal slope. Otherwise, focus, not rectangular and coarse edges of the blanks are inevitable.

Check the parallelism of the groove and disk with a simple device consisting of a smooth trimming fixed on the stopper with a screwdriver. Install the improvised dipstick before the cloth tooth is touching and fix the clamp. Then move the device to the slide to the far edge of the disk - the conservation of the touche density of the screw is indicated about the strict parallelism of the machine parts.

To change the position of the table in the circular machines of carpentry type, four screws in the corners of the case are intended. In household models, parallelism is usually regulated by a motor shift, for what you need to unscrew the nuts from the bottom of the machine.

Council. Overly, free movement of the corner stop by a groove can be used to correct, making the jerner on the side of the sidelines. It does not help - you have to purchase a new one or make homemade at least for accurately cut at right angles.
Having finished with the table, check the longitudinal focus tightly in the groove of Bru, inserting it on both sides.

Perform the operation you need to set up according to the instructions for the sawmill and adjust its scale.
Recent checks
Performed previous operations will increase the quality of work on the circular machine, but it is also worth taking care of security. Take a look at the split knife, which must stand in the middle of the disk and at right angles to the table plane. This is checked by an even bar and the same drawing square.

The principle of adjusting the proppant knife is similar for most saws: nuts or screws are weakened, the tilt of the rack and the output of the corner is changed, then the fastener is tightened.

It remains to check the side wings of expansion and, if necessary, align parts at the table level. Try to carry out such service at least once a year and your "circular" will always be proper. And for cheap machines, such a check is recommended immediately after buying equipment.