How to install a plastic panel in the kitchen. Do you know how to fix the wall panel for the kitchen?
The kitchen is a room that is being repaired more often than the other rooms. Therefore, the question of how to mount the wall panels in the kitchen, is very interested in homemade masters, who decided to make a change in the interior in the apartment own forces. Thanks to new manufacturing technologies building materials Such familiar finishes, like tile and wallpapers, gradually pass their positions. Wall panels played a considerable role in this, the variety of execution of which is simply amazing. The reader is invited to familiarize himself with the varieties of wall panels and ways to install them.
Wall panels in the kitchen, despite the simplicity of installation, you can pick up for any interior design.
Advantages of wall panels
Compared to other ways to finish the walls, the lining with wall panels has a number of very tangible advantages. Thanks to its characteristics and simplicity of installation, they are becoming increasingly popular.
The advantages of these products are as follows:
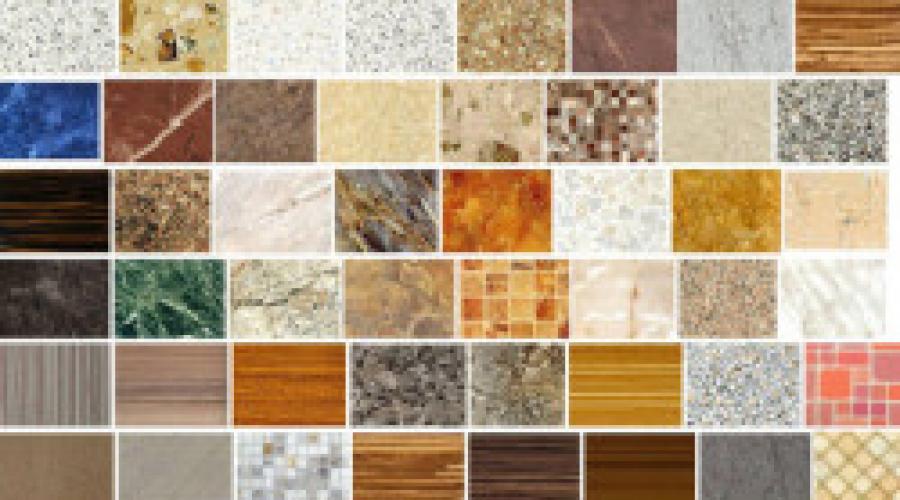
There is a large variety of options. wall MDF. Cuisine panels.
- Speed \u200b\u200binstallation. One panel overlaps a rather large surface area. At the same time, efforts are much less spent than when working with a cafeter or with paint.
- Significant time savings. This is a fairly relevant factor, since the kitchens are the room, without which normal life activity is impossible in the apartment.
- No need for repair or aligning the main walls. The overhead panels allow you to quickly and securely disguise all defects of the old surface.
- Products have a quite affordable price. In addition, component parts are much cheaper than expensive glue for tiles.
- Easy installation. In order to secure the products, you do not need a set of special equipment and professional skills. This work is under the power even a novice home master.
Installation of the wall panel in the kitchen is possible in various ways. It depends on the model, type and material from which the panel is made.
Panel varieties
Plastic panels in the kitchen are easily clean and withstand moisture.
Today there are a large amount of material that you can quickly and qualitatively sew walls of almost any room. This material has a different appearance, resistance to moisture and temperature, wear resistance and service life.
Modern technologies involve the ability to install such types of panels in the kitchen:
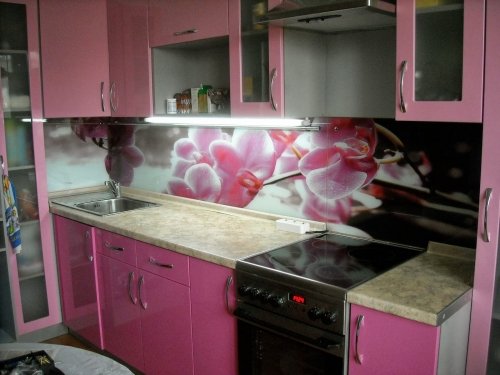
- From plastic. These products have a wide variety of sizes and colors. The number of advantages include such qualities as simplicity in installation and maintenance, moisture resistance and good insulation qualities. A certain minus is a soft surface of plastic, which is easily scratched, breaks and deformed from high temperatures. They are undesirable to mount over the worktop or next to the stove.
- From laminated MDF. This is a rather cheap and practical option. MDF has a presentable view. For the kitchen it is better to use the material laminated from two sides. Such protection will protect the product from dampness and mold. In such surfaces do not stick to such surfaces, they are durable, easy to maintain, do not react to moisture drops. A certain minus is the obstacity of these products to severe heating.
- From kalen glass. This material is the most expensive. But the area of \u200b\u200bits use is limited only by the apron. Advantages in Kalenic Glass is quite a lot - it is resistant to mechanical effects, to moisture and mold, has a spectacular look. Its surface on which the scratches do not remain are environmentally safe, it is easy to wash it.
- From laminated plywood. Waterproof plywood protective layer Plastic, is an excellent kitchen decoration solution. The material is environmentally friendly, well protected from moisture is durable and easily cleaned. Does not tolerate open fire.
- From artificial stone. Artificial stone is very durable, not afraid of fire and water. The life of its operation is several decades. It is environmentally safe, does not react to chemically active substances and acids. Stone is easy to care. Some minus is the high cost and difficulty in processing.
The construction industry is constantly expanding the range finishing material. His characteristics and installation methods are improved.
Fastening wall panels on frame
Most panels involve fastening on a frame that is rigidly fixed on the wall.

But such a construction reception is appropriate only for spacious kitchens. For small rooms, the frame design is not acceptable, it can pick up quite a lot of useful area.
If the area allows, then you can safely mount the framework.
For the manufacture of a frame used such material:
- Wooden rails 20 × 30 mm. Wood before use must be treated from mold. A certain disadvantage of the tree is its instability to moisture drops. This factor may lead to the deformation of the frame and the finish surface.
- Steel profiles CD and UD. The steel grille is very durable, it does not react to a strong heat and increased humidity. The service life of the metal crate can be several decades.
In order to mount the crate, this will require such an inventory:
- perforator;
- hoven for metal;
- a hammer;
- screwdriver;
- building level;
- pencil;
- plastic dowels;
- self-tapping screws and metal;
- protective glasses and gloves.
After the project is drawn up required material. Next on the wall markup. After that, installation of the crates is carried out.
This is done in that order:
- On the perimeter of the walls, guide products are screwed, which limit the size of the frame.
- If necessary, vertical suspensions are mounted for walls. These products serve to align and give stiffness to jumper sifts.
- Jumpers are installed between guide profiles or rails. Depending on the project, they can be set vertically or horizontally with an interval of 40-50 cm.
- The jumpers are aligned and fixed by self-drawing on vertical plumbing.
The doom is ready. You can go to the mounting panels. Attach individual fragments with the help of a special lock, screws or brackets (kleimers).
Blinding and screwing panels
This method is quite common. But it does not differ in particular reliability, since over time glue loses its properties from constant moisture and temperature drops. As a rule, in this way the fastening of light materials is carried out, such as plywood, plastic or MDF. If it is decided to glue a heavier panel, then a robust support is necessary for their lower part.
In order for the panel reliably to the wall, it needs to be prepared accordingly.
This is done like this:
- the vertical surface is measured;
- the wall is processed by primer deep penetration;
- a layer of waterproof solution is applied to the surface cement basedwhich eliminates all irregularities;
- the plane is aligned and polished;
- another 2-3 primer layers are applied.
Only after this wall is ready for paneling. Good option is the use of polyurethane sealant or liquid nails. The glue must be applied to the entire surface of the panel. After it is attached to its place, it must be tightly pressing and pressed throughout the plane heavy dump or struts.
More simple way Fastening large panels is their screwing directly to the wall. To do this, several holes are drilled in the panel and wall, in which the dowels are inserted and screws screw. Hats of selflessness can be masked down by lower or upper lockers. If they are in the middle of the panel, they are closed with decorative plugs.
Panels can be fixed without using fasteners. Their lower edge is installed on the worktop and pressed the plinth. The upper edge is pressed by a suspended cabinet. For kalenic glass, steel frames can be manufactured.
Conclusion on the topic
The kitchen finish is a terrain and creative business. When carrying out this work, you can combine a wide variety of materials. From this quality of the repair and the appearance of the premises will only improve. Do not be afraid to fantasize and experiment.
If you exhibit interest in how to mount the wall panels in the kitchen, then you will probably need quite clear instructions for working. Of course, the championship in finishing the so-called apron in the working area continues to hold yet tiled or clay tiles. However, no one will be able to put the tile of themselves. In addition, its laying requires certain skills, liberation most of the kitchen, time - and regular cleaning. The wall panels are not difficult, only primitive skills are required from the installer, such as possession of a drill and hacksaw.
The finishes will last much longer than the same washable wallpaper and will not require maximum accuracy in circulation, which is extremely necessary during the trim, for example, plastic. Caring for the wall panels is as simple as the tiled tile - and this is the most important thing that you are oriented when choosing a kitchen finish. Moreover, the lad out of the tile requires a perfectly smooth wall.
If you select Wall panels, you can come to terms with their irregularities, you just have to resort to another installation method. The design of the wall panels is such that it allows you to assemble the wall with almost no gaps.
You will receive a visually monolithic surface. And this is not counting what you will know what you will save: the material is significantly cheaper than the same tile or ceramzitranite.
How to mount wall panels in the kitchen, invented several ways. Which one to stop, depends on the smoothness of your walls and your determination - how much time you are ready to spend on the installation.
Preparation of material
Any of the methods of fastening implies, above all, the workpiece of the panels.
- So choosing wall panels. They must coincide with the gamut with a tabletop and design of kitchen furniture. The thickness of the panels is 3-10 mm. What preferred depends on the method you will be attached to. Through the thick panels should not be necessary: \u200b\u200bthey will be less reliably held, but no sense in very thick trim any.
- Exact measurements are made. Their scrupulsiness is especially important if your work area has a difficult configuration due to different size Limitting its lockers. Please note that the height of the trim should be longer than the distance to the countertops: the edge of the MDF panel will go for it. The top edge can rest in the lockers if they are there, can go under them. If the wall is not limited from above, decide in advance whether the panel will reach the ceiling or close only a part of the wall - it is necessary to rely only on the external harmony of the apron.
- On the size of the size displays panels.
- In the marked places cut holes under the sockets with switches, if they are in the working area.

Installation on glue
The simplest, but affordable only with smooth walls and is not considered too reliable. It is explained by the fact that the glue can partially lose its bonding properties from drops. So, stopping in this way, choose a heat-resistant adhesive composition so that the panels in the near future are not falling off. In addition, it is worth considering the type of wall panels.
- Leafers have 122x244 cm sizes. It is convenient to paint them with complex abstracts of the working area, but they are too vigilant to fit the glue.
- Square are available in two sizes: 30x30 and 98x98. Outwardly, the wall finished will be reminded by a cafeter. With adhesive installation it is better to choose a smaller dimension.
- Racks similar to long-fashioned lining and often decorated under the tree. When gluing them can be considered the most successful choice: individual elements have a rather small weight.
- The process itself is simple and simple.
- The work area is cleaned from previous coatings. The tile is dismantled at mandatory, well-holding paint can simply be thickly protected.
- The wall is grounded with a composition compatible with glue. Give the primer dry!
- Each item is flashed with glue, it is withstanding the time specified in the instruction (from 1 minute to 6) and pressed against the wall. The evenness of the elements is constantly monitored by the level.
- When the entire apron zone is pasted, the joints between the panels are labeled sealant to enhance moisture resistance and temperature resistance.

Frame set
- It in the basic principles repeats the walls of the wall with plasterboard. The surface can have drops to 2 cm per square meter.
- The wall is processed by antiseptics to prevent the appearance of fungal colonies.
- In addition to the cutting of the MDF panels, it will take a blank of wooden plates, of which the lamp will be constructed. Planks are cut in size and soaked with hydrophobic solutions.
- The cutture includes a frame around the perimeter and the plank inside it, stuffed across the laying of the panels. The step between the rails is 40-50 cm, they are attached to dowels and self-stakes strictly in terms of level - the evenness of the future working area depends on it.
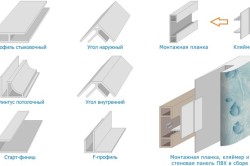
- Mounted angular profiles in which panels will be inserted.
- The casing begins at the bottom and left. The first panel is inserted into the groove of the angle and is attached to the rails or self-strains with decorative hats or confirm clips.
- Each subsequent panel is inserted into the grooves of the previous one and fixed on the frame.
- At the end of the installation, an entry side is fixed, which will hide the joint of the trimming with a tabletop, and ceiling plinthIf the wall panels reach the top of the top. If the seams between the individual items are too wide, you will have to spend money on the connecting sheets. If you choose with taste, they will become a great designer touch.
Installation in spacer
This option does not require glue, nor fasteners, nor clamps. However, it is suitable only for small kitchens, where the work area is closed by a solid panel from one sheet.
- The slab cutting is carried out in such a way that its lower end stands on the tabletop.
- The panel is installed in the apron; Her upper end is started under the locker and pressed them. For reliability, you can fix it with hidden brackets.
- The lower edge is fixed by the plinth, which in this case is selected more massive and attached directly to the tabletop.
- The advantage of this installation is that the next time the panel is removed without difficulty and damage, and the installation takes a few minutes.
The panel for apron is a large rectangular sheet of laminated wood chipboard (LDSP), a little less thickness than a table top. MDF panels - a reasonable choice, with the variety of marble and floral colors, the cost of material and installation is significantly lower than the cost. ceramic tile.
For "Apron" take a plate with a thickness of 3 to 10 mm, covered with film of the same color and with the same pattern as the tabletop. Such a "apron" is quickly mounted (the panel also sticks the unprofessional), it is easily clean and, most importantly, it is inexpensive. Smonimit wall panel In the kitchen in the apron zone is simple enough.
Method 1. Fasten the wall panel to the wall in the place you need - you can use liquid nails or the wall panel is usually attached to a dowel-nail 6x40 or 6x60 to the wall, which are then closed with decorative caps-plugs under the color of the panel. At the same time, the upper edges can be removed under the upper shelf (if sizes allow). The bottom edge of the wall panel for the kitchen is attached to the plinth (an entry side). An intricate side (plinth corner) is attached to the tabletop with self-drawers, and thus reliably fix the wall panel. The color of the corner can be selected exactly the same as the color of the combined panels, and you can select a silver or golden corner, under the color of the kitchen or rails. The corner will not only allow to hide the docking seam between the panels, but also will not allow crumbs to fall under the kitchen tables - the favorite habitat of domestic ants and cockroaches. Also, if railings are used in the kitchen (suspended shelves), they additionally fasten the wall panels to the wall.
Method 2. The easiest. If the wall on which the panel is fairly smooth, put the panel on the table top headset - thus, it will be pressed on top of the top, and the plinth will fix it from the bottom. Typically, the upper cabinets from the kitchen headset enter the panel by 1.5-2 centimeters. It is not necessary to glue anything. So even better - in case of dismantling, the panel does not have to tear off the wall with difficulty.
Sliced \u200b\u200bedges, the ends of the panel are edged if they are visible, and they can also be protected with silicone or waterproof varnish, paint.
And most importantly - do not forget to bring out the sockets for household appliances and a switch to illuminate the working area! The wall panel is not worth the "rain" every day or use abrasive detergents (powders). If you are weekly (and better - daily) wash the panel with a sponge with soap or simply moistened with water, the panel will delight you with its beauty and convenience for many years.
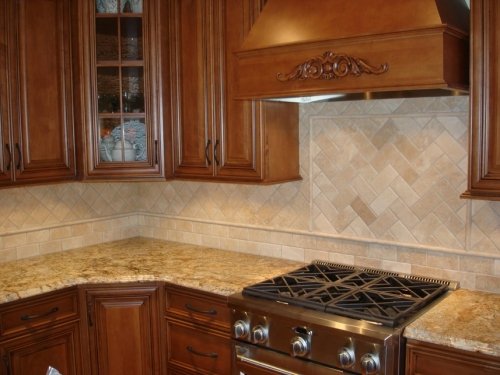
When repairing the kitchen there is a task to decorate space above the hob. This is the place that most often attracts the glance when we are preparing. Often the issue is solved by inserts from decorative ceramic tiles. However, there are some problems - cladding with tiles is not such an easy and fast process, in addition, this material has a relatively high cost.
You can cope with the task of arranging the kitchen apron using wall panels from MDF from Albico with photo printing. Such a kitchen apron has a number of advantages:
- wide selection thematic paintingsapplied using photo printing;
- rich and bright colors on a glossy surface;
- the perfect smooth surface for installation is required;
- fast and easy installation;
- simplicity in further maintenance;
- durability of operation.
Method for installing kitchen apron from Albico
Kitchen aprons or skin albico have standard size and a thickness of 280 * 61 * 0.6 cm. The panel is made of MDF and is easy to handle the cutting tool. The thickness of six centimeters allows you to install the panel even on the not perfectly smooth surface, for example, on top of the old tile, which simplifies work. For installation, you will need the following tool:
- drill;
- electric jigsaw and a small-dimensional saw;
- ruler or square;
- roulette;
- mounting glue or liquid nails;
- pencil or marker for marking;
- screwdriver.
To begin with, it is necessary to cut down the plates excess at the perimeter using an electric bike. Then cut the technological holes, as a rule, are holes for the outlet. The most difficult thing in this procedure is not mistaken with sizes. The mounted glue is applied throughout the plane from the back of the panel or directly on the wall. After the articulation of the kitchen apron and the wall, you need to press Skinal well. And the last action is the installation of electrical fittings.
As you can see, nothing complicated.
If you invite the wizard, then it will take it at no more than an hour. And if there is a minimum of tools, you can do this work yourself. Install the kitchen apron from Albico can at any time, for this you do not need to start repair. And, most importantly, after this work, garbage and dust remains almost no. Trimming and chips from MDF are easily going and do not damage other surfaces in the kitchen.
Probably, you need to start with the fact that the wall panel in the kitchen can be made from different materialsEach of which has its advantages and disadvantages. And since the kitchen is the place where a lot of fat and other droplets fall on the walls near the working surfaces, then it is necessary to approach the choice of material very carefully.
Let's deal with what you can actually install the wall panel in the kitchen, and only then consider the principles and sequence of mounting.
Types of materials used
It is important to note that the decision is to apply one or another material or not - it depends not only on its practical features, but also from the overall design of the kitchen. Try to choose the material so that it harmonized with the room with the style.
So, let's start an overview of the materials:
- Washing wallpaper or PVC film. An option, of course, the simplest and cheapest. Because wallpapers will need a little, and you can take them in a couple of hours. However, there are serious shortcomings - near the working surfaces of the kitchen, any, even very good wallpaper Quickly come into disrepair, and it looks like a apron from wallpaper most often not very gorgeous.
- . In principle, it is convenient that the material is inexpensive, it takes it a bit, and it's easy to care for such a surface. If we talk about how to see the kitchen with plastic panels, it is unlikely to have difficulty. Because the assembly technology is simple and fast. From the shortcomings, it is possible to distinguish not very greater strength of the plastic itself. If it is very easy to touch something, then a dent or crack appears on the apron. Therefore, if you are interested in how to deprive the kitchen with plastic panels and what nuances can be here, then remember that such a surface will require maximum accuracy.
- drill and perforator;
- screwdriver;
- wood hacksaw;
- self-tapping screw and fast installation;
Marking
Let's start installing the rails.
Assembly of the carcass
So, except for the panels themselves, we will need such a tool and consumables:
- roulette, pencil and construction thread;
- drill and perforator;
- screwdriver;
Tip: It is quite possible to save and not buy the power tools. Take it for a couple of days to hire - after all, it is unlikely to install a wall panel in the kitchen with your own hands will take more time.
- wood hacksaw;
- self-tapping screw and fast installation;
- wooden rails for the frame (usually enough 20 mM wide widths.);
- plinth to decorate the perimeter of the future apron.
In principle, the first stage of work can be started with such a "gentlemanic set."
Marking
First you need to note where the rails will be located. This is the perimeter and vertical jumpers. Jumpers in most cases can be placed at a distance of 40-50 cm. From each other - as a rule, this distance is enough.
But of course, if the wall panels are set in the kitchen of thin plastic, it may be necessary to reduce this distance so that the panels do not begged.
Let's start installing the rails.
Assembly of the carcass
- Thip the number of desired rails and their length.
- With the help of a hacksaw cut the bar and put them to the wall.
Tip: In order for the frame to serve longer - before fixing the rails, treat them with moisture protection and antiseptic impregnations. With this approach, the increased moisture content of the kitchen will not spoil the frame for a very long time.
- We take the perforator and screw the perimeter to the wall. Do not forget to adjust the vertical rails "by level".
- Insert vertical jumpers, but until you screw them.
- We stretch the thread from the right vertical rail to the left - so we will understand how to fix the jumpers in order to ultimately get a flat frame of the frame;
- We screw the jumpers.
In general, the frame is ready and the photo below shows how it should look about.
By the way, perhaps you are interested in how to glue the wall panel in the kitchen, and not to fasten it. In this case, it is actually so possible - it is possible to glue it, only this will not be so secure, since with time due to temperature drops in the room and high humidity, the glued panels are likely to "be" from the draft wall.
Yes, and before glueing something, the wall need to be very good to prepare - align the plaster and treat the primer, plus it is necessary to wait until all this dry. Easier and faster still make a frame.
Sheaving
So, proceed to the last step (as you already understood, as a visual example, we consider the assembly of several horizontal panels - not solid). We collect the panel from the bottom up so that if the extreme panel does not fit and it will have to cut it along, it was in the top of the wall - under the lockers this moment will not be so noticeable.
- Cut off the panel of the desired length, stick them to the slats and screw. By the way, if the panels are allowed, it can be attached to the usual stapler.
- Similarly, we pass all the plane.
- Plinth attires the perimeter of the received apron.
In principle, all!
Conclusion
We looked at how to install wall panels in the kitchen and what to do it better and easier. We hope that the information came in handy, and if some moments still remained incomprehensible, then browse the video in this article - perhaps questions will no longer.
Successful to you p »width \u003d" 640 "ALLOWFULSCREEN \u003d" »FRAMEBORDER \u003d" 0 "\u003e
Good luck to you!